|
|
|
|
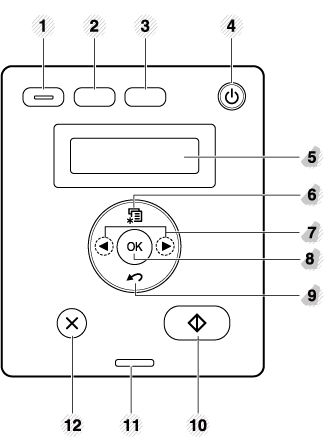
Type A
|
1 |
|
Turn into eco mode to reduce toner consumption and paper usage when pc-printing only (see Eco printing). |
|||
|
2 |
Configures the wireless network connection easily without a computer (see Using the WPS button ). |
||||
|
|
Press this button and the LED will start blinking. If you want to print only the active screen, release the button when the LED stops blinking. If you want to print the whole screen, release the button while it’s blinking.
|
||||
|
3 |
|
Sends scanned data (see Basic Scanning). |
|||
|
4 |
|
Allows you to copy both sides of an ID card like a driver’s license on a single side of paper (see ID card copying). |
|||
|
5 |
/Wakeup |
|
Turns the power on or off, or wakes up the machine from the power save mode. If you need to turn the machine off, press this button for more than three seconds. |
||
|
6 |
When the LED lights on, place the front side of an ID card facing down on the scanner glass (see ID card copying). |
||||
|
7 |
When the LED lights on, place the back side of an ID card facing down on the scanner glass (see ID card copying). |
||||
|
8 |
|
|
Stops an operation at any time and there are more functions.
|
||
|
9 |
+/- Buttons |
Allows you to increase/decrease the number of pages to copy. You can determine the number of copies (up to 99 copies) to copy by pressing the +/- buttons. The default value is 1.
|
|||
|
10 |
|
|
Starts a job. |
||
|
11 |
Indicates the status of your machine (see Understanding the status LED). |
||||
|
12 |
Shows the status of the toner (see Understanding the status LED). |
||||
|
13 |
Display screen |
Shows the number of pages you want to copy. |
|||
|
[a] SCX-340xW Series only. |
|||||


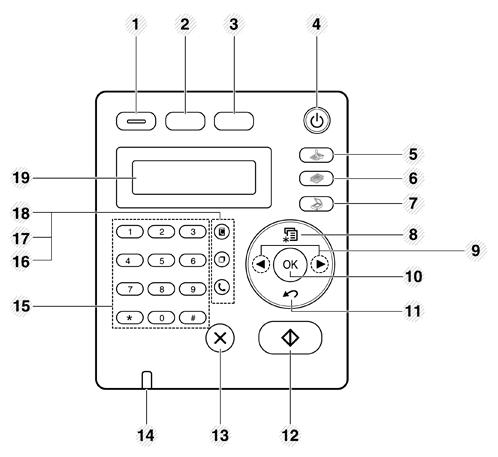
Type B
|
1 |
|
Turn into eco mode to reduce toner consumption and paper usage when pc-printing and copying only (see Eco printing). |
|||
|
2 |
Configures the wireless network connection easily without a computer (see Using the WPS button ). |
||||
|
|
Press this button and the display will on the display screen. If you want to print only the active screen, select the . If you want to print the whole screen, select .
|
||||
|
3 |
|
Allows you to copy both sides of an ID card like a driver’s license on a single side of paper (see ID card copying). |
|||
|
4 |
/Wakeup |
|
Turns the power on or off, or wakes up the machine from the power save mode. If you need to turn the machine off, press this button for more than three seconds. |
||
|
5 |
Fax |
|
Switches to Fax mode. |
||
|
6 |
Copy |
|
Switches to Copy mode. |
||
|
7 |
Scan |
|
Switches to Scan mode. |
||
|
8 |
|
|
Opens Menu mode and scrolls through the available menus (see Menu overview). |
||
|
9 |
Left/Right Arrows |
|
Scrolls through the options available in the selected menu and increases or decreases values. |
||
|
10 |
|
Confirms the selection on the screen. |
|||
|
11 |
|
|
Sends you back to the upper menu level. |
||
|
12 |
|
|
Starts a job. |
||
|
13 |
|
|
Stops an operations at any time. |
||
|
14 |
Indicates the status of your machine (see Understanding the status LED). |
||||
|
15 |
Dials a number or enters alphanumeric characters (see Keypad letters and numbers). |
||||
|
16 |
|
|
When you press this button, you can hear a dial tone. Then enter a fax number. It is similar to making a call using speaker phone (see Receiving manually in Tel mode). |
||
|
17 |
|
|
Redials the recently sent fax number or received caller ID in ready mode, or inserts a pause(-) into a fax number in edit mode (see Redialing the fax number). |
||
|
18 |
|
|
Allows you to store frequently used fax numbers or search for stored fax numbers (see Storing email address or Setting up the fax address book). |
||
|
19 |
Display screen |
Shows the current status and displays prompts during an operation. |
|||
|
[a] SCX-340xFW/ SCX-340xHW Series only. |
|||||


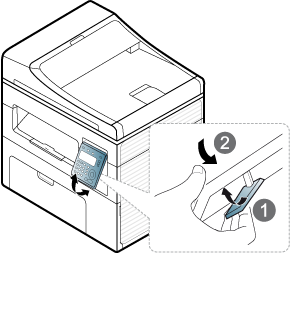
Adjusting the control panel
|
|
|
|
Illustrations on this user’s guide may differ from your machine depending on its options or models. Check your machine type (see Front view). |