|
|
|
|
When the number you have dialed is busy or there is no answer when you send a fax, the machine automatically redials the number. The redial time depends on the country's factory default setting.
When the display shows , press  () button to redial
the number without waiting. To cancel the automatic redialing, press
() button to redial
the number without waiting. To cancel the automatic redialing, press  ( or ).
To change the time interval between redials and the number of redial attempts.
-
Press
 (fax) >
  ()> > on
the control panel.
()> > on
the control panel. -
Select or you want.
-
Select the option you want.
-
Press
 () button
on the control panel.
() button
on the control panel. -
Select the fax number you want.
Ten recently sent fax numbers with ten received Caller IDs are shown.
-
When an original is loaded in the document feeder, the machine automatically begins to send.
If an original is placed on the scanner glass, select to add another page. Load another original and press . When you have finished, select when appears.
Confirming a transmission
When the last page of your original has been sent successfully, the machine beeps and returns to ready mode.
When something goes wrong while sending your fax, an
error message appears on the display. If you receive an
error message, press ( or ) to
clear the message and try to send the fax again.
|
|
|
|
You can set your machine to print a confirmation report automatically
each time sending a fax is completed. Press |
|
|
|
|
You can send a fax from your computer without going to the machine.
To send a fax from your computer, the Samsung Network PC Fax program must be installed. This program will be installed when you installed the printer driver.
-
Open the document to be sent.
-
Select from the menu.
The window will be displayed. It may look slightly different depending on your application.
-
Select Samsung Network PC Fax from the window
-
Click or .
-
Enter the recipients’ numbers and select the option
![[Note]](../../common/icon_note.png)
Select the menu or click the
 button
from the window and click on any option you want to know about.
button
from the window and click on any option you want to know about. -
Click .
You can set your machine to send a fax at a later time when you will not be present. You cannot send a color fax using this feature.
-
Place a single document face down on the document glass, or load the documents face up into the document feeder.
-
Press
(fax) on
the control panel. -
Adjust the resolution and the darkness to suit your fax needs.
-
Press
() > > on the control panel.Or select > > on the touch screen.
-
Enter the number of the receiving fax machine and press .
-
The display asks you to enter another fax number to send the document.
-
To enter more fax numbers, press when highlights and repeat steps 5.
-
You can add up to 10 destinations.
-
Once you entered a group dial number, you cannot enter another group dial numbers anymore.
-
-
Enter the job name and the time.
If you set a time earlier than the current time, the fax will be sent at that time on the following day.
-
The original is scanned into memory before transmission.
The machine returns to ready mode. The display reminds you that you are in ready mode and that a delayed fax is set.
You can check the list of delayed fax jobs.
Press
() > > > on the control panel.
-
Place a single document face down on the document glass, or load the documents face up into the document feeder.
-
Press
(fax) > () > > on the control panel. -
Select the fax job and press .
When you have finished, select when appears. The machine scans the original into memory.
-
Press
( or ) to
return to ready mode.
This function is used when a high priority fax need to be sent ahead of reserved operations. The original is scanned into memory and immediately transmitted when the current operation is finished.
-
Place a single document face down on the document glass, or load the documents face up into the document feeder.
-
Press
(Fax) > () > > on the control panel.Or select > > on the touch screen.
-
Enter the destination fax number and press .
-
Enter the job name and press .
-
If an original is placed on the scanner glass, select to add another pages. Load another original and press .
When you have finished, select when appears.
The machine starts to scan and send a fax to destinations.
You can set the machine to forward the received or sent fax to other destination by a fax, an email or a server. If you are out of office but have to receive the fax, this feature may be useful.
|
|
|
|
-
Place a single document face down on the document glass, or load the documents face up into the document feeder.
-
Press
(fax) > () > > > > > on the control panel.Or select > > > > , , or > > on the touch screen.
options may not be available depending on model or optional goods (see Variety feature).
-
Enter the destination fax number, email address, or server address and press .
-
Press
( or ) to
return to ready mode.Subsequent sent faxes will be forwarded to the specified fax machine.
You can set the machine to forward the received or sent fax to other destination by a fax, an email or a server. If you are out of office but have to receive the fax, this feature may be useful.
|
|
|
|
Though you sent or received a color fax, the data is forwarded in grayscale. |
-
Press
(fax) > () > > > , , or > or > on the control panel.Or select > > > > , , or > or > on the touch screen.
-
options may not be available depending on model or optional goods (see Variety feature).
-
To set the machine to print out a fax when fax forwarding has been completed, select .
-
-
Enter the destination fax number, email address, or server address and press .
-
Enter the starting tim and ending time, then press .
-
Press
( or ) to
return to ready mode.Subsequent sent faxes will be forwarded to the specified fax machine.
|
|
|
|
-
Place a single document face down on the document glass, or load the documents face up into the document feeder.
-
Press
(fax) > on the control panel.Or select > Select the menu you want > Select from the sub-menus > on the touch screen.
-
: Send faxes in normal mode.
-
: Send faxes on both sides of the original.
-
: Send faxes on both sides of the original and prints each one on a separate sheet, but the information on the back side of the printout is rotated 180°.
-
-
Press .
|
|
|
|
-
Open the Samsung Easy Printer Manager.
-
Select the appropriate machine from the .
-
Select menu.
-
Use to change the fax settings.
-
: Convert the received faxes to PDF or TIFF.
-
: Select location to save the converted faxes.
-
: Select prefix.
-
: After receiving the fax, set prints information for the received fax.
-
: Set to show the popup window to notify receiving a fax.
-
: After receiving the fax, open it with default application.
-
: After receiving a fax, the machine does not notify the user or opens the application.
-
-
Press > .
-
Press
(fax) > () > > > on the control panel.Or select > > > > > > on the touch screen.
-
Select the option you want.
-
: Answers an incoming fax call and immediately goes into the fax reception mode.
-
: Receives a fax by pressing
 () and
then () button.
() and
then () button. -
: Is for when an answering machine attached to your machine. Your machine answers an incoming call, and the caller can leave a message on the answering machine. If the fax machine senses a fax tone on the line, the machine automatically switches to Fax mode to receive the fax.
To use the mode, attach an answering machine to the EXT socket on the back of your machine.
-
: You can receive a call using the Distinctive Ring Pattern Detection (DRPD) feature. Distinctive Ring is a telephone company service which enables an user to use a single telephone line to answer several different telephone numbers. For further details, see Receiving faxes using DRPD mode.
This setting may not be available depending on your country.
-
-
Press .
-
Press
( or ) to
return to ready mode.
You can receive a fax call by pressing () button
and then pressing () when you hear
a fax tone. If your machine has a handset, you
can answer calls using the handset (see Features by models).
To use this mode, you must attach an answering machine to the EXT socket on the back of your machine. If the caller leaves a message, the answering machine stores the message. If your machine detects a fax tone on the line, it automatically starts to receive the fax.
|
|
|
|
When you are using an extension telephone connected to the EXT socket, you can receive a fax from someone you are talking to on the extension telephone, without going to the fax machine.
When you receive a call on the extension phone and hear fax tones, press the keys on the extension phone. The machine receives the fax.
is the remote receive code preset at the factory. The first and the last asterisks are fixed, but you can change the middle number to whatever you want.
|
|
|
|
While you are talking over the telephone connected to the EXT socket, copy and scan features are not available. |
This setting may not be available depending on your country. Distinctive Ring is a telephone company service which enables an user to use a single telephone line to answer several different telephone numbers. This feature is often used by answering services who answer telephones for many different clients and need to know which number someone is calling in on to properly answer the phone.
|
|
|
|
This setting may not be available depending on your country. |
-
Select
(fax) > () > > > > on the control panel. Or select > > > > > > > on the touch screen.
-
Call your fax number from another telephone.
-
When your machine begins to ring, do not answer the call. The machine requires several rings to learn the pattern.
When the machine completes learning, the display shows . If the DRPD setup fails, appears.
-
Press when DRPD appears and start over from step 2.
-
DRPD must be set up again if you re-assign your fax number, or connect the machine to another telephone line.
-
After DRPD has been set up, call your fax number again to verify that the machine answers with a fax tone. Then have a call placed to a different number assigned to that same line to be sure the call is forwarded to the extension telephone or answering machine plugged into the EXT socket.
-
|
|
|
|
This feature may not be available depending on model or optional goods (see Features by models). |
You may need to prevent your received faxes from being accessed by unauthorized people. Turn on secure receiving mode, then all incoming faxes go into memory. You can print the incoming faxes with entering the password.
|
|
|
|
To use the secure receiving mode, activate the menu
from Or select > > > > on the touch screen. |
Printing received faxes
-
Select
(fax) > () > > > on the
control panel. Or select > > > > > on the touch screen.
-
Enter a four-digit password and press .
-
The machine prints all of the faxes stored in memory.
|
|
|
|
-
Place a single document face down on the document glass, or load the documents face up into the document feeder.
-
Press
(fax) > () > > > on the control panel.-
: Prints in Normal mode.
-
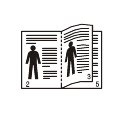
: Prints pages to be read like a book.
-
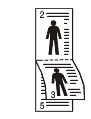
: Prints pages to be read by flipping like a note pad.
-
-
Press .
-
Press
( or ) to
return to ready mode.
Since your machine is a multi-tasking device, it can receive faxes while you are making copies or printing. If you receive a fax while you are copying or printing, your machine stores incoming faxes in its memory. Then, as soon as you finish copying or printing, the machine automatically prints the fax.
|
|
|
|
If fax is received and being printed, other copy and print jobs cannot be processed at the same time. |