Basic copying
|
|
|
|
For special printing features, refer to the Advanced Guide (see Copy menu). |
|
|
|
|
If your has machine for buttons on the control panel (see Control panel overview):
|
-
Select
 (copy) on
the control panel.
(copy) on
the control panel. -
Place a single document face down on the document glass, or load the documents face up into the document feeder (see Loading originals).
-
If you want to customize the copy settings including , , , , and more by using the control panel buttons (see Changing the settings for each copy).
-
Enter the number of copies using the arrow or number keypad, if necessary.
-
Press
 (Start).
|
|
|
|
If you need to cancel the copying job during the operation, press |
Changing the settings for each copy
Your machine provides default settings for copying so that you can quickly and easily make a copy.
|
|
|
|
Darkness
If you have an original containing faint marking and dark images, you can adjust the brightness to make a copy that is easier to read.
-
Select
(copy) >  () > > on
the control panel.
() > > on
the control panel. -
Select the option you want and press .
For example, the being the lightest, and the being the darkest.
-
Press
 () to
return to ready mode.
() to
return to ready mode.
Contrast
The menu lets you increase or decrease the difference between the bright and dark areas of an image.
-
Select
(copy) > () > > on
the control panel. -
Select the option you want and press .
Select to heighten the contrast and select to reduce it.
-
Press
() to
return to ready mode.
Original
The original setting is used to improve the copy quality by selecting the document for the current copy job.
-
Select
(copy) > () > > on the control panel. -
Select the option you want and press .
-
: Use for originals containing mostly text.
-
: Use for originals with mixed text and photographs.
![[Note]](../../common/icon_note.png)
If texts in the printout is blurry, select to get the clear texts.
-
: Use when the originals are photographs.
-
-
Press
() to
return to ready mode.
You can reduce or enlarge the size of a copied image from 25% to 400% from the document feeder or scanner glass.
|
|
|
|
To select from the predefined copy sizes
-
Select
(copy) > () > > on the
control panel. -
Select the option you want and press .
-
Press
() to
return to ready mode.
To scale the copy by directly entering the scale rate
-
Select
(copy) > () > > > on the control panel. -
Enter the copy size you want using the numeric keypad.
-
Press to save the selection.
-
Press
() to
return to ready mode.
|
|
|
|
When you make a reduced copy, black lines may appear at the bottom of your copy. |
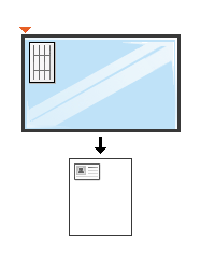
Your machine can print 2-sided originals on one sheet.
The machine prints one side of the original on the upper half of the paper and the other side on the lower half without reducing the size of the original. This feature is helpful for copying a small-sized item such as business card.
|
|
|
|
Depending on the model, the operating procedure may differ.
-
Press on the control panel.
-
Place the front side of an original facing down on the scanner glass where arrows indicate as shown. Then, close the scanner lid.
-
appears on the display.
If your machine has +/- buttons on the control panel, the Front LED on the control panel lights on.
-
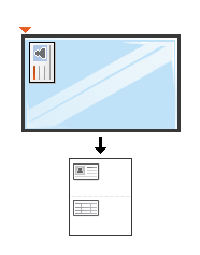
Press
().Your machine begins scanning the front side and shows .
If your machine has +/- buttons on the control panel, the Back LED on the control panel lights on.
-
Turn the original over and place it on the scanner glass where arrows indicate as shown. Then, close the scanner lid.
-
Press
() button.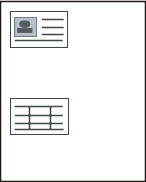
|
|
|
|