This chapter explains common printing tasks.
This chapter includes:
![[Note]](../common/note.png)
|
|
|
The procedures in this chapter are mainly based on Windows XP. |
System requirements
Before you begin, ensure that your system meets the following requirements:
Your machine supports the following Windows operating systems.
|
OPERATING SYSTEM |
Requirement (recommended) |
||
|---|---|---|---|
|
CPU |
RAM |
free HDD space |
|
|
Windows 2000 |
Pentium II 400 MHz (Pentium III 933 MHz) |
64 MB (128 MB) |
600 MB |
|
Windows XP |
Pentium III 933 MHz (Pentium IV 1 GHz) |
128 MB (256 MB) |
1.5 GB |
|
Windows Server 2003 |
Pentium III 933 MHz (Pentium IV 1 GHz) |
128 MB (512 MB) |
1.25 GB to 2 GB |
|
Windows Server 2008 |
Pentium IV 1 GHz (Pentium IV 2 GHz) |
512 MB (2 GB) |
10 GB |
|
Windows Vista |
Pentium IV 3 GHz |
512 MB (1 GB) |
15 GB |
|
Windows 7 |
Pentium IV 1 GHz 32-bit or 64-bit processor or higher |
1 GB (2 GB) |
16 GB |
|
|||
|
Windows Server 2008 R2 |
Pentium IV 1 GHz (x86) or 1.4 GHz (x64) processors (2GHz or faster) |
512 MB (2 GB) |
10 GB |
|
|
|
|
|
OPERATING SYSTEM |
Requirements (recommended) |
||
|---|---|---|---|
|
CPU |
RAM |
free HDD space |
|
|
Mac OS X 10.5 |
|
512 MB (1 GB) |
1 GB |
|
Mac OS X 10.6 |
|
1 GB (2 GB) |
1 GB |
|
Item |
Requirements |
|---|---|
|
Operating system |
RedHat Enterprise Linux WS 4, 5 (32/64bit) Fedora Core 2~10 (32/64bit) SuSE Linux 9.1 (32bit) OpenSuSE 9.2, 9.3, 10.0, 10.1, 10.2, 10.3, 11.0, 11.1 (32/64bit) Mandrake 10.0, 10.1 (32/64bit) Mandriva 2005, 2006, 2007, 2008, 2009 (32/64bit) Ubuntu 6.06, 6.10, 7.04, 7.10, 8.04, 8.10 (32/64bit) SuSE Linux Enterprise Desktop 9, 10 (32/64bit) Debian 3.1, 4.0, 5.0 (32/64bit) |
|
CPU |
Pentium IV 2.4GHz (IntelCore2) |
|
RAM |
512 MB (1 GB) |
|
Free HDD space |
1 GB (2GB) |
|
|
|
|
Introducing useful software programs
Samsung Anyweb Print
This tool helps you to screen-capture, preview, scrap, and print the screen of Windows Internet Explorer more easily, than when you use the ordinary program. Click > > Samsung Printers > Samsung AnyWeb Print > to link the website where the tool is available for the download. This tool is available only for Windows operating systems.
Your printer drivers support the following standard features:
-
Paper orientation, size, source, and media type selection
-
Number of copies
You can also use various special printing features. The following table shows a general overview of features supported by your printer drivers:
|
|
|
|
Some models or operating system may not support the certain feature(s) in the following table. |
|
Feature |
Windows |
|---|---|
|
Machine quality option |
● |
|
Poster printing |
● |
|
Multiple pages per sheet |
● |
|
Booklet printing |
● |
|
Fit to page printing |
● |
|
Reduce and enlarge printing |
● |
|
Different source for first page |
● |
|
Cover page options |
● |
|
Transparency seperator option |
● |
|
Raster compression |
● |
|
Finishing options |
● |
|
Output options |
● |
|
Watermark |
● |
|
Overlay |
● |
|
Double-sided printing (duplex) |
● |
(●: Supported, Blank: Not supported)
|
|
|
|
|
Feature |
Windows |
|---|---|
|
Machine quality option |
● |
|
Poster printing |
● |
|
Multiple pages per sheet |
● |
|
Booklet printing |
● |
|
Fit to page printing |
● |
|
Reduce and enlarge printing |
● |
|
Different source for first page |
● |
|
Cover page options |
● |
|
Transparency seperator option |
● |
|
Raster compression |
|
|
Finishing options |
● |
|
Output options |
● |
|
Watermark |
● |
|
Overlay |
|
|
Double-sided printing (duplex) |
● |
(●: Supported, Blank: Not supported)
|
Feature |
Windows |
Macintosh |
Linux |
Unix |
|---|---|---|---|---|
|
Machine quality option |
● |
● |
● |
● |
|
Poster printing |
● |
|||
|
Multiple pages per sheet |
● |
● |
● (2, 4) |
● (2, 4) |
|
Booklet printing |
● |
● |
● |
● |
|
Fit to page printing |
● |
● |
● |
● |
|
Reduce and enlarge printing |
● |
● |
||
|
Cover page options |
● |
● |
● |
● |
|
Transparency seperator option |
● |
● |
● |
● |
|
Raster compression |
||||
|
Finishing options |
● |
● |
● |
● |
|
Output options |
● |
● |
● |
● |
|
Watermark |
● |
|||
|
Double-sided printing (duplex) |
● |
● |
● |
● |
(●: Supported, Blank: Not supported)
Your machine allows you to print from various Windows, Macintosh, or Linux applications. The exact steps for printing a document may vary depending on the application you use.
|
|
|
|
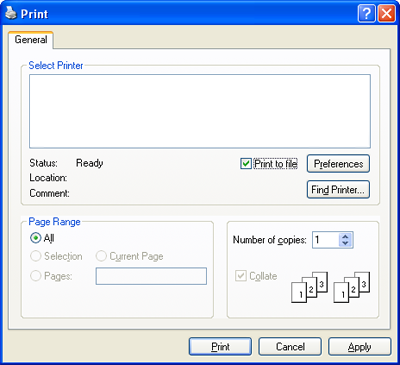
The following procedure describes the general steps required for printing from various Windows applications.
|
|
|
|
Macintosh basic printing (see Macintosh printing). Linux basic printing (see Linux printing). |
The following window is for Notepad in Windows XP. Your window may differ, depending on your operating system or the application you are using.
-
Open the document you want to print.
-
Select from the menu. The window appears.
-
Select your machine from the list.
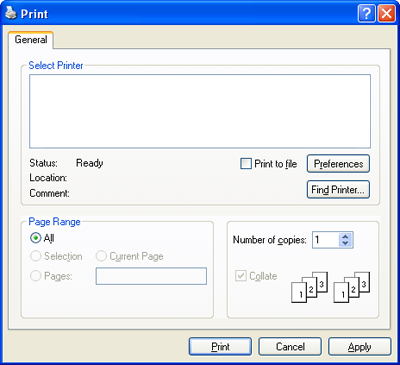
The basic print settings including the number of copies and print range are selected within the window.
To take advantage of the printer features provided by your printer driver, click or in the application’s window to change the print setting (see Opening printing preferences).
-
To start the print job, click or in the window.
-
The PostScript driver is recommended for best print image quality from PostScript-based applications such as Acrobat Reader®, Adobe Illustrator®, Adobe Photoshop®, etc.
-
If you are using Windows Internet Explorer, the Samsung AnyWeb Print too will save your time for screen-captured images or printing the image. Click > > Samsung Printers > Samsung AnyWeb Print > to link the website where the tool is available for the download.
-
Canceling a print job
If the print job is waiting in a print queue or print spooler, cancel the job as follows:
-
Click the Windows menu.
-
For Windows 2000, select > .
-
For Windows XP/2003, select .
-
For Windows 2008/Vista, select > > .
-
For Windows 7, select > > .
-
For Windows Server 2008 R2, select > > .
-
-
For Windows 2000, XP, 2003, 2008 and Vista, double-click your machine.
For Windows 7 and Windows Server 2008 R2, right click your printer icon > context menus > .
If item has ► mark, you can select other printer drivers connected with selected printer.
-
From the menu, select .
|
|
|
|
You can also access this window by simply double-clicking
the machine icon ( You can also cancel the current job by pressing on the control panel. |
You can preview the settings you selected on the upper right of the .
-
Open the document you want to print.
-
Select from the menu. The window appears.
-
Select your printer driver from the list.
-
Click or .

You can check the machine’s current status using the button. When you press the button, the Smart Panel program is opened. The Smart Panel program displays the current status of the machine (see Using Samsung Printer Status ).
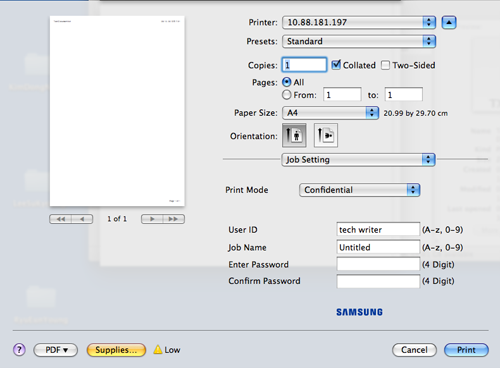
This option allows you to choose how to print or save the printing file by using the HDD in your machine. The default is which is for printing without storing the printing file on the HDD. You can also use this option in other tabs.
-
: This mode prints without storing your document.
-
: This mode is useful when you print more than one copy. You can print one copy first to check the quality, then print the rest of copies in the list of after entering (see button). You can find your printing job in the list and select it, and press the button. The rest of copies will be printed.
-
: This option is used when you need to find a stored file using the control panel.
-
: This option is used when you need to find a stored file using the control panel. The user name automatically appears as the user name that you use to log on Windows.
-
-
: This mode is used for printing confidential documents. You need to enter a password to print it (see ).
-
: This option is used when you need to find a stored file using the control panel.
-
: This option is used when you need to find a stored file using the control panel. The user name automatically appears as the user name that you use to log on Windows.
-
: Enter a password you want to use. This option is used for loading a stored file using the control panel.
-
: Re-enter the password to confirm it.
-
-
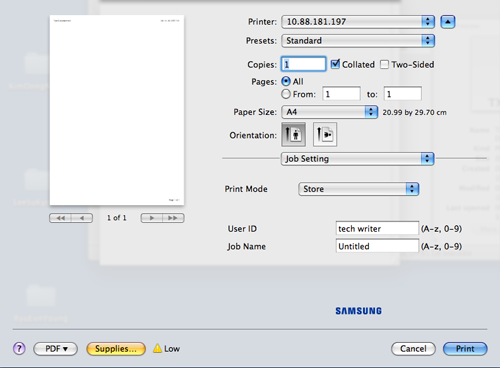
: This mode is used only for storing documents on the HDD. If necessary, you can load and print the stored documents. You can find the stored file in the (see Document box). First, choose a document box in and then set .
-
: This option is used when you need to find a stored file using the control panel.
-
: This option is used when you need to find a stored file using the control panel. The user name automatically appears as the user name that you use to log on Windows.
-
: If the of the document box you selected is , you have to enter the password for the document box. This option is used for loading a stored file using the control panel.
-
: Re-enter the password to confirm it.
-
-
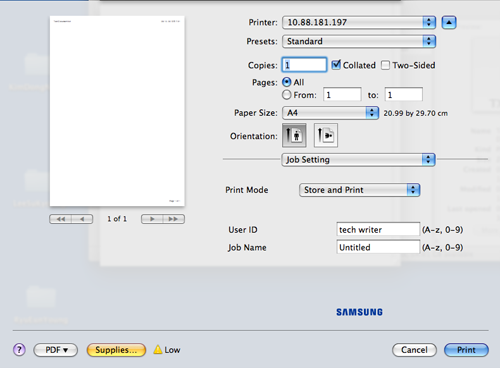
: This mode is used when printing and storing documents at the same time. If necessary, you can load and print the stored documents. You can find the stored file in the (see Document box). First, choose a document box in and then set .
-
: This option is used when you need to find a stored file using the control panel.
-
: This option is used when you need to find a stored file using the control panel. The user name automatically appears as the user name that you use to log on Windows.
-
: If the of the document box you selected is , you have to enter the password for the document box. This option is used for loading a stored file using the control panel.
-
: Re-enter the password to confirm it.
-
-
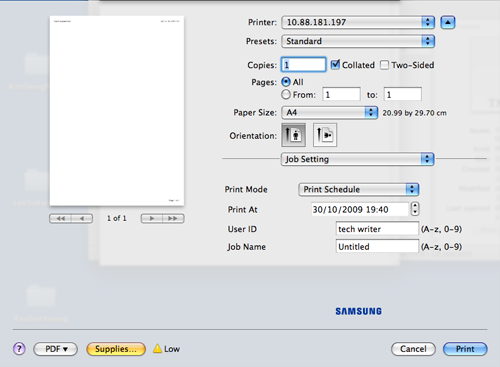
: Use this option to enter a specific time to print the job. This is useful for printing large amount of data or if you want all your job to print at the same time.
-
: Select the date and time you want to print.
-
: This option is used when you need to find a stored file using the control panel.
-
: This option is used when you need to find a stored file using the control panel. The user name automatically appears as the user name that you use to log on Windows.
-
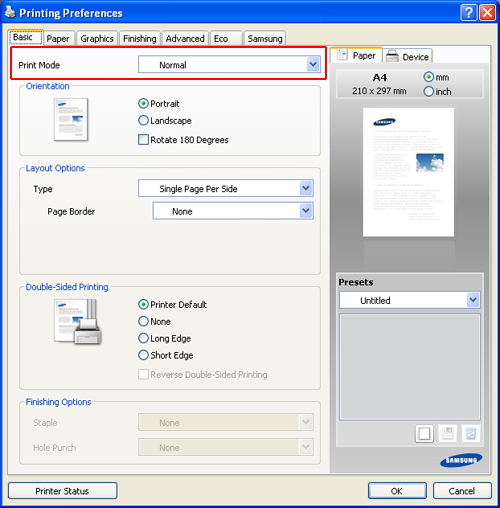
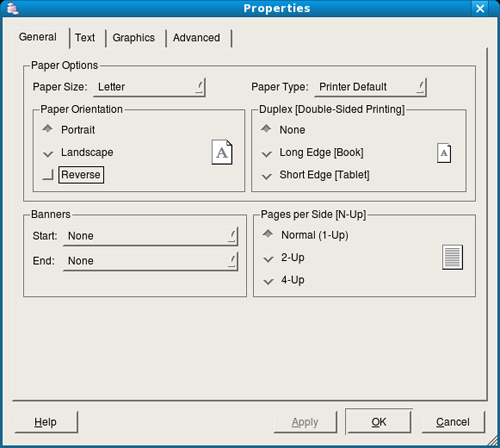
tab
Use tab to adjust how the document appear on the printed page.
Click the tab to display the options shown below.

This option allows you to select the direction in which information is printed on a page.
-
: This option prints across the width of the page, letter style.
-
: This option prints across the length of the page, spreadsheet style.
-
: This option allows you to rotate the page, 180 degrees.
-
: This option allows you to reverse the original document like a mirror. This option is available only when you use the PS printer driver.
This option allows you to select various ways to layout your document.
-
: This option is a basic layout option. This option allows you to print a page on one side of a paper.
-
: This option allows you to print several pages on one side of a paper (see Printing multiple pages on one sheet of paper).
-
: This option allows you to print your document into a poster-size document. This option prints your document into several pages. Paste printed pages together to form one poster-size document (see Printing posters).
-
: This option allows you to print your document on both sides of the paper to make into a booklet (see Printing booklets).
-
: This option allows you to print your document on which border line is. This option is not available for and .
This option allows you to print on both sides of paper (see Printing on both sides of the paper).
This option allows you to specify the number of staples or hole punches.
|
|
|
|
-
: Select the number of staples between and .
-
: Select the number of hole punches between and . Depending on the punch kit, would appear instead of .
Use the tab options to set the basic paper handling specifications.
Click the tab to display the options shown below.
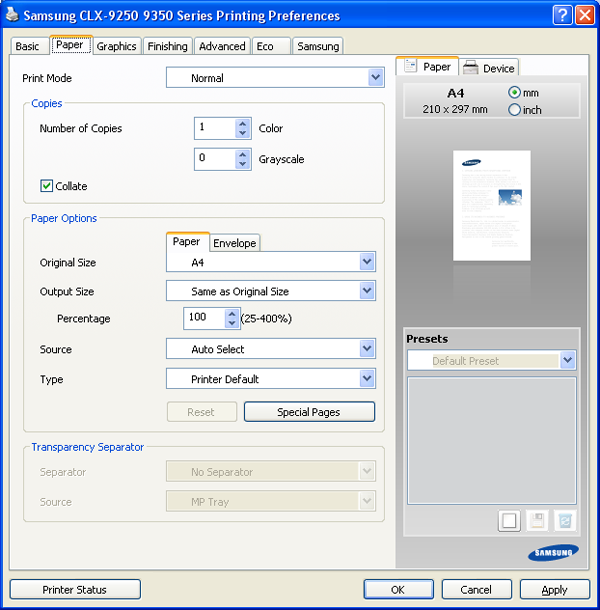
This option allows you to choose the number of copies to be printed in or . You can select 1 to 9999 copies.
-
: If you check this option, printouts in sets to match the sequence of originals.
This option allows you to choose paper tray you want to use.
|
|
|
|
When printing on an envelope, select the tab to set the options. |
-
: This option allows you to set the actual paper size of the originals.
-
: This option allows you to scale your print job to any selected paper size regardless of the originals size (see Fitting your document to a selected paper size).
-
: This option allows you to change the size of a page’s contents to appear larger or smaller on the printed page by typing in a percentage you want. You can also click the up/down arrows to select the scaling rate (see Change the size by percentage of your document).
-
-
: Make sure that is set to the corresponding paper tray.Use when printing on special materials, such as envelopes and transparencies.
-
: This option allows you to set the type of paper to be loaded in the tray. This setting appears in the list, so that you can select it. This will let you get the best quality printout. If not, the desired print quality may not be achieved.
-
: 71 to 90 g/m2 (19 to 24 lb)Normal plain paper.
-
: 91 to 105 g/m2 (25 to 28 lb) thick paper.
-
: 106 to 175 g/m2 (29 to 46 lb) thick paper.
-
: 176 to 216 g/m2 (47 to 57 lb) thick paper.
-
: 217 to 253 g/m2 (58 to 67 lb) thick paper.
-
Thin: 60 to 70 g/m2 (16 to 18 lb) thin paper.
-
: 105 to 120 g/m2 (28 to 32 lb) bond.
-
: 75 to 90 g/m2 (20 to 24 lb) color-backgrounded paper.
-
: 120 to 150 g/m2 (32 to 40 lb) label.
-
: 138 to 146 g/m2 (37 to 39 lb) transparency paper.
-
: 75 to 90 g/m2 (20 to 24 lb) envelope.
-
: 75 to 90 g/m2 (20 to 24 lb) preprinted paper.
-
Cotton: 75 to 90 g/m2 (20 to 24 lb) cotton paper such as Gilbert 25 % and Gilbert 100 %.
-
d: 60 to 90 g/m2 (16 to 24 lb) recycled paper.
-
: 70 to 90 g/m2 (19 to 24 lb) If you need to keep the print-out for a long period time, such as archives, select this option.
-
: 90 to 163 g/m2 (24 to 43 lb) letterhead paper.
-
: 90 to 163 g/m2 (24 to 43 lb) punched paper.
-
: 105 to 163 g/m2 (28 to 43 lb) cardstock.
-
: 170 to 216 g/m2 (45 to 57 lb) cardstock.
-
: 106 to 169 g/m2 (28 to 45 lb) thin glossy.
-
: 170 to 253 g/m2 (45 to 67 lb) thick glossy.
-
-
: This option is allows you to make special pages such as covers. You can add, delete or update the special page settings to the list. This option is available only when you use the PCL printer driver.
Allows you to add a blank or printed seperator between transparencies. This option is available only when you select in .
-
: Does not place separator sheets betweentransparencies.
-
: Places the same image on the dividersheets as printed on the transparency.
-
: Places a blank sheet between transparencies.
-
: Select a tray with paper to use as a separator.
tab
Use the tab options to adjust the print quality for your specific printing needs.
Click the tab to display the options shown below.
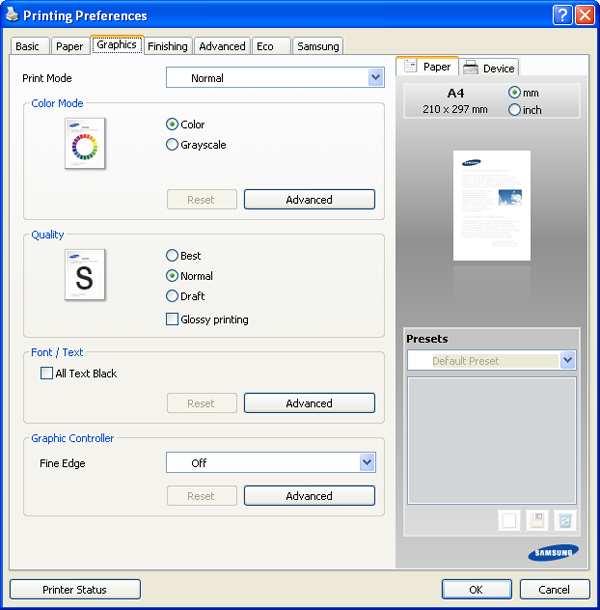
You can choose color options. Setting to typically produces the best possible print quality for color documents. If you want to print a color document in grayscale, select .
To adjust color manually, click . Simply slide the color balance slider in the tab to adjust color, or click the tab for driver provided color correction for general image processing.
|
|
|
|
-
: You can adjust the appearance of images by changing the settings in the option.
-
: You can adjust the appearance of images by changing the settings in the option. option allows you to select options to convert a continous-tone image into printable binary image.
The higher the setting, the sharper the clarity of printed characters and graphics. The higher setting may also increase the printing time of a document. When you check , the machine allows you to print with the effect of gloss finish.
Check to print in solid black, regardless of the color it appears on the screen.
-
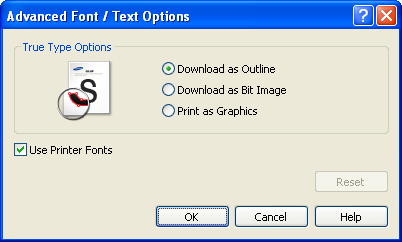
: Automatically selects an option for best format. This option is available only when you use the PS printer driver.
-
: This option allows the driver to download any TrueType fonts that are used in your document not stored (resident) on your machine. If, after printing a document, you find that the fonts did not print correctly, choose and resubmit your print job.
-
: This option allows the driver to download the font data as bitmap images. Documents with complicated fonts, such as Korean or Chinese, or various other fonts, will print faster in this setting. is useful when printing from Adobe programs.
-
: This option allows the driver to download any fonts as graphics. When printing documents with high graphic content and relatively few TrueType fonts, printing performance (speed) may be enhanced in this setting. This option is available only when you use the PCL printer driver.
-
: If your machine is a TrueType rasterizer machine, select this option to download the TrueType font as an outline font. This option is available only when you use the PS printer driver.
-
: When is checked, the printer uses the fonts that are stored in its memory (resident fonts) to print your document, rather than downloading the fonts used in your document. Because downloading fonts takes time, selecting this option can speed up your printing time. When using , the printer will try to match the fonts used in your document to those stored in its memory. If, however, you use fonts in your document that are very different from those resident in the printer, your printed output will appear very different from what it looks like on the screen.
|
|
|
|
If you click , settings in the option returns to the default setting. |
This option allows users to emphasize edges of texts and fine lines for improving readability and align each color channel registration in color printing mode.
: This option determines the compression level of images for transferring data from computer to a printer. If you set this option to , the printing speed will be high, but the printing quality will be low. This option is available only when you use the PCL printer driver.
|
|
|
|
If you click , settings in the option returns to the default setting. |
These options are available only when you use the PS printer driver.
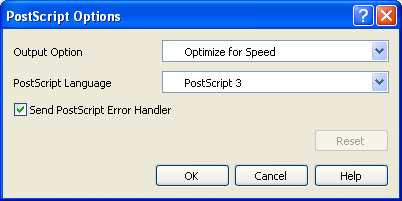
-
: This option allows you to select the output format for PostScript files.
-
: General format for PostScript files.
-
: Creates a file that conforms to the Adobe Document Structuring Conventions(ADSC). This is a useful format to use when you want to create a PostScript file and print it on a different machine.
-
: Creates a file as a image. This is a useful format to use if you want include the file as an image in another document that will be printed from a different program.
-
: Creates a PostScript file you can use it later.
-
-
: This option allows you to choose the PostScript language level.
-
: If this options is checked, the machine prints an error page when an error occurs during printing.
|
|
|
|
If you click , settings in the returns to the default setting. |
tab
Use the tab to set various finishing options.
Click the tab to display the options shown below.
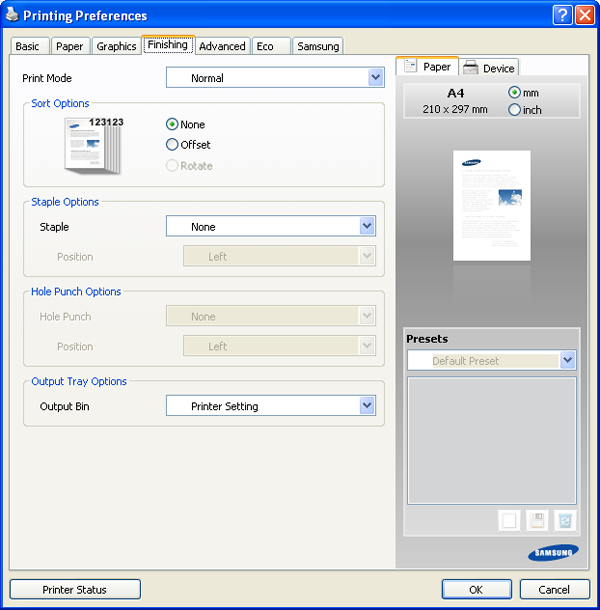
-
: This option allows you to sort out the printouts easily.
-
: Disables this option.
-
: When printing multiple copies, this option shift the output position of each set.
This feature is available only when the standard or booklet finisher is installed.

-
: When printing multiple copies, the printouts are stacked criss-crossed in sets.
-
This feature is available only when the standard or booklet finisher is not installed.
-
This feature is available only with Letter and A4 sized print media.
-
Before using this feature, you have to load the paper in the trays with SEF(Short edge feed) and LEF(Long edge feed). For example, direction of paper feeding in the tray 1 is SEF, and direction of paper feeding in the tray 2 is LEF.
-
-
-
: This option allows you to specify the number of staples and the staple position. This option is available only when the optional standard finisher or booklet finisher is installed.
-
: Select the number of staples between and .
-
: Select the position of staples among , and .
When you use the staple and punch together, you can only set the same position for staples and punch holes.
,
,
,
,
,
-
-
: This option allows you to specify the number of hole punches and the hole punching position. Holes are punched in the printouts for filing them. This option is available only when the optional punch kit is installed in the optional standard finisher or booklet finisher.
-
: Select the number of hole punches between and . Depending on the punch kit, would appear instead of .
-
: Select the position of hole punches among , and .
When you use the staple and punch together, you can only set the same position for staples and punch holes
,
,
,
,
,
-
-
: This option allows you to specify the tray where to output the printed documents Tray setting.
tab
Use the tab to set various printing options.
Click the tab to display the options shown below.
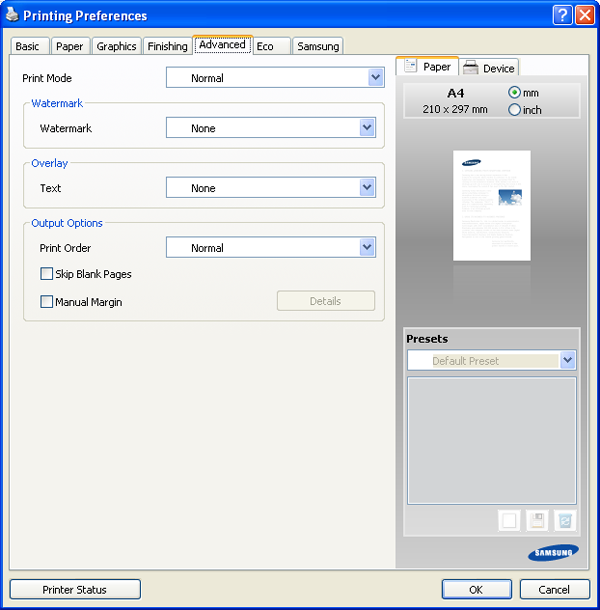
This option allows you to print text over an existing document (see Using watermarks).
Overlays are often used to take the place of letterhead paper (see Using overlay). This option is available only when you use the PCL printer driver.
-
: This options allows you to set the sequence in which the pages will print. Select the print order from the drop-down list. and are available only when you use the PCL printer driver.
-
: This option allows you to print all pages from the first page to the last page.
-
: This option allows you to print all pages from the last page to the first page.
-
: This option allows you to print only the odd numbered pages of the document.
-
: This option allows you to print only the even numbered pages of the document.
-
-
: This option allows you to specify not to print blank pages in the original data.
-
: This option allows you to specify binding margin. Binding margin adjusts binding position. This option is not available when you use the PS printer driver.
-
: This option allows you to set advanced output options for printing. This option is available only when you use the PS printer driver.
-
: This option specifies whether to print PostScript data created by the application that can create the PostScript code for printing. The default is checked. If this option is checked, some print options such as , , , and may not work correctly when printing from the application that can create the PostScript code for printing. In that case, please uncheck this option.
In some cases, unchecking may cause unexpected printout.
-
|
|
|
|
If you click , settings in the option returns to the default setting. |
tab
Use the tab to set various printing options.
The tab allows
you to save print resources and lead you to eco-friendly printing. When
you select , you
can see the eco image ( )on
some options. Also, Some options are not available
to use in the eco mode.
)on
some options. Also, Some options are not available
to use in the eco mode.
Click the tab to display the options shown below.
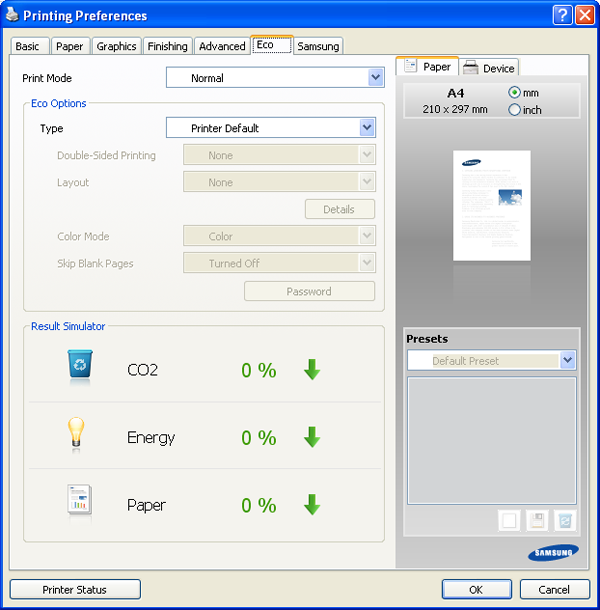
-
: If you select this option, this feature is determined by the setting you’ve made on the control panel of the machine.
-
:
-
: Eco mode gets activated. Select , , , and you want to use in eco mode. As long as you do not change the options from the other tabs, the document will be print out as set in the eco mode.
-
: If the administrator sets in for this machine, the eco mode is always set by this machine’s eco setting, while the in the printer driver is disabled. If you need to change the print settings, click and enter the password or contact your administrator.
shows the result of reduced emission of carbon dioxide, used electricity, and the amount of saved paper in accordance with the settings you selected.
|
|
|
|
tab
Use the tab to display the copyright and the version number of the driver. If your computer is connected to the Internet, you can have access to following services:
Click the tab to display the options.
-
: This option allows you to download updates for your printer driver.
-
: This option directly connects you to Samsung’s Website.
-
: This option allows you to register your machine.
-
: This option allows you to order supplies on-line.
Using a favorite setting
The option, which is visible on each preferences tab except for tab, allows you to save the current preferences settings for future use.
To save a item:
-
Change the settings as needed on each tab.
-
Enter a name for the item in the input box.

-
Click
 . Then
all current driver settings are saved.
. Then
all current driver settings are saved. If you want to update the setting you made, select more options and click
 .
.To use a saved setting, select it from the drop down list. The machine is now set to print according to the setting you selected.
To delete saved setting, select it from the drop down list and click
 .
. You can also restore the printer driver’s default settings by selecting from the drop down list.
Click the question mark from the upper-right corner of the window and click on any option you want to know about. Then a pop-up window appears with information about that option's feature which is provided from the driver.
If the question mark does not appear, select the option you want to know about and press on your keyboard.

If you want to search information via a keyword, click the tab in the window, and enter a keyword in the input line of the option. To get information about supplies, driver update or registration and so on, click appropriate buttons.
When you install the optional devices such as optional dual cassette feeder, standard finisher, etc, this machine automatically detects and sets the optional devices. If you cannot use the optional devices you installed in this driver, you can set the optional devices in . Job Accounting allows you to print with the given permission.
-
Click the Windows menu.
-
For Windows 2000, select > .
-
For Windows XP/2003, select .
-
For Windows 2008/Vista, select > > .
-
For Windows 7, select > > .
-
For Windows Server 2008 R2, select > > .
-
-
Right-click your machine.
-
For Windows XP/2003/2008/Vista, press .
-
For PS driver, select PS driver and right-click to open .
For Windows 7 and Windows Server 2008 R2, from context menus, select the .
If item has ► mark, you can select other printer drivers connected with selected printer.
-
-
Select .
The window may differ depending on the driver or operating system you are using.
-
Select the appropriate option.
-
: Select the optional tray you installed. You can select the (dual cassette feeder) or (high capacity feeder). Also, you can see the tray information, and set the paper size and type in . If you select , settings in the returns to the default setting.
-
: Select the optional finisher you installed. You can select the or .
-
: Select the memory capacity which is installed in the machine. This option is available only when you use the PS printer driver.
-
: This option is available only when you set . Select the optional punch kit you installed. You can select the or .
The available punch kit may differ from country to country. Contact your local Samsung dealer or the retailer where you purchased your machine.
-
: Select one of the options. This option is available only when you use the PS printer driver.
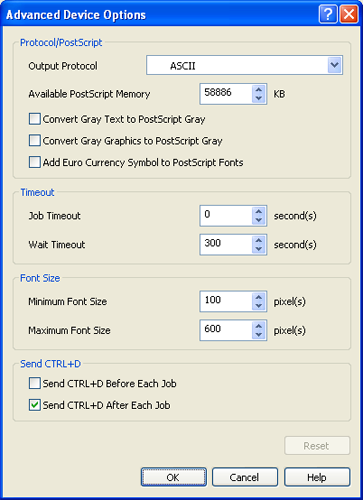
-
: Specifies the protocol of the printer will use for print jobs.
When you click , data is sent in ASCII format (7-bit), which may take longer to print but can be sent through any I/O channel, such as a serial, parallel, or network port. When you click (Binary Communications Protocol) or (Tagged Binary Communications Protocol), all data except special control characters is sent in binary (8-bit) format. The binary formats can be sent over parallel or serial communications ports and are faster than sending data in ASCII format.
-
: Specifies the amount of available PostScript memory. It is a subset of the printer's total physical memory. It is usually the best to use the default setting, which is determined by your printer manufacturer.
-
: Specifies whether to convert the true gray (RGB value) in text to the gray provided by the PostScript driver.
-
: Specifies whether to convert the true gray (RGB value) in graphics to the gray provided by the PostScript driver.
-
: Specifies whether to augment the device fonts with the Euro character.
-
: Specifies how long the document can take to get from the computer to the printer before the printer stops trying to print the document. If you specify 0, the printer will continue trying to print indefinitely.
-
: Specifies how long the printer will wait to get more PostScript information from the computer. After the specified time passes, the printer stops trying to print the document and prints an error message. If you are trying to print a very complicated document, you may want to increase this value. If you specify 0, the printer will wait indefinitely.
-
: Specifies the minimum font size (in pixels) for which the PostScript driver will download TrueType fonts as outline (Type 1) fonts. A font smaller than the minimum setting will be downloaded as a bitmap (Type 3) font. This option lets you fine-tune the Automatic setting for the (see ).
-
: Specifies the maximum font size (in pixels) for which the PostScript driver will download TrueType fonts as bitmap (Type 3) fonts. A font larger than the maximum setting will be downloaded as an outline (Type 1) font. This option lets you fine-tune the Automatic setting or override the setting for the (see ).
-
: Specifies whether the printer will be reset at the beginning of every PostScript document. The default is unchecked. CTRL+D will reset your printer to its default setting to ensure that prior jobs won't affect the current print job. CTRL+D may cause a print job to fail if your printer is connected through a network. If your document fails to print when sent to a printer connected through parallel or serial ports, check this option.
-
: Specifies whether the printer will be reset at the end of every PostScript document. The default is checked. CTRL+D will reset your printer to its default setting to ensure that future print jobs won't be affected by the current print job. CTRL+D may cause a print job to fail if your printer is connected through a network. If your document fails to print when sent to a network printer, uncheck this option.
If you click , settings in the returns to the default setting.
-
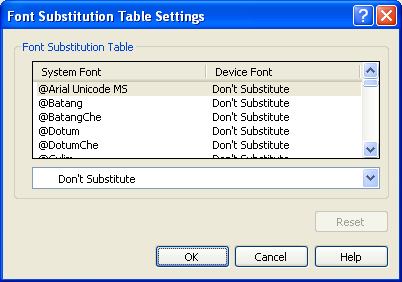
-
: Displays the font substitution table and options for changing the TrueType-to-printer font mapping. This option is available only when you use the PS printer driver.
-
: Allows you to associate user and account identification information with each document you print.
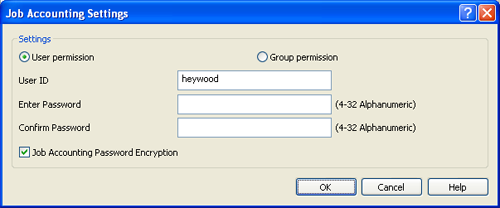
-
: If you check this option, only users with user permission can start a print job.
-
: If you check this option, only groups with group permission can start a print job.
-
If you want to encrypt job accounting password, check .
-
Administrators can enable job accounting and configure permissions in the control panel or SyncThru™ Web Service. For the detailed information about them, refer to the Administrator’s Guide.
-
-
-
Click until you exit the or window.
Using special print features
Special print features include:
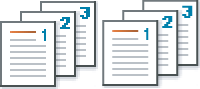
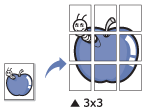
You can select the number of pages to print on a single sheet of paper. To print more than one page per sheet, the pages will be reduced in size and arranged in the order you specify. You can print up to 16 pages on one sheet.
-
To change the print settings from your software application, access (see Opening printing preferences).
-
Click the tab, select in the drop-down list.
-
Select to print a border around each page on the sheet.
-
Select the number of pages you want to print per sheet (2, 4, 6, 9, or 16) in the drop-down list.
-
Select the page order from the drop-down list, if necessary.
-
Click the tab, select the , , and .
-
Click or until you exit the window.
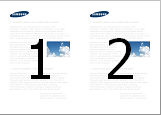
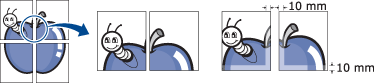
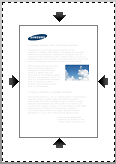
This feature allows you to print a single-page document onto 4, 9, or 16 sheets of paper, for the purpose of pasting the sheets together to form one poster-size document.
-
To change the print settings from your software application, access (see Opening printing preferences).
-
Click the tab, select in the drop-down list.
-
Select the page layout you want.
Specification of the page layout:
-
: Document will be enlarged and be divided into 4 pages.
-
: Document will be enlarged and be divided into 9 pages.
-
: Document will be enlarged and be divided into 16 pages.
-
-
Select the value. Specify in millimeters or inches by selecting the radio button on the upper right of tab to make it easier to paste the sheets together.
-
Click the tab, select the , , and .
-
Click or until you exit the window.
-
You can complete the poster by pasting the sheets together.
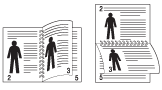
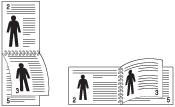
This feature prints your document on both sides of a paper and arranges the pages so that the paper can be folded in half after printing to produce a booklet.
|
|
|
|
-
To change the print settings from your software application, access the (see Opening printing preferences).
-
Click the tab, select from the drop-down list.
-
Select type. If you print a document containing many pages, select , you can divide the output booklet into multiple batches.The maximum sheet in a batch is 15 sheets.
For example, if you copy 80 pages of a document, and set the number to 10.
- First batch: 1~40 pages (10 sheets)
- Second batch: 41~80 pages (10 sheets)
-
Click the button. Then select the option you want.
-
: You can use this option when a optioanl booklet finisher is installed.
When you select or , is available only in (see ). However, a batch of more than 15 sheets is not printed out to the booklet tray, but to the finishing tray.
-
: Disables this feature.
-
: This option allows you to fold the center of booklet.
-
: This option allows you to staple and fold the center of booklet.
-
-
: This option allows you to shift the images to create a center margin for the booklet.
-
: This option allows you to select page reading order right to left.
-
-
Click the tab, select the , , and .
The option is not available for all paper sizes. In order to find out the available paper size for this feature, select the available paper size in the option on the tab.
If you select an unavailable paper size, this option can be automatically canceled. Select only available paper. (paper without
 or
or  mark).
 -
Click or until you exit the window.

You can print on both sides of a paper; duplex. Before printing, decide how you want your document oriented. You can only use this feature with Letter, Legal, Oficio, US Folio, A4, ISO B5, JIS B5, Statement, Executive, A5, 8K, 16K, Ledger, Tabloid Extra, A3 or JIS B4 sized paper.
-
To change the print settings from your software application, access (see Opening printing preferences).
-
Click the tab.
-
From the section, select the binding option you want.
-
: If you select this option, this feature is determined by the setting you’ve made on the control panel of the machine. This option is available only when you use the PCL printer driver.
-
: Disables this feature.
-
: This option is the conventional layout used in bookbinding.
-
: This option is the conventional layout used in calendars.
-
: Check this option to reverse the print order when duplex printing.
-
-
Click the tab, select the , , and .
-
Click or until you exit the window.
You can change the size of a document to appear larger or smaller on the printed page by typing in a percentage you want.
-
To change the print settings from your software application, access (see Opening printing preferences).
-
Click the tab.
-
Select actual paper size of the originals from the .
-
Enter the scaling rate in the input box.
You can also click the up/down arrows to select the scaling rate.
You cannot use this feature when you select a size of paper from the .
-
Select the and .
-
Click or until you exit the window.
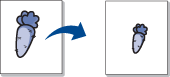
This printer feature allows you to scale your print job to any selected paper size regardless of the document size. This option can be useful when you want to check fine details on a small document.
-
To change the print settings from your software application, access (see Opening printing preferences).
-
Click the tab.
-
Select actual paper size of the originals from the .
-
Select the size of paper to be printed in the tray from the .
-
Select the and .
-
Click or until you exit the window.
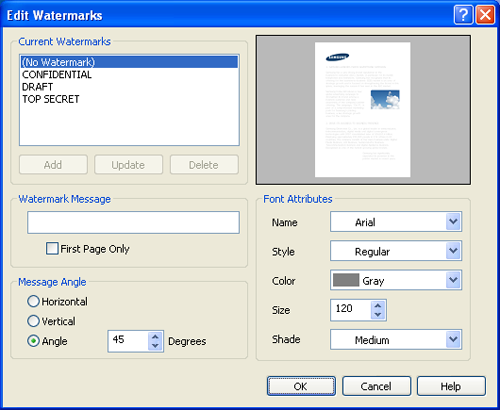
The watermark option allows you to print text over an existing document. For example, you use it when you want to have large gray letters reading “DRAFT” or “CONFIDENTIAL” printed diagonally across the first page or all pages of a document.
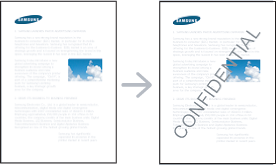
There are several predefined watermarks that come with the machine. They can be modified, or you can add new ones to the list.
-
To change the print settings from your software application, access (see Opening printing preferences).
-
Click the tab, and select the desired watermark from the drop-down list. You will see the selected watermark in the preview image.
-
Click or until you exit the print window.
-
To change the print settings from your software application, access (see Opening printing preferences).
-
From the tab, select from the drop-down list. The window appears.
-
Enter a text message in the box. You can enter up to 256 characters. The message displays in the preview window.
When the box is checked, the watermark prints on the first page only.
-
Select watermark options.
You can select the font name, style, color, size, and shade from the section, as well as set the angle of the watermark from the section.
-
Click to add a new watermark to the list.
-
When you finish editing, click or until you exit the window.
To stop printing the watermark, select from the drop-down list.
-
To change the print settings from your software application, access (see Opening printing preferences).
-
Click the tab, select from the drop-down list. The window appears.
-
Select the watermark you want to edit from the list and change the watermark message and options.
-
Click to save the changes.
-
Click or until you exit the window.
-
To change the print settings from your software application, access (see Opening printing preferences).
-
Click the tab, select from the drop-down list. The window appears.
-
Select the watermark you want to delete from the list and click .
-
Click or until you exit the window.
This option is available only when you use the PCL printer driver.
What is an overlay?
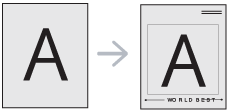
An overlay is text and/or images stored on the computer hard drive (HDD) as a special file format that can be printed on any document. Overlays are often used to take the place of letterhead paper. Rather than using preprinted letterhead, you can create an overlay containing exactly the same information that is currently on your letterhead. To print a letter with your company’s letterhead, you do not need to load preprinted letterhead paper in the machine just print the letterhead overlay on your document.
To use a page overlay, you must create a new page overlay containing your logo or image.
-
Create or open a document containing text or an image for use in a new page overlay. Position the items exactly as you wish them to appear when printed as an overlay.
-
To save the document as an overlay, access (see Opening printing preferences).
-
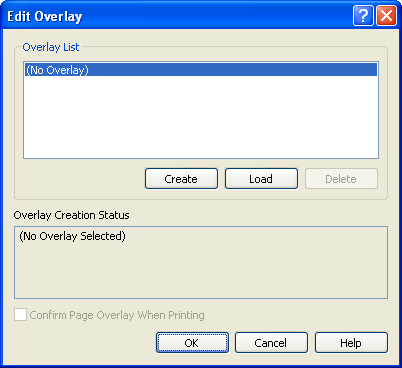
Click the tab, and select from the drop-down list. window appears.
-
In the window, click .
-
In the window, type a name up to eight characters in the box. Select the destination path, if necessary (The default is C:\Formover).
-
Click . The name appears on the .
-
Click or until you exit the window.
-
The file is not printed. Instead, it is stored on your computer hard disk drive.
|
|
|
|
The overlay document size must be the same as the document you print with the overlay. Do not create an overlay with a watermark. |
After an overlay has been created, it is ready to be printed with your document. To print an overlay with a document:
-
Create or open the document you want to print.
-
To change the print settings from your software application, access (see Opening printing preferences).
-
Click the tab.
-
Select the desired overlay from the drop-down list.
-
If the overlay file you want does not appear in the drop-down list, select from the list and click . Select the overlay file you want to use.
If you have stored the overlay file you want to use in an external source, you can also load the file when you access the window.
After you select the file, click . The file appears in the box and is available for printing. Select the overlay from the box.
-
If necessary, check box. If this box is checked, a message window appears each time you submit a document for printing, asking you to confirm your wish to print an overlay on your document.
If this box is not checked and an overlay has been selected, the overlay automatically prints with your document.
-
Click or until you exit the window.
The selected overlay prints on your document.
|
|
|
|
The resolution of the overlay document must be the same as that of the document you will print with the overlay. |
-
Access the to set the paper size in MP tray(see “Tray setting” on page 46).
-
Click arrows to adjust paper size.
|
|
|
|
Paper handling ranges from 98 to 320 mm width (3.87 to 12.6 inches) and from 148 to 1,200 mm length (5.8 to 47.3 inches). |
This chapter explains how to use the Direct Printing Utility to print PDF files without open the files.
![[Caution]](../common/caution.png)
|
|
|
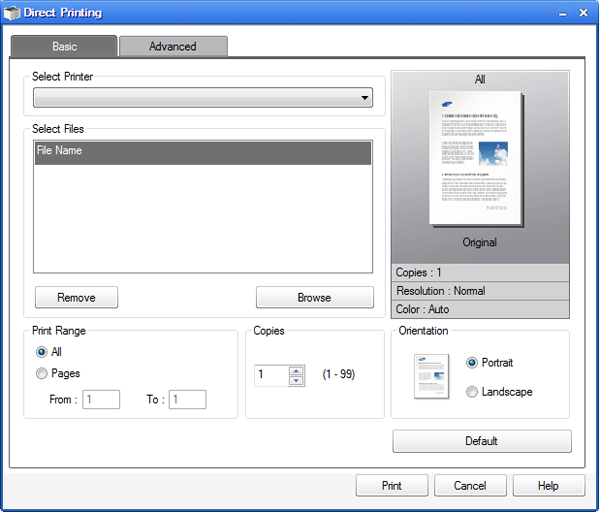
What is Direct Printing Utility?
Direct Printing Utility is a program that sends a PDF file directly to your machine to print without having to open the file. It sends data through the Windows spooler using the port of the printer driver. It only supports PDF format.
To install this program, select -> and put a check mark in this program when you install the printer driver.
Printing
There are several ways you can print using the Direct Printing Utility.
From the Direct Printing Utility window
-
From the menu select or > Samsung Printers > > Direct Printing Utility.
The Direct Printing Utility window appears.
-
Select your machine from the drop-down list and click .
-
Select the PDF file you wish to print and click .
The PDF file is added in the section.
-
Customize the machine settings for your needs.
-
Click . The selected PDF file is sent to the machine.
Using the right-click menu
-
Right-click on the PDF file you wish to print and select .
The Direct Printing Utility window appears with the PDF file is added.
-
Select the machine you wish to use.
-
Customize the machine settings for your needs.
-
Click . The selected PDF file is sent to the machine.
|
|
|
|
Most Windows applications will override settings you specify in the printer driver. Change all print settings available in the software application first, and change any remaining settings using the printer driver. |
-
Click the Windows menu.
-
For Windows 2000, select > .
-
For Windows XP/2003, select .
-
For Windows 2008/Vista, select > > .
-
For Windows 7, select > > .
-
For Windows Server 2008 R2, select > > .
-
-
Right-click your machine.
-
For Windows 2000, XP, 2003 and Vista, press .
For Windows 7 and Windows Server 2008 R2, from context menus, select the .
If item has ► mark, you can select other printer drivers connected with selected printer.
-
Change the settings on each tab.
-
Click .
|
|
|
|
If you want to change the settings for each print job, change it in . |
Setting your machine as a default machine
-
Click the Windows menu.
-
For Windows 2000, select > .
-
For Windows XP/2003, select .
-
For Windows 2008/Vista, select > > .
-
For Windows 7, select > > .
-
For Windows Server 2008 R2, select > > .
-
-
Select your machine.
-
Right-click your machine and select .
For Windows 7 and Windows Server 2008 R2, if item has ► mark, you can select other printer drivers connected with selected printer.
You will sometimes need to save the print data as a file.
To create a file:
-
Check the box at the window.
-
Click .
-
Type in the destination path and the file name, and then click .
For example c:\Temp\file name.
If you type in only the file name, the file is automatically saved in , or . The saved folder may differ, depending on your operating system or the application you are using.
This section explains how to print using a Macintosh. You need to set the print environment before printing (see Installation guide).
Printing a document
When you print with a Macintosh, you need to check the printer driver setting in each application you use. Follow the steps below to print from a Macintosh:
-
Open the document you want to print.
-
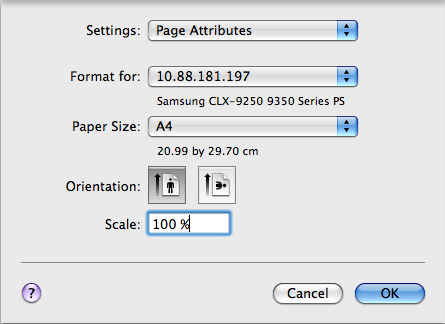
Open the menu and click ( in some applications).
-
Choose your paper size, orientation, scaling, other options, and make sure that your machine is selected. Click .
-
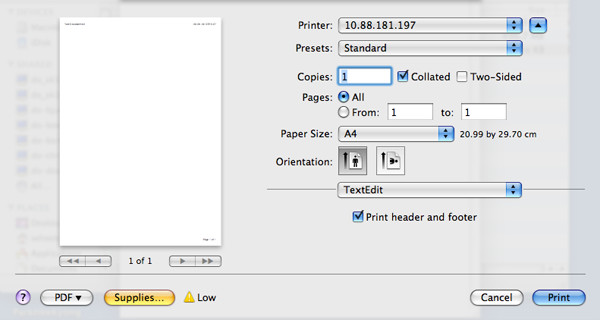
Open the menu and click .
-
Choose the number of copies you want and indicate which pages you want to print.
-
Click .
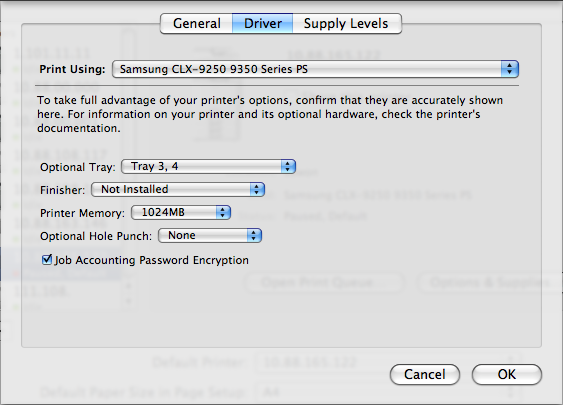
Activating optional devices or accessories
After installing the optional devices or accessories, you need to activate the options.
-
Open and click .
-
Select your machine and click .
-
Select and set the necessary options.
Changing printer settings
You can use advanced printing features provided by your machine.
Open an application and select from the menu. The machine name, which appears in the printer properties window, may differ depending on the machine in use. Except for the name, the composition of the printer properties window is similar to the following.
|
|
|
|
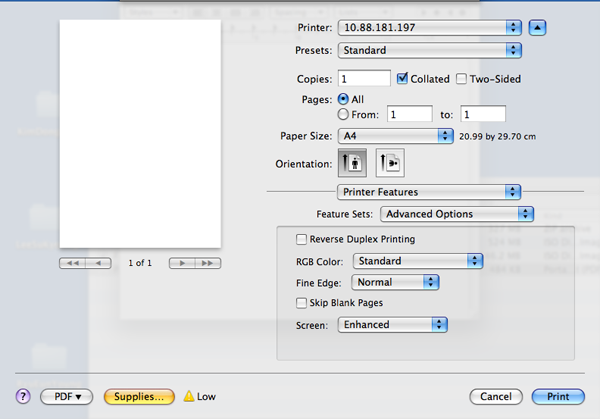
The following pane is the first pane you will see when you open the printer properties pane. Select other advanced features from the drop down list.
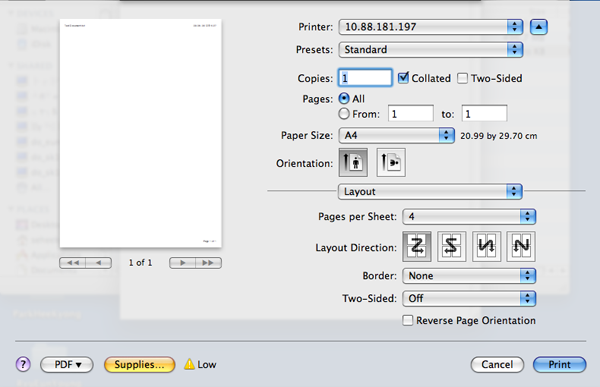
The tab provides options to adjust how the document appears on the printed page. You can print multiple pages on one sheet of paper. Select from the drop-down list.

-
: This option determines how many pages to be printed on one page (see Printing multiple pages on one sheet of paper).
-
: This option allows you to select the printing direction on a page similar to the examples on UI.
-
: This option allows you to print a border around each page on the sheet.
-
: This option allows you to print on both sides of a paper (see Printing on both sides of paper).
-
: This option allows you to rotate paper 180 degrees.
The tab provides options for selecting . Select from the drop-down list.
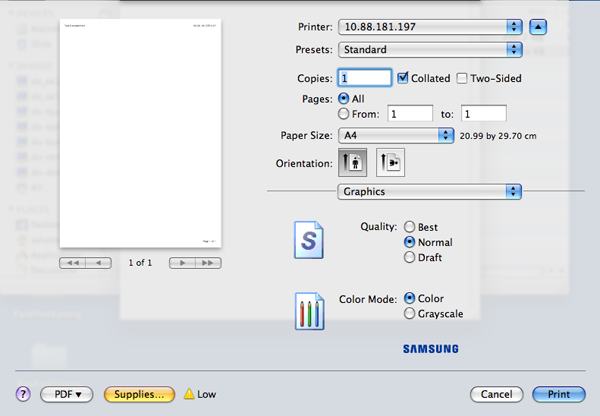
-
: This option allows you to select the printing resolution. The higher the setting, the sharper the clarity of printed characters and graphics. The higher setting also may increase the time it takes to print a document.
-
: You can set the color options. Setting to typically produces the best possible print quality for color documents. If you want to print a color document in grayscale, select .
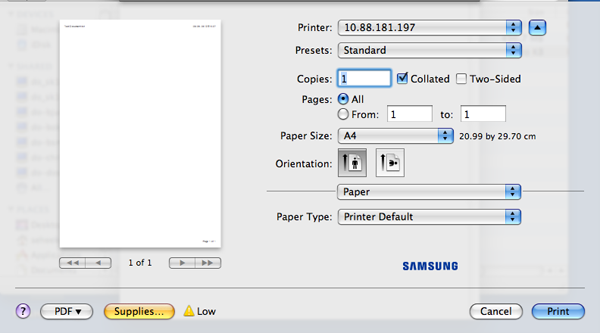
Set to correspond to the paper loaded in the tray from which you want to print. This will let you get the best quality printout. If you load a different type of print material, select the corresponding paper type.
This option allows you to print with the given permission.
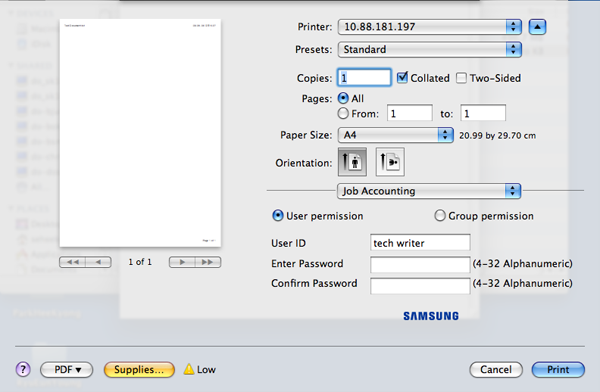
-
: If you check this option, only users with user permission can start a print job.
-
: If you check this option, only groups with group permission can start a print job.
|
|
|
|

This option allows you to choose how to print the printing file by using the hard disk drive in your machine.This option allows you to choose how to print or save the printing file by using the HDD in your machine.
-
: The default is .
-
: This mode prints without storing your document.
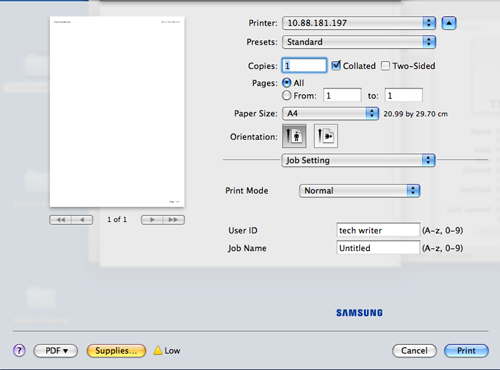
-
: This mode is used for printing confidential documents. You need to enter a password to print it (see ).
-
: This option is used when you need to find a stored file using the control panel. The user name automatically appears as the user name that you use to log in Mac OS X.
-
: This option is used when you need to find a stored file using the control panel.
-
: Enter the password you want to use. This option is used for loading a stored file using the control panel.
-
: Re-enter the password to confirm it.
-
-
: This mode is used only for storing documents on the HDD. If necessary, you can load and print the stored documents. You can find the stored file in the (see Document box).
-
: This option is used when you need to find a stored file using the control panel. The user name automatically appears as the user name that you use to log in Mac OS X.
-
: This option is used when you need to find a stored file using the control panel.
-
-
: This mode is used when printing and storing documents at the same time. If necessary, you can load and print the stored documents. You can find the stored file in the (see Document box).
-
: This option is used when you need to find a stored file using the control panel. The user name automatically appears as the user name that you use to log in Mac OS X.
-
: This option is used when you need to find a stored file using the control panel.
-
-
: Use this option to enter a specific time to print the job. This is useful for printing large amount of data or if you want all your job to print at the same time. Select the date and time you want to print. and are used when you need to find a stored document using the control panel.
-
: Select the date and time you want to print.
-
: This option is used when you need to find a stored file using the control panel. The user name automatically appears as the user name that you use to log in Mac OS X.
-
: This option is used when you need to find a stored file using the control panel.
-
-
-
: This option allows you to reverse the print order when duplex printing.
-
: This setting determines how colors are rendered. is the most widely used setting which the color tone of this mode is the closest to that of standard monitor (sRGB Monitor). mode is appropriate for printing presentation data and charts. The color tone of mode produces more color images than that of mode. mode is best used for printing fine lines, small characters and color drawings. The color tone of mode may be different from that of monitor, the pure toner colors are used for printing cyan, magenta and yellow colors. is most common color setting used in the corporate environment.
-
: This option allows you to emphasize edges of texts and fine lines for improving readability.
-
: This option allows you to specify not to print blank pages in the original data.
-
: This option allows you to select options to convert a continous-tone image into printable binary image.
-
: You can select the print output options such as staple, offset and etc. This option is available only when the optional standard finisher or booklet finisher is installed.
-
: This feature prints your document on both sides of a paper and arranges the pages so that the paper can be folded in half after printing to produce a booklet. Some options in are available only when the optional stanard finisher or booklet finisher is installed.
-
: Prints the document with a front cover. The front cover can be a blank paper or the first page in the document.
-
: Prints the document with a back cover. The back cover can be a blank paper or the last page in the document.
-
: Prints the document with a front cover and a back cover. The covers can be blank papers or the first and the last pages in the document.
-
: This option allows you to place a blank sheet between transparencies.
You can print more than one page on a single sheet of paper. This feature provides a cost-effective way to print draft pages.
-
Open an application, and select from the menu.
-
Select from the drop-down list under . In the drop-down list, select the number of pages you want to print on one sheet of paper.
-
Select the other options you want to use.
-
Click , then machine prints the selected number of pages you want to print on one sheet of paper.
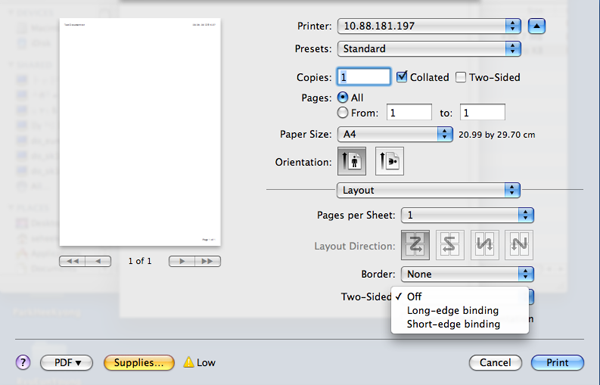
You can print on both sides of the paper. Before printing in the duplex mode, decide on which edge you will be binding your finished document. The binding options are, as follows:
-
: This option is the conventional layout used in book binding.
-
: This option is the type often used with calendars.
-
From your Macintosh application, select from the menu.
-
Select from the drop-down list under .
-
Select a binding orientation from option.
-
Select the other options you want to use.
-
Click and; the machine prints on both sides of the paper.
|
|
|
|
If you print more than 2 copies, the first copy and the second copy might print on the same sheet of paper. Avoid printing on both sides of paper when you are printing more than 1 copy. |
Printing from applications
There are a lot of Linux applications that allow you to print using Common UNIX Printing System (CUPS). You can print on your machine from any such application.
-
Open an application, and select from the menu
-
Select directly using lpr.
-
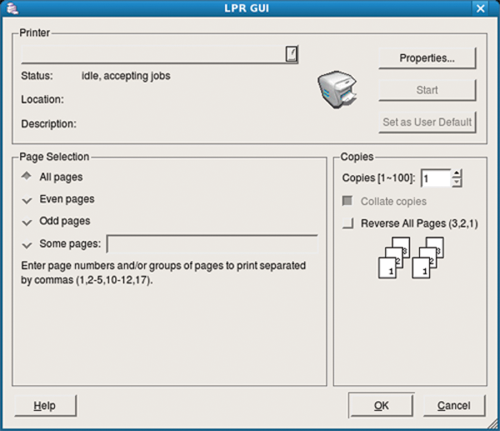
In the LPR GUI window, select the model name of your machine from the printer list and click .
-
Change the print job properties using the following four tabs displayed at the top of the window.
-
: This option allows you to change the paper size, the paper type, and the orientation of the documents. It enables the duplex feature, adds start and end banners, and changes the number of pages per sheet.
-
: This option allows you to specify the page margins and set the text options, such as spacing or columns.
-
: This option allows you to set image options that are used when printing image files, such as color options, image size, or image position.
-
: This option allows you to set the print resolution, paper source, and destination.
-
-
Click to apply the changes and close the window.
-
Click in the window to start printing.
-
The Printing window appears, allowing you to monitor the status of your print job.
To abort the current job, click .
Printing files
You can print many different types of files on your machine using the standard CUPS way, directly from the command line interface. The CUPS lpr utility allows you to do that. But the drivers package replaces the standard lpr tool by a much more user-friendly LPR GUI program.
To print any document file:
-
Type lpr <file_name> from the Linux shell command line and press Enter. The window appears.
When you type only lpr and press , the window appears first. Just select any files you want to print and click .
-
In the window, select your machine from the list, and change the print job properties.
-
Click to start printing.
Using the window provided by the , you can change the various properties for your machine as a printer.
-
Open the .
If necessary, switch to .
-
Select your machine on the available printers list and click .
-
The window appears.

The following five tabs display at the top of the window:
-
: This option allows you to change the printer location and name. The name entered in this tab displays on the printer list in .
-
: This option allows you to view or select another port. If you change the machine port from USB to parallel or vice versa while in use, you must re-configure the machine port in this tab.
-
: This option allows you to view or select another machine driver. By clicking , you can set the default device options.
-
: This option shows the list of print jobs. Click to cancel the selected job and select the check box to see previous jobs on the job list.
-
: This option shows the class that your machine is in. Click to add your machine to a specific class or click to remove the machine from the selected class.
-
-
Click to apply the changes and close the window.
Proceeding the print job
After installing the printer, choose any of the image, text, PS or HPGL files to print.
-
Execute “” command.
For example, you are printing “”
document1
This will open the UNIX Printer Driver in which the user can select various print options.
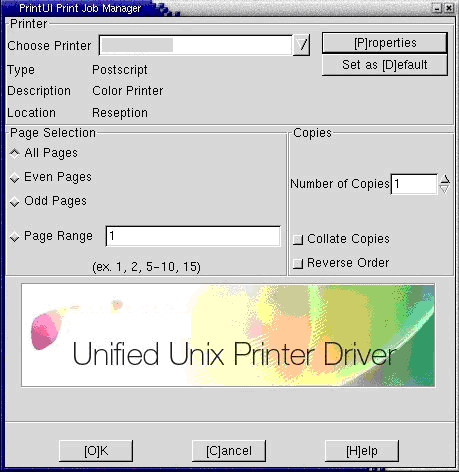
-
Select a printer which has been already added.
-
Select the printing options from the window such as .
-
Select how many copies needed in .
To take advantage of the printer features provided by your printer driver, press . (see Changing the printer settings.)
-
Press to start the print job.
Changing the printer settings
The UNIX Printer Driver in which the user can select various print options in printer .
The following hot keys may also be used: “H” for , “O” for and “A” for and “C” for .
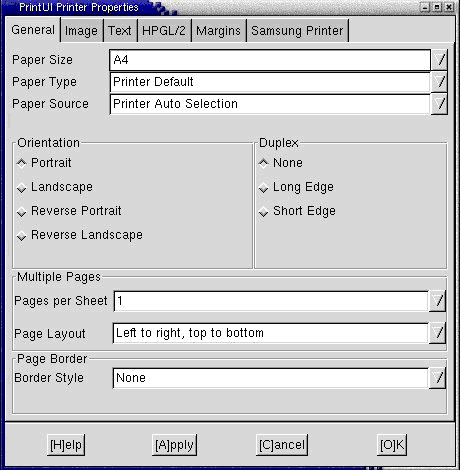
tab
-
: Set the paper size as A4, Letter or other paper sizes, according to your requirements.
-
: Choose the type of the paper. Options available in the list box are , , and .
-
: Select the source of the page. By default, it is .
-
: Select the direction in which information is printed on a page.
-
: Print on both sides of paper to save paper.
-
: Print several pages on one side of paper.
-
: Choose any of the border styles (e.g.: , )
tab
In this tab, you can change the brightness, resolution or an image position of your document.
tab
Set the character margin, line space or the columns of the actual print output.
tab
-
: To print all graphics in black.
-
: Fit the entire graphic into a single page.
-
: Change value to increase the thickness of pen lines. By default, it is 1000.
tab
-
: Set the margins for the document. By default, margins are not enabled. The user can change the margin settings by changing the values in the respective fields. Set by default, these values depend on the page size selected.
-
: Change the units to points, inches or centimeters.
tab
Select various options in the and frames to customize various settings. These options are specific to the printer and depend on the PPD file.