Document box
This guide gives you information on .
You can store documents sent from computers or scanned images in the . The is located on your machine’s hard disk drive (HDD). It means the documents are stored on the HDD. You can create a password for a certain document box, so unauthorized users cannot access it. Also, you can print stored documents by using a variety of printing features and send the documents to several destination such as email, server or fax. You can set a document box and use document box feature with SyncThru™ Web Service (see Using the box with SyncThru™ Web Service ).
![[Note]](../common/note.png)
|
|
|
If important data is stored in the , we recommend you to backup the data regulary. Samsung disclaims all responsibility for damage or loss of data caused by misuse or failure of the machine. |
To use the feature, press on the display screen.
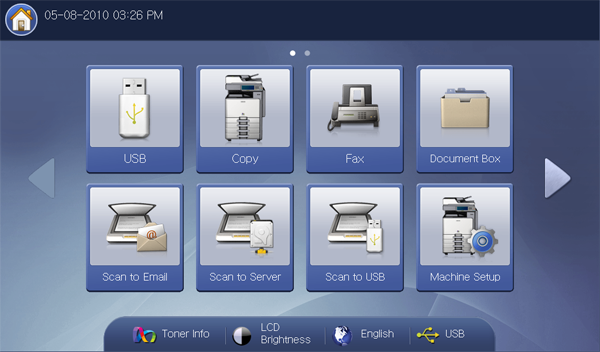
allows you to store the scanned data on HDD(your machine's hard disk drive) in your machine. The stored data can be sent to different destinations like , , , , or .
-
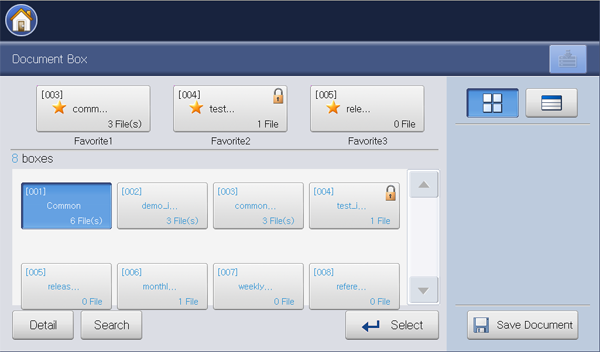
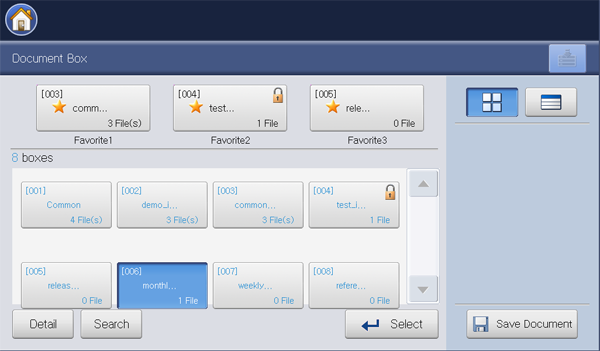
Favorite box list: Displays three favorite boxes you set.
-
Box display area: Displays all boxes. You can select a box in this area.
-
: Displays information of selected box in detail.
-
: Allows you to search a box or stored data.
-
: Enters the selected box. If you select and set a password when you make a new document box, enter the password when the window appears.
-
: Saves documents on HDD in your machine (see Saving documents).
-
 This button allows you to move to , , , etc. Press this button and select
the menu you want to move to.
This button allows you to move to , , , etc. Press this button and select
the menu you want to move to. -
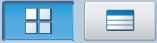 You can choose the layout for viewing the boxes from the box
or list.
You can choose the layout for viewing the boxes from the box
or list.
To use , you need to create a new box first in the > > . You can also edit or delete the created boxes.
|
|
|
|
-
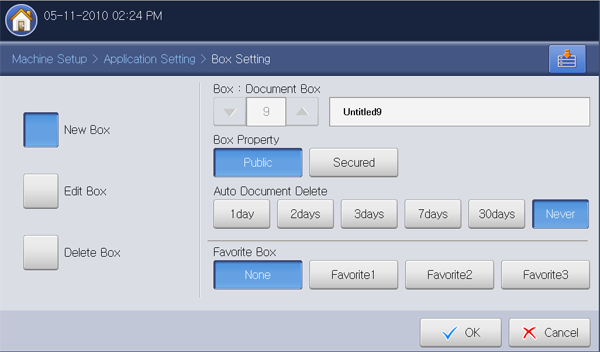
: Creates a new box.
-
: Edits a created box.
-
: Deletes a created box.
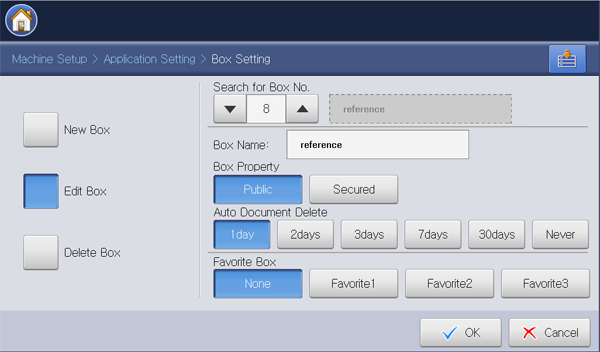
You can create a new box to store your scanned data.
-
Press > > > from the display screen.
-
Press the box name input area. Then the pop-up keyboard appears.
Enter the box name. Then press .
-
Box number is automatically filled with the first free number.
-
If you do not enter the box name, the machine assigns the box name as 'xxx'. The 'xxx' number is the box number.
-
-
Press an appropriate option in .
-
: All users scan use the box.
-
: Set up the password to prevent unauthorized persons from accessing.
-
-
Press the appropriate option in .
![[Warning]](../common/warning.png)
After deleting files, the files cannot be restored.
-
~ : Set up the period for which stored data are in the box. After the period, the stored data get automatically deleted.
-
: Do not delete the stored data.
-
-
Press the option, if necessary.
If you set , and , your machine displays them in .
You can set only three favorite boxes. If all favorite boxes were selected, a warning message appears.
-
Press from the display screen.
You can change the settings of a created box.
|
|
|
|
Only the setting can be edited in the box. |
-
Press > > > from the display screen.
-
Select the box number you want to edit using the up/down arrows.
-
Press the input area. Then the pop-up keyboard appears.
Enter the box name. Then press .
-
Press the appropriate option in .
-
: All users can use the box.
-
: Set up the password to prevent unauthorized person from accessing.
-
-
Press an appropriate option in .
After deleting files, the files cannot be restored.
-
~ : Set up the period for which stored data are in the box. After the period, the stored data get automatically deleted.
-
: It is set not to delete the stored data.
-
-
Press the option, if necessary.
If you press a favorite box already assigned, the warning message appears. If you want to change the favorite box to the box you are editing, press .
-
Press from the display screen.
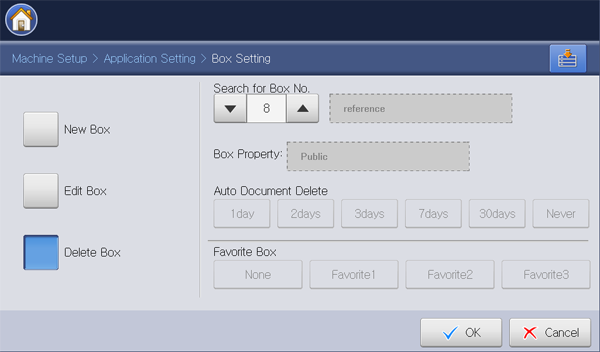
You can delete a created box.
|
|
|
|
The box cannot be deleted even by administrator. |
-
Press > > > from the display screen.
-
Select the box number you want to delete using the up/down arrows. You can select the box directly using the button.
-
Press from the display screen.
-
Press when the confirmation window appears.
This machine allows you to store the scanned data on HDD using the feature in , , , or mode.
-
: See Saving documents.
-
, or : See Saving documents.
-
: See Saving documents.
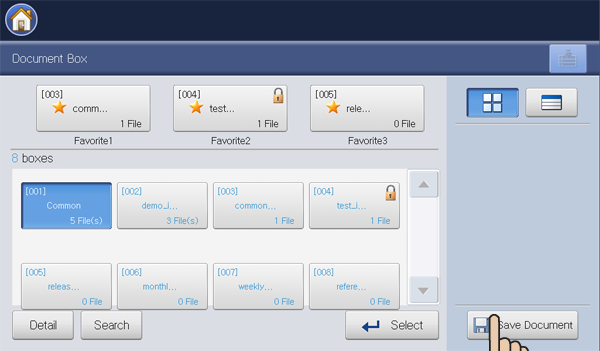
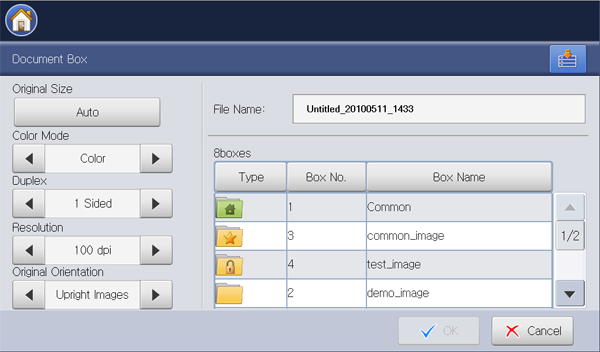
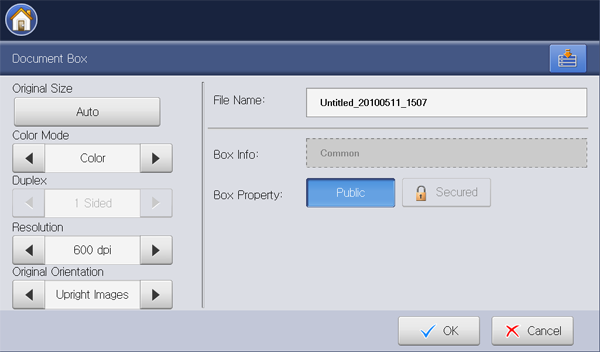
You can also store the scanned data directly in .
-
Place the originals face up in the DADF, or place a single original face down on the scanner glass and close the DADF (see Loading originals).
-
Press > from the display screen..
-
Set the appropriate option using the left/right arrows.
-
: Selects the actual paper size of the originals.
-
: Selects the color options of scanned data.
-
: Selects whether the machine scans one side of the original or both sides of the original .
-
: Selects scanning resolution value.
-
: Selects the orientation of the originals.
-
-
Press input area. Then the pop-up keyboard appears.
Enter the file name you want. Press .
-
Select a destination box where you want to store the scanned data.
-
Press to scan and store the scanned data.
-
To cancel the current scan job, press on the control panel. Or you can delete current and pending jobs using on the control panel. Select the job you want to cancel and press (see button).
-
If an original is placed on the scanner glass, the machine shows the window asking if you want to place another page. Load another original and press . When you finish, press on this window.
-
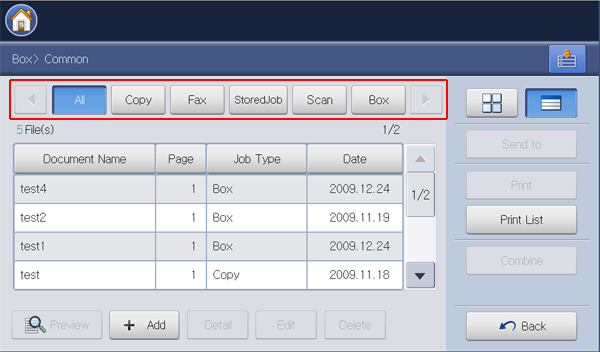
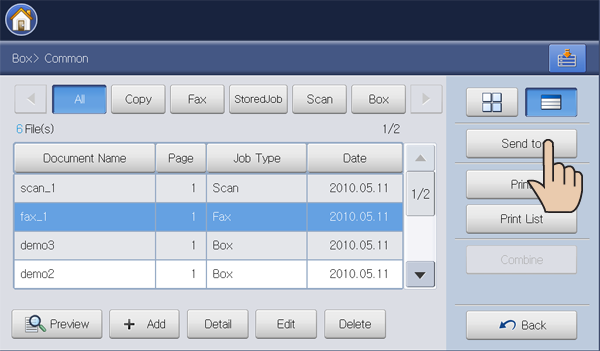
Press > Select a box you want to enter > from the display screen.
-
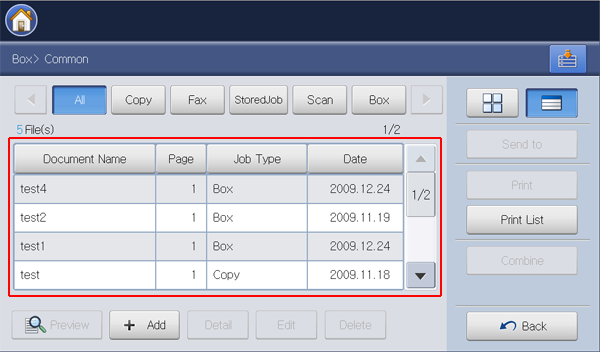
Job type list: Displays the job types. You can select a job type, if necessary.
-
Stored data list: Displays all stored data. You can select a stored data in this area.
-
Preview: Displays the preview image. This button can activate only when a stored data is selected (see Previewing the stored data).
-
+Add: Stores a new scanned data (see Adding scanned data).
-
: Displays detailed information of the selected out of stored data (see Viewing detail information).
-
: Changes the name and file property of the selected stored data (see Editing stored data).
-
: Deletes the selected out of stored data (see Deleting stored data).
-
: Sends the selected out of stored data to specific destination (see Sending stored data).
-
: Prints the selected out of stored data (see Printing stored data).
-
: Prints the list of stored data on the document box selected (see Printing information of stored data).
-
: Combines two or more stored data as one single data (see Combining stored data).
-
This button allows you to move to , , , etc. Press this button and select
a menu you want to move.
-
You can choose the layout for viewing the stored data from
thumbnail or list.
This machine allows you to print the stored data on HDD. You can also send the stored data to specific destinations using , , , or , or combine two or more stored data as one single file.
Selecting the job type
When you select and enter a box, you can see the job type list above the stored data list. The default value of job type list is . If you select a job type in the job type list, selected job types get sorted out in the stored data list.
-
Press > Select a box you want to enter > from the display screen.
-
Press a job type you want to sort.
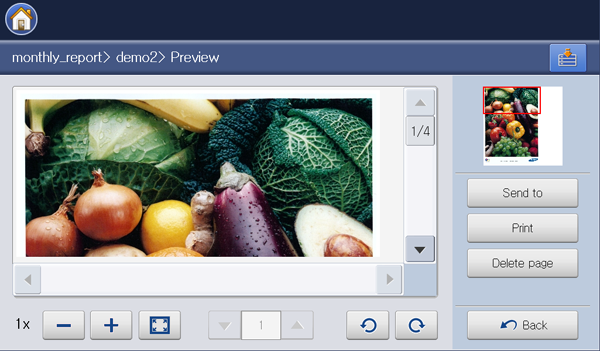
Previewing the stored data
You can preview the stored data using . This feature has many handy functions for preview.
-
Press > Select a box you want to enter > from the display screen.
-
Select a stored data from the stored data list and press .
-
Press the appropriate option for preview, if necessary.
Tools
Function

Reduces the previewed image by 2 times or 4 times. You can view the reduced image.

Magnifies the previewed image by 2 times or 4 times. You can view the desired portion of the enlarged image.

Fits the previewed image on the preview screen.
If the selected stored data contains mutiple pages, press the left/right arrow for previewing the another pages.

Rotates the previewed image 90 degrees counterclockwise or clockwise.
Sends the previewed data to specific destination (see Sending stored data).
Prints the whole pages which is previewed.
Deletes the previewed page from the selected out of stored data. If the stored data has only one page, the stored data will be deleted.
Returns to the previous page.
You can store a new scanned data direcly from the selected box.
-
Place the originals face up in the DADF, or place a single original face down on the scanner glass and close the DADF (see Loading originals).
-
Press > Select a box you want to enter > from the display screen.
-
Press .

-
Set the appropriate option using the left/right arrows.
-
: Selects the actual paper size of the originals.
-
: Selects the color options of scanned data.
-
: Selects whether the machine scans one side of the original or both sides of the original .
-
: Selects scanning resolution value.
-
: Selects the orientation of the originals.
-
-
Press input area. Then the pop-up keyboard appears.
Enter the file name you want. Then press .
-
Press to scan and store the scanned data.
-
To cancel the current scan job, press on the control panel. Or you can delete current and pending jobs using on the control panel. Select the job you want to cancel and press (see button).
-
If an original is placed on the scanner glass, the machine shows the window asking if you want to place another page. Load another original and press . When you finish, press on this window.
-
Viewing detail information
You can see the detailed information of the selected out of stored data. You can also change the name and file property of the selected stored data pressing .
-
Press > Select the box you want to enter > from the display screen.
-
Press the stored data for which you want detailed information, and press .
-
The window appears. Check the detailed information.
If you want to change the name, press .
-
Press .
Editing stored data
You can change the name of the selected stored data
-
Press > Select the box you want to enter > from the display screen.
-
Press the stored data you want to edit. Press .
-
The window appears.
-
Press input area. The pop-up keyboard appears.
Enter the file name you want. Press .
Deleting stored data
You can delete the selected stored data.
-
Press > Select the box you want to enter > from the display screen.
-
Press the stored data you want to delete. Press .
-
Press when the confirmation window appears.
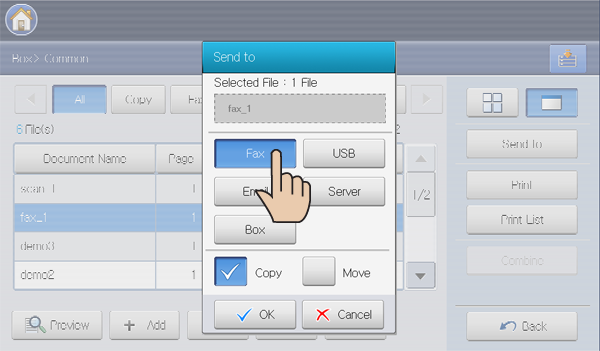
Sending stored data
You can send the stored data to specific destination using , , , , or .
|
|
|
|
-
Press > Select the box you want to enter > from the display screen.
-
Press the stored data you want to send. Press .
-
Press , and then press .
-
: The stored data is kept in the box.
-
: The machine deletes the stored data after sending.
-
-
When the cursor is blinking in the input line, enter the fax number using the numeric keypad on the control panel, or use from the display screen, if you have stored frequently used fax numbers.
-
Press on the control panel. The machine starts to send a fax to destinations.
|
|
|
|
While the machine is sending a fax, you cannot send an email at the same time. |
|
|
|
|
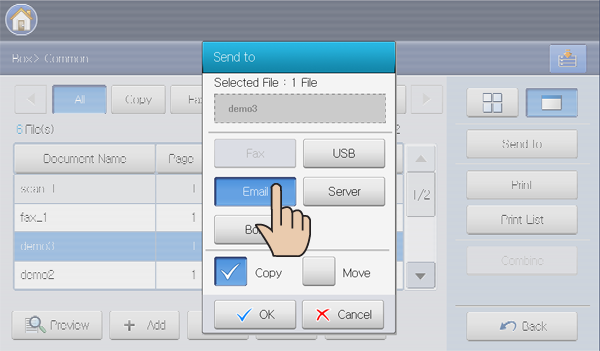
When you send stored data to email, you can only send data which the is , or . |
-
Press > Select the box you want to enter > from the display screen.
-
Press the stored data you want to send. Press .
-
Press , and then press .
-
: The stored data is kept in the box.
-
: The machine deletes the stored data after sending.
-
-
Enter the each item using the pop-up keyboard (see Entering email addresses by the address book or Entering email addresses by the pop-up keyboard).
If you already configured the , and input area in > > , you can see the sender's email address, subject, and message.
-
Select the file format of the stored data by pressing the left/right arrows from .
-
Press the button to send the stored data.
|
|
|
|
While the machine is sending an email, you cannot use the machine to copy or to send a fax. |
|
|
|
|
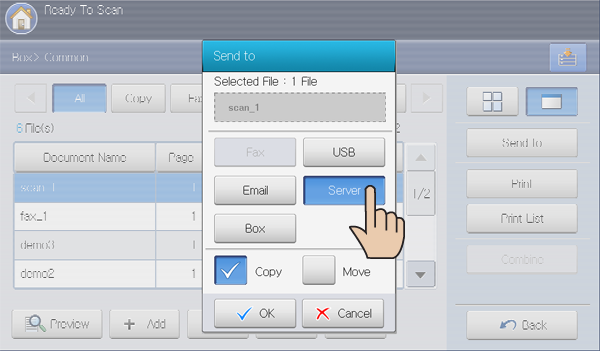
When you send stored data to server, you can only send data which the is , or . |
-
Press > Select a box you want to enter > from the display screen.
-
Press a stored data you want to send, and press .
-
Press , and then press .
-
: The stored data is kept in the box.
-
: The machine deletes the stored data after sending.
-
-
Press the server name’s input area. Press to enter recipient’s server address manually (see Entering server addresses manually).
Or you can use to enter the addresses easily (see Entering server addresses from the address book).
-
Select the file format of the stored data pressing the left/right arrows from .
-
Press the button to send the stored data.
|
|
|
|
While the machine is sending a stored data, you cannot use the machine to copy or to send a fax. |
-
Press > Select the box you want to enter > from the display screen.
-
Press the stored data you want to send. Press .
-
Press , and then press .
-
: The stored data is kept in the box.
-
: The machine deletes the stored data after sending.
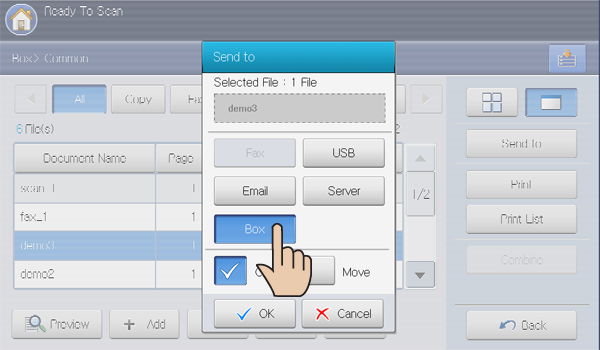
-
-
Press the destination box to where the stored data will be sent.
-
Press to send the stored data.
|
|
|
|
When you send stored data to server, you can only send data which the is , or . |
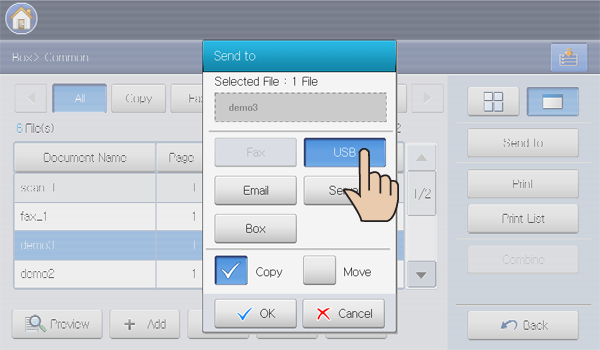
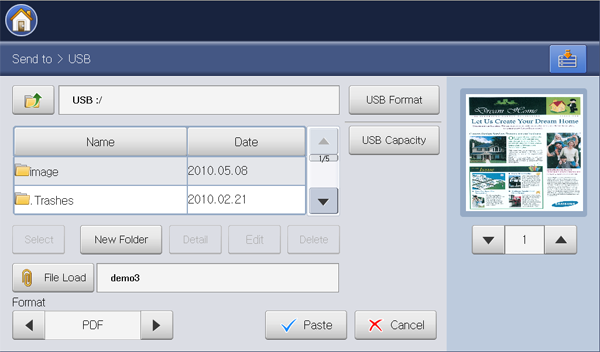
This feature is available only when the USB memory device is connected to the machine.
-
Press > Select the box you want to enter > from the display screen.
-
Press the stored data you want to send, and press .
-
Press . Press .
-
: The stored data is kept in the box.
-
: The machine deletes the stored data after sending.
-
-
Select the folder where the scanned image will be stored. If you do not select a folder, scan image is stored in root.
-
If you want to store the sent data in a new folder, make a new folder in the USB memory using .
-
You can format the USB memory device using .
-
You can check the status of the USB memory device using .
-
-
Select the file format of the stored data by pressing the left/right arrows from .
-
Press to send the stored data.
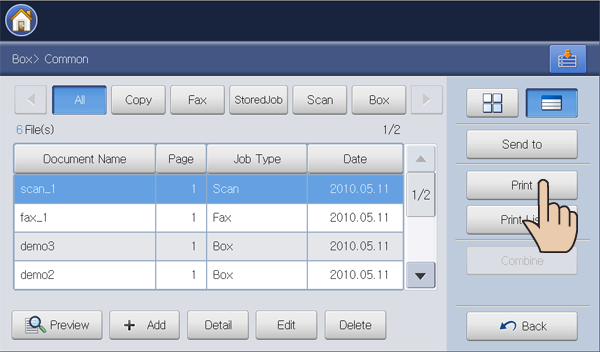
Printing stored data
You can print the selected stored data.
-
Press > Select the box you want to enter > from the display screen.
-
Press the stored data you want to print. Press .
-
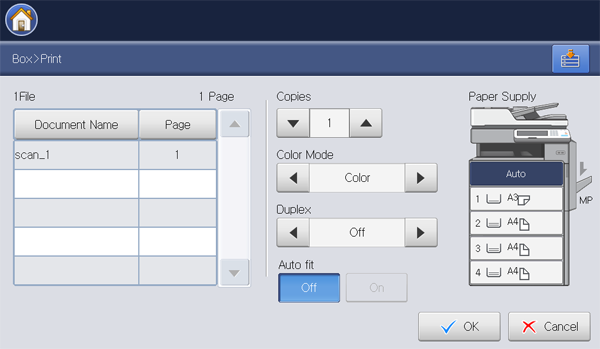
Press the appropriate option.
-
: Selects the number of copies.
-
: Selects the color mode of copies.
-
: Selects the machine to print copies on both sides of the paper.
-
: Sets the auto fit option. This machine reduces or enlarges the original based on the size of the output paper.
-
: Sets a tray that contains the paper to be printed.
-
-
Press to begin printing.
Printing information of stored data
You can print information of the selected document box.
-
Press > Select the box you want to enter > from the display screen.
-
Press .
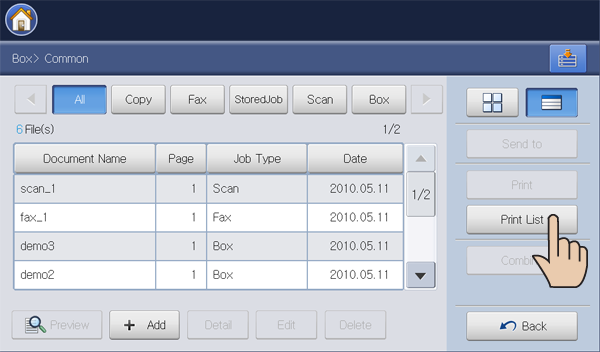
General information and stored data of the selected document box gets printed out.
|
|
|
|
If you select a job type, the printout shows the document list of the selected job type. For example, you select , the printout shows the document list of job. 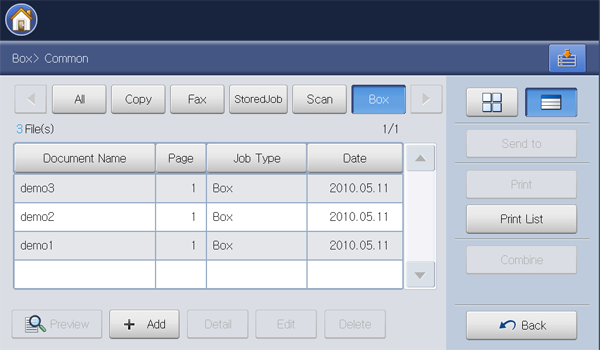
|
Combining stored data
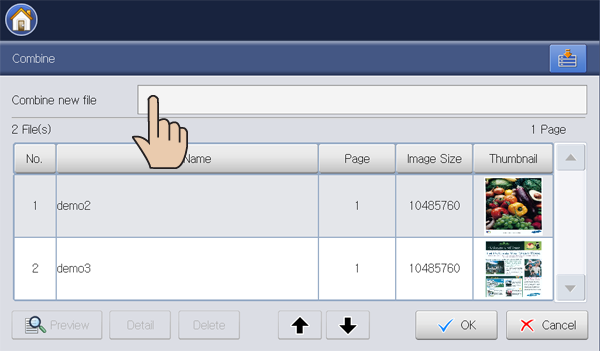
You can combine two or more stored data as one file.
-
Press > Select the box you want to enter > from the display screen.
-
Press two or more stored data you want to combine, and press .
You can use this feature if the job types of the selected documents are the same. If is inactivated when you select documents, make sure that job types are the same.

-
Press the input area. Then the pop-up keyboard appears.
Enter the box name. Then press .
-
Press .
|
|
|
|
If important data is stored in the , we recommend you to backup the data regulary. Samsung disclaims all responsibility for damage or loss of data caused by misuse or failure of the machine. |
You can store documents sent from computers or scanned images in the . You can create a password for a certain document box, so unauthorized users cannot access it. Also, you can print stored documents by using a variety of printing features and send the documents to several destinations such as email, server or fax. Only users registered in the machine can use through login SyncThru™ Web Service.
To use , you need to create a new document box first in the . You can also edit or delete the created document boxes.
|
|
|
|
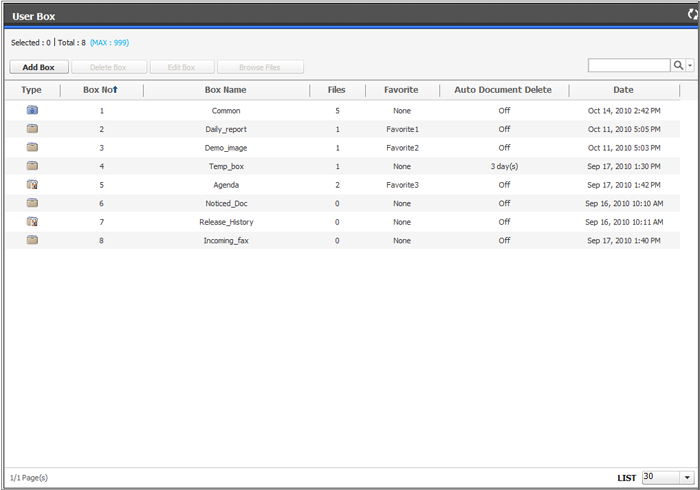
-
: Creates a new document box.
-
: Deletes a created document box.
-
: Edits a created document box.
-
: Enter the selected document box. If you select and set a password when you make a new document box, enter the password when the window appears.
You can create a new box in which store your scanned data.
-
Turn your networked computer on and open the web browser.
-
Enter your machine’s IP address as the URL in a browser.
(Example, http://123.123.123.123)
-
Press or click to access the SyncThru™ Web Service shows.
If necessary, you can change the language in the upper right corner of the SyncThru™ Web Service.
-
Click . The window appears.
-
Enter the ID and password. Select a domain as you log-in to the machine.
-
Click .
If you do not use the SyncThru™ Web Service for five minutes, you will be automatically logged out.
-
Click .
-
Click . The window appears.
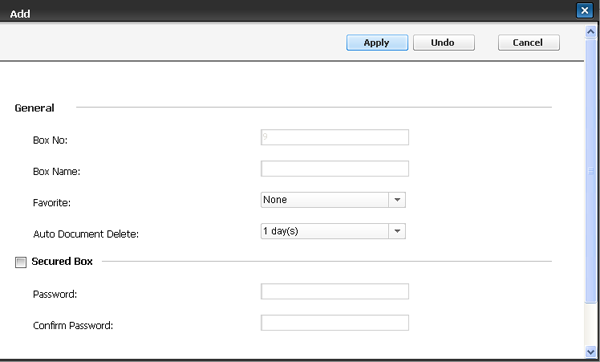
-
Enter the box name to be added.
is automatically filled with the first free number.
-
Select the option if necessary.
If you set , , and , your machine displays them in .
You can set only three favorite boxes. If all favorite boxes were selected, a warning message appears.
-
Select the option.
After deleting files, the files cannot be restored.
-
~ : Set up the period for which stored data is kept in the box. After the period, the stored data will be automatically deleted.
-
: The stored data will not be deleted.
-
-
Check to prevent unauthorized person from accessing. Enter the password and re-enter the password.
If you do not want to use the option, skip this step. Any user can access the created document box.
-
Click .
Press to delete the information you entered. If you press , the window is closed.
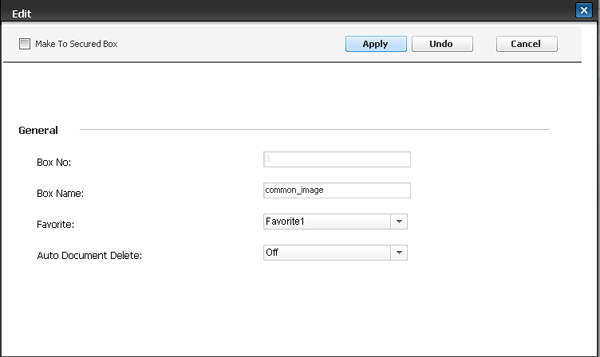
You can change the settings of a created box.
|
|
|
|
Only the setting can be edited in the box. |
-
Turn your networked computer on and open the web browser.
-
Enter your machine’s IP address as the URL in a browser.
(Example, http://123.123.123.123)
-
Press or click to access the SyncThru™ Web Service shows.
If necessary, you can change the language in the upper right corner of the SyncThru™ Web Service.
-
Click . The window appears.
-
Enter the ID and password. Select a domain as you log in the machine.
-
Click .
If you do not use the SyncThru™ Web Service for five minutes, you will be automatically logged out.
-
Click .
-
Select the box you want to edit.
-
Click . The window appears.
-
Change the box settings.
-
Click .
Press to delete the information you entered. If you press , the window is closed.
You can delete a created box.
|
|
|
|
The box cannot be deleted- not even by an administrator. |
-
Turn your networked computer on and open the web browser.
-
Enter your machine’s IP address as the URL in a browser.
(Example, http://123.123.123.123)
-
Press or click to access the SyncThru™ Web Service shows.
If necessary, you can change the language in the upper right corner of the SyncThru™ Web Service.
-
Click . The window appears.
-
Enter the ID and password. Select a domain as you log-in to the machine.
-
Click .
If you do not use the SyncThru™ Web Service for five minutes, you will automatically be logged out.
-
Click .
-
Select the box you want to delete.
-
Click .
Click when the confirmation window appears.
Searching a document box
-
Turn your networked computer on and open the web browser.
-
Enter your machine’s IP address as the URL in a browser.
(Example, http://123.123.123.123)
-
Press or click to access the SyncThru™ Web Service shows.
If necessary, you can change the language in the upper right corner of the SyncThru™ Web Service.
-
Click . The window appears.
-
Enter the ID and password. Select a domain as you log in the machine.
-
Click .
If you do not use the SyncThru™ Web Service for five minutes, you will automatically be logged out
-
Click .
-
Enter the document box name you want to search in the search input area.
-
Click
 . The
search result appears.
. The
search result appears.
Using a document box
-
Turn your networked computer on and open the web browser.
-
Enter your machine’s IP address as the URL in a browser.
(Example, http://123.123.123.123)
-
Press or click to access the SyncThru™ Web Service shows.
If necessary, you can change the language in the upper right corner of the SyncThru™ Web Service.
-
Click . The window appears.
-
Enter the ID and password. Select a domain as you log in the machine.
-
Click .
If you do not use the SyncThru™ Web Service for five minutes, you will automatically be logged out.
-
Click .
-
Select the box you want to enter.
-
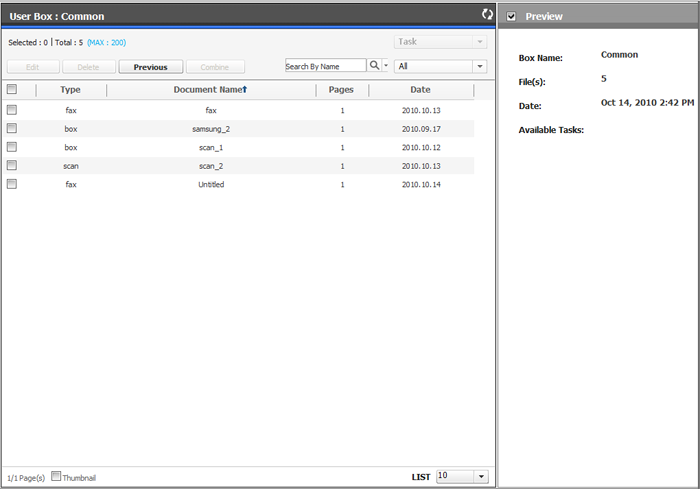
Click . Then stored data list appears.
-
: You can change the name of the selected document which is stored.
-
: You can delete the stored document selected. If you check the column header’s check box, all documents are checked.
-
: You can return to the previous page.
-
: You can combine two or more stored data as one file.
-
 You can search for a document that is currently stored in
the box.
You can search for a document that is currently stored in
the box. -
 You can select a job type in the job type list. Selected
job types get sorted out in the stored data list.
You can select a job type in the job type list. Selected
job types get sorted out in the stored data list. -
: If you check , you can see the thumbnail of stored documents.
-
: You can set the number of documents in the list. So, you can see as many as documents as the selected number in the .
-
: If you check the box, you can preview the image of the selected data in the list. You can also use and directly. Click
 () or
() or  ().
(). -
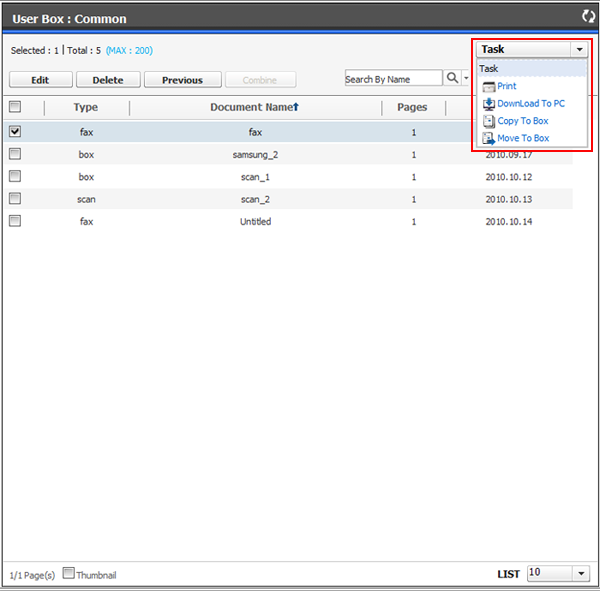
: You can use many convenient functions for stored data.
-
: You can print the selected stored data (see Printig stored data).
-
: You can copy the stored data to a specific box. The stored data is kept in the box (see Copying stored data).
-
: You can move the stored data to a specific box. The machine deletes the stored data after moving (see Moving stored data).
-
: You can download a stored document to your networked computer (see Downloading a document to your computer).
-
-
Printig stored data
You can print a stored document.
-
Turn your networked computer on and open the web browser.
-
Enter your machine’s IP address as the URL in a browser.
(Example, http://123.123.123.123)
-
Press or click to access the SyncThru™ Web Service shows.
If necessary, you can change the language in the upper right corner of the SyncThru™ Web Service.
-
Click . The window appears.
-
Enter the ID and password. Select a domain as you log in to the machine.
-
Click .
If you do not use SyncThru™ Web Service for five minutes, you will automatically be logged out
-
Click .
-
Select the box which has the document you want to print. Then click .
-
Select the the stored data you want to print. Then click . The window appears.
-
Set the appropriate printing options.
-
Click to begin printing.
Copying stored data
You can copy a stored document to a specific box.
-
Turn your networked computer on and open the web browser.
-
Enter your machine’s IP address as the URL in a browser.
(Example, http://123.123.123.123)
-
Press or click to access the SyncThru™ Web Service shows.
If necessary, you can change the language in the upper right corner of the SyncThru™ Web Service.
-
Click . The window appears.
-
Enter the ID and password. Select a domain as you log in to the machine.
-
Click .
If you do not use the SyncThru™ Web Service for five minutes, you will automatically be logged out
-
Click .
-
Select the box which has the document you want to copy. Then click .
-
Select the document you want to copy. Then click . The window appears.
-
Select the box where the copied document will be stored.
-
Click to begin copying.
Moving stored data
You can move a stored document to a specific box.
-
Turn your networked computer on and open the web browser.
-
Enter your machine’s IP address as the URL in a browser.
(Example, http://123.123.123.123)
-
Press or click to access the SyncThru™ Web Service shows.
If necessary, you can change the language in the upper right corner of the SyncThru™ Web Service.
-
Click . The window appears.
-
Enter the ID and password. Select a domain as you log in to the machine.
-
Click .
If you do not use SyncThru™ Web Service for five minutes, you will automatically be logged out
-
Click .
-
Select the box which has the document you want to move. Then click .
-
Select the document you want to move. Then click . The window appears.
-
Select the box where the moved document will be stored.
-
Click to begin Moving.
The machine deletes the stored data after moving
Downloading a document to your computer
You can download a stored document to your networked computer.
-
Turn your networked computer on and open the web browser.
-
Enter your machine’s IP address as the URL in a browser.
(Example, http://123.123.123.123)
-
Press or click to access the SyncThru™ Web Service shows.
If necessary, you can change the language in the upper right corner of the SyncThru™ Web Service.
-
Click . The window appears.
-
Enter the ID and password. Select a domain as you log in the machine.
-
Click .
If you do not use SyncThru™ Web Service for five minutes, you will automatically be logged out
-
Click .
-
Select the box that has the document you want to download. Then click .
-
Select the document you want to download. Then click . The window appears.
You cannot use this feature depending on the job type of the selected document. If is inactivated when you select a document, make sure that job type.
-
Click .
-
Select the appropriate option when the pop-up window appears. You can open directly or save the document.