Management tools
This chapter introduces management tools provided to help you make full use of your machine.
Easy Capture Manager
![[Note]](../common/note.png)
|
|
|
Available for Windows OS users only. |
Capture your screen and launch Easy Capture Manager by simply pressing the Print Screen key. Now you can easily print your captured screen as captured or edited.
|
|
|
|
Available for Windows and Mac OS X users only. |
This tool helps you screen-capture, preview, scrap, and print Windows Internet Explorer pages more easily, than when you use an ordinary program. Click > > > > to link to the website where the tool is available for download.
Easy Eco Driver
|
|
|
|
Available for Windows OS users only. |
With the Easy Eco Driver, you can apply Eco features to save paper and toner before printing. To use this application, checkbox in the printer properties should be checked.
Easy Eco Driver also allows you simple editing such as removing images and texts, changing fonts, and more. You can save frequently used settings as a preset.
How to use:
-
Open a document to print.
-
Print the document.
-
Select the options you want to apply to the document.
You can see the preview of the applied features.
-
Click .
Using Samsung Easy Printer Manager
|
|
|
|
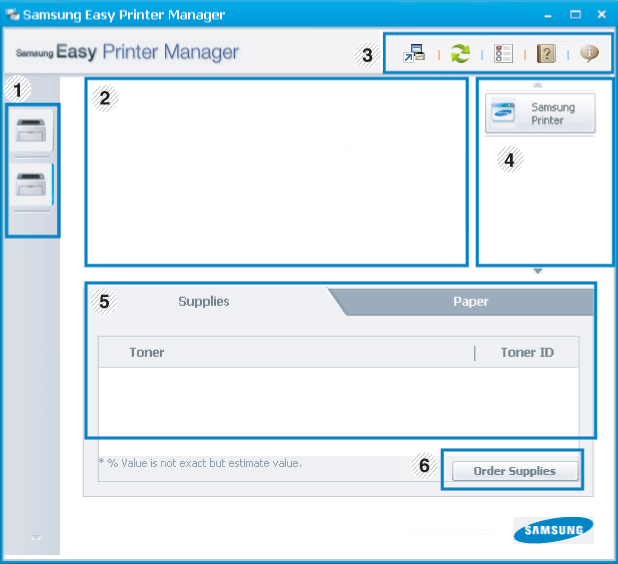
Samsung Easy Printer Manager is an application that combines Samsung machine settings into one location. Samsung Easy Printer Manager combines device settings as well as printing environments, settings/actions, and launching. All of these features provide a gateway to conveniently use your Samsung machine. Samsung Easy Printer Manager provides two different user interfaces for the user to choose from: the basic user interface and the advanced user interface. Switching between the two interfaces is easy: just click a button.
Understanding Samsung Easy Printer Manager
To open the program:
For Windows,
Select > or > > Samsung Easy Printer Manager > Samsung Easy Printer Manager.
For MAC,
Open the folder > folder > .
The Samsung Easy Printer Manager interface is comprised of various basic sections as described in the table that follows:
|
|
|
|
The screenshot may differ depending on operating system you are using. |
|
1 |
Printer list |
The Printer List displays printers installed on your computer and network printers added by network discovery (Windows only). |
|||
|
2 |
Printer information |
This area gives you general information about your machine. You can check information, such as the machine’s model name, IP address (or Port name), and machine status.
|
|||
|
3 |
Application information |
Includes links for changing to the advanced settings, preference, help, and about.
|
|||
|
4 |
Quick links |
Displays to machine specific functions. This section also includes links to applications in the advanced settings.
|
|||
|
5 |
Contents area |
Displays information about the selected machine, remaining toner level, and paper. The information will vary based on the machine selected. Some machines do not have this feature. |
|||
|
6 |
Order supplies |
Click on the button from the supply ordering window. You can order replacement toner cartridge(s) from online. |
|
|
|
|
Select the menu or
click the |
Advanced settings user interface overview
The advanced user interface is intended to be used by the person responsible for managing the network and machines.
|
|
|
|
Some menus may not appear in the display depending on options or models. If so, it is not applicable to your machine. |
You can configure various machine settings such as machine setup, paper, layout, emulation, network, and print information.
This menu includes settings to create or delete scan to PC profiles.
-
: Determines whether or not scanning is enabled on the device.
-
tab: Contains settings related general scan and device settings.
-
tab: Contains settings related to image altering.
This menu includes settings related to the basic fax functionality of the selected device.
-
: If is , incoming faxes will not be received on this device.
-
: Enables faxing on the device and allows more options to be set.
(Windows only)
This menu includes settings related to error alerting.
-
: Provides settings related to when alerts will be received.
-
: Provides options relating to receiving alerts via email.
-
: Provides a history of device and toner related alerts.
Provides querying of quota information of the specified job accounting user. This quota information can be created and applied to devices by job accounting software such as SyncThru™ or CounThru™ admin software.
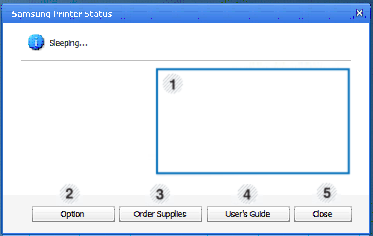
The Samsung Printer Status is a program that monitors and informs you of the machine status.
|
|
|
|
Samsung Printer Status overview
If an error occurs while operating, you can check the error from Samsung Printer Status. Samsung Printer Status is installed automatically when you install the machine software.
You can also launch Samsung Printer Status manually. Go to the , click the tab > button.
These icons appear on the Windows task bar:
|
Icon |
Mean |
Description |
|---|---|---|
|
|
Normal |
The machine is in ready mode and experiencing no errors or warnings. |
|
|
Warning |
The machine is in a state where an error might occur in the future. For example, it might be in toner low status, which may lead to toner empty status. |
|
|
Error |
The machine has at least one error. |
|
1 |
Toner Level |
You can view the level of toner remaining in each toner cartridge. The machine and the number of toner cartridge(s) shown in the above window may differ depending on the machine in use. Some machines do not have this feature. |
|||
|
2 |
|
You can set printing job alert related settings. |
|||
|
3 |
|
You can order replacement toner cartridge(s) from online. |
|||
|
4 |
|
You can view the online User’s Guide.
|
|||
|
5 |
|
Close the window. |
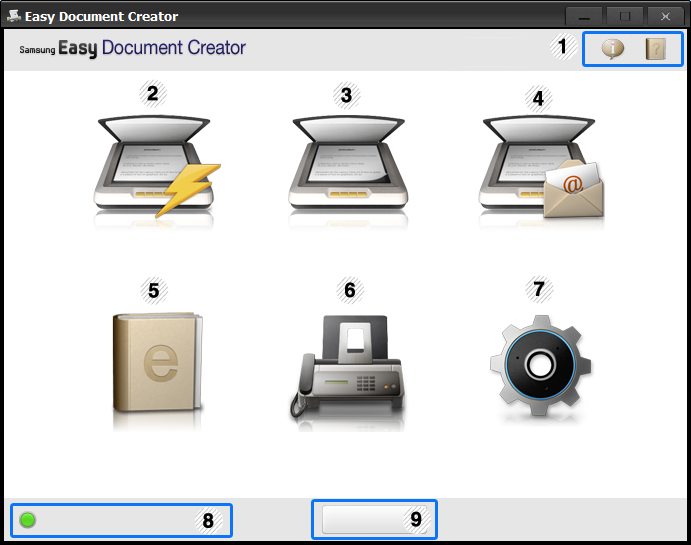
Samsung Easy Document Creator is an application to help users scan, compile, and save documents in multiple formats, including .epub format. These documents can be shared via social networking sites or fax. Whether you’re a student needing to organize research from the library or a stay-at-home mom sharing scanned pictures from last year’s birthday party, Easy Document Creator will provide you with the necessary tools.
|
|
|
|
|
|
|
|
Click the ( |
Understanding Samsung Easy Document Creator
To open the program:
Select > or > > Samsung Easy Document Creator > Samsung Easy Document Creator.
The Samsung Easy Document Creator interface is comprised of various basic sections as described in the table that follows:
|
|
|
|
The screenshot may differ depending on operating system you are using. |
|
1 |
|
Click the information button to see the program’s version information. |
|||
|
|
Click the help button to get the information of any option you want to use. |
||||
|
2 |
|
Automatically scans with the settings provided in Configuration. You can pre-set the options such as image type, document size, resolution, or file type (see Quick Scanning). |
|||
|
3 |
Provides more in-depth options for scanning documents on a one-by-one basis (see Scanning).
|
||||
|
4 |
Provides an easy and quick way to upload files to a variety of social networking sites (SNS). Scan an image directly or select an existing image to upload to Facebook, Flickr, Picasa, Google, or Twitter (see Scanning to a Social Networking Site).
|
||||
|
5 |
Provides the ability to scan multiple documents in as one e-book or convert existing files into an e-book format (.epub file) (see Converting to an E-Book). |
||||
|
6 |
Provides the ability to directly fax a document from Easy Document Creator if the Samsung Network PC Fax driver is installed (see Using a fax in your computer).
|
||||
|
7 |
Provides the options for a and . |
||||
|
8 |
Shows the scanning/faxing device ready to use. |
||||
|
9 |
If you cannot see any device ready to use, click this button to find a device.
|


|
|
|
|
Click the ( |
Using features
-
Place a single document face down on the document glass, or load the documents face up into the document feeder.
-
Click from the home screen.
-
Select the type of scanning or a favorites then click .
-
Make adjustments to the image ( and ).
-
Click to scan a final image or to get another preview image.
-
Select to , , or .
-
Click on (Saving a Scan), ( E-mailing a Scan), or ( Uploading).
|
|
|
|
If there is room on the document glass, more than
one item can be scanned at the same time. Use the |
Configuring Quick Scan
To set up the Quick Scan options:
-
Click from the home screen.
-
Click on to use the default settings, or select your own options.
-
Click to save changes.
Using Quick Scan
-
Place a single document face down on the document glass, or load the documents face up into the document feeder.
-
Click from the home screen.
-
Select a save location for the scanned images.
-
Click to save the image.
|
|
|
|
Click to scan another image with the same settings. |
Scan Directly
-
Place a single document face down on the document glass, or load the documents face up into the document feeder.
-
Click from the home screen.
-
Click > .
-
Click .
Upload Existing File
-
Click from the home screen.
-
Click > .
-
Select the site and click to find the file to upload.
-
Select a social networking site to send the image and click .
-
Follow the instructions in each social networking site.
|
|
|
|
If there are some problems on accessing or uploading to each SNS site due to a network environment issue, it's needed to check security limitations established in your network with network administrator. To guarantee correct functioning of SNS upload in Samsung Easy Document Creator, unrestricted network environment is needed for HTTPS communication. |
Scan Directly
-
Place a single document face down on the document glass, or load the documents face up into the document feeder.
-
Click from the home screen.
-
Click > .
-
Enter a name and author to be used as metatag information for the .epub file, a file name, and select a save location.
-
Click .
Convert Existing Files
-
Click from the home screen.
-
Click > .
-
Click to find the file to convert.
-
Enter a name and author to be used as metatag information for the .epub file, a file name, and select a save location.
-
Click .
Unified Driver Configurator is a tool primarily intended for configuring machine devices. You need to install Unified Linux Driver to use Unified Driver Configurator. Refer to the Administrator’s Guide.
After the driver is installed on your Linux system, the Unified Driver Configurator icon will automatically be created on your desktop.
Opening the Unified Driver Configurator
-
Double-click the on the desktop.
You can also click the Menu icon and select > .
-
Click each button on the left to switch to the corresponding configuration window.
-
Printers Configuration
-
Scanners Configuration
To use the on screen help, click .
-
-
After changing the configurations, click to close the Unified Driver Configurator.
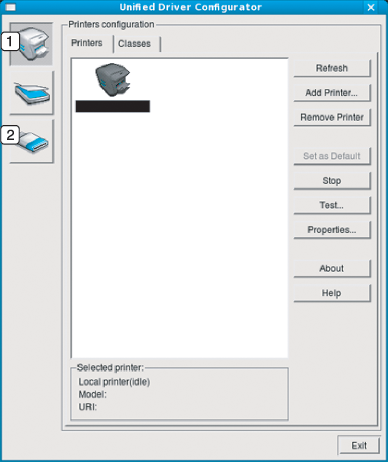
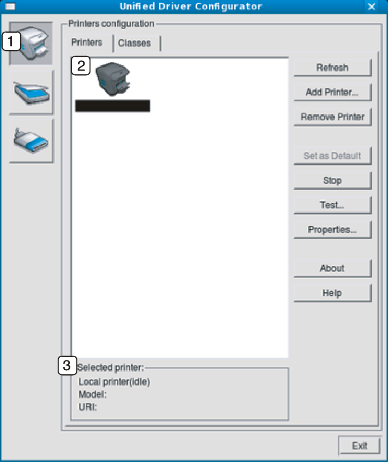
has the two tabs: and .
tab
View the current system’s printer configuration by clicking on the machine icon button on the left side of the Unified Driver Configurator window.
|
1 |
Switches to . |
|
2 |
Shows all of the installed machine. |
|
3 |
Shows the status, model name and URI of your machine. |
The printer control buttons are, as follows:
-
: Renews the available machines list.
-
: Allows you to add a new machine.
-
: Removes the selected machine.
-
: Sets the current selected machine as a default machine.
-
: Stops/starts the machine.
-
: Allows you to print a test page to ensure the machine is working properly.
-
: Allows you to view and change the printer properties.
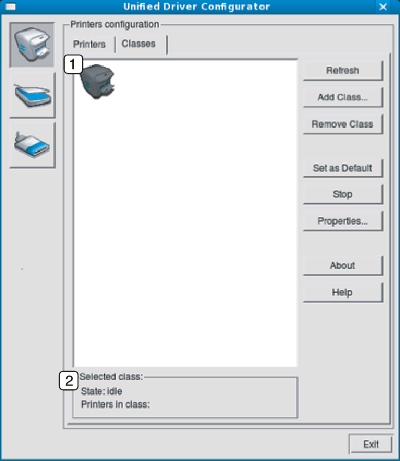
tab
The Classes tab shows a list of available machine classes.
|
1 |
Shows all of the machine classes. |
|
2 |
Shows the status of the class and the number of machines in the class. |
-
: Renews the classes list.
-
: Allows you to add a new machine class.
-
: Removes the selected machine class.
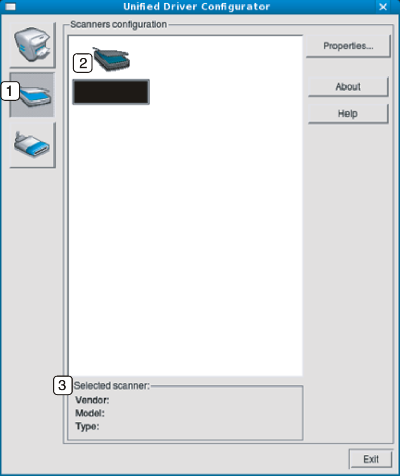
In this window, you can monitor the activity of scanner devices, view a list of installed Samsung machine devices, change device properties, and scan images.
|
1 |
Switches to . |
|
2 |
Shows all of the installed scanners. |
|
3 |
Shows the vendor, model name, and type of your scanner. |
-
: Allows you to change the scan properties and scan a document.
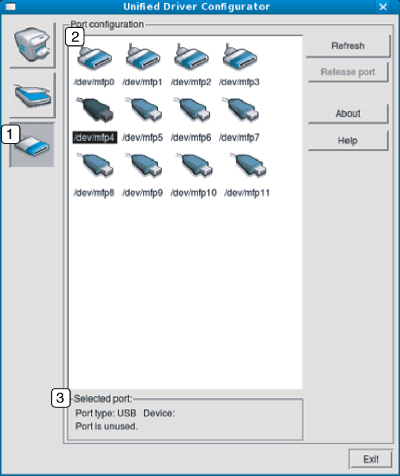
In this window, you can view the list of available ports, check the status of each port, and release a port that is stalled in a busy state when its owner has terminated the job for any reason.
|
1 |
Switches to . |
|
2 |
Shows all of the available ports. |
|
3 |
Shows the port type, device connected to the port, and status |
-
: Renews the available ports list.
-
: Releases the selected port.
Sharing Ports Between Printers and Scanners
Your machine may be connected to a host computer via a parallel port or USB port. Since the machine contains more than one device (printer and scanner), it is necessary to organize proper access of “consumer” applications to these devices via the single I/O port.
The Unified Linux Driver package provides an appropriate port sharing mechanism that is used by Samsung printer and scanner drivers. The drivers talk to their devices via so-called machine ports. The current status of any machine port can be viewed via the . The port sharing prevents you from accessing one functional block of the machine device, while another block is in use.
When you install a new machine onto your system, it is strongly recommended you do this with the assistance of an Unified Driver Configurator. In this case you will be asked to choose I/O port for the new device. This choice will provide the most suitable configuration for machine’s functionality. For machine scanners, I/O ports are being chosen by scanner drivers automatically, so proper settings are applied by default.