Basic printing
|
|
|
|
For special printing features, refer to the Advanced Guide (see Using advanced print features). |
|
|
|
|
If you are a Mac, Linux, or Unix operating systems user, refer to the Advanced Guide (see Mac printing, Linux printing, or Linux printing). |
The following window is for Notepad in Windows 7.
-
Open the document you want to print.
-
Select from the menu.
-
Select your machine from the list.
-
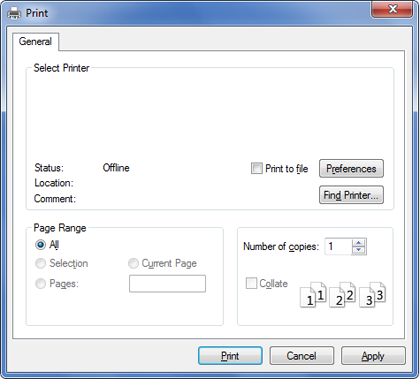
The basic print settings including the number of copies and print range are selected within the window.
![[Note]](../../common/icon_note.png)
To take advantage of the advanced printing features, click or from the window (see Opening printing preferences).
-
To start the print job, click or in the window.
Canceling a print job
If the print job is waiting in the print queue or print spooler, cancel the job as follows:
-
You can access this window by simply double-clicking the machine icon (
 ) in
the Windows task bar.
) in
the Windows task bar. -
You can also cancel the current job by pressing
 () on the control panel.
Opening printing preferences
|
|
|
|
-
Open the document you want to print.
-
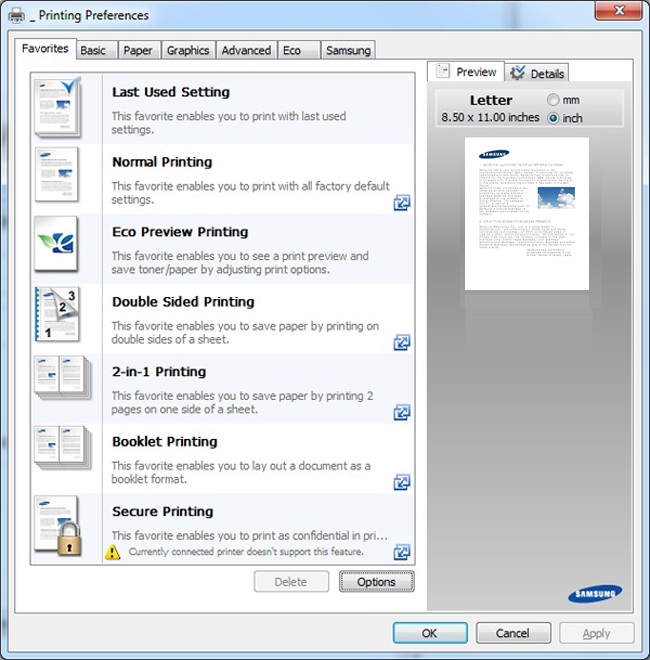
Select from the file menu. The window appears.
-
Select your machine from the .
-
Click or .
The screenshot may differ depending on model.
-
You can apply Eco features to save paper and toner before printing (see Easy Eco Driver).
-
You can check the machine’s current status pressing the button (see Using Samsung Printer Status).
-
The option, which is visible on each preferences tab except for the and tab, allows you to save the current preferences for future use.
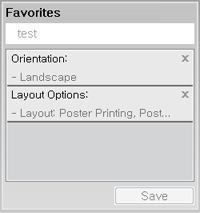
To save a item, follow these steps:
-
Change the settings as needed on each tab.
-
Enter a name for the item in the input box.
-
Click .
-
Enter name and description, and then select the desired icon.
-
Click . When you save , all current driver settings are saved.
|
|
|
|
To use a saved setting, select it in the tab. The machine is now set to print according to the settings you have selected.To delete saved settings, select it in the tab and click . |
The function cuts toner consumption and paper usage. The function allows you to save print resources and lead you to eco-friendly printing.
If you press the Eco button from the control panel, eco mode is enabled. The default setting of Eco mode is duplex (CLP-68x series only), Multiple Pages per Side (2-up), skip blank pages.
|
|
|
|
You can set the machine’s settings by using the in Samsung Easy Printer Manager program. |
Setting Eco mode on the control panel
|
|
|
|
It may be necessary to press to navigate to lower-level menus for some models. |
-
Select
 () > > on the control panel.
 -
Select the option you want and press .
-
: Select this to turn on or off the eco mode.
-
: Set the eco mode off.
-
: Set the eco mode on.
If you set the eco mode on with a password from the SyncThru™ Web Service ( tab > > > ) or Samsung Easy Printer Manager ( > ), the message appears. You have to enter the password to change the eco mode status.
-
-
Follow the settings from Syncthru™ Web Service or Samsung Easy Printer Manager. Before you select this item, you must set the eco function in SyncThru™ Web Service ( tab > > > ) or Samsung Easy Printer Manager ( > ).
-
: The machine is set to mode.
-
: Change any necessary values.
-
-
-
Press to save the selection.
|
|
|
|
To take advantage of the advanced printing features, click or from the window (see Opening printing preferences). |
Open the tab to
set Eco mode. When you see the eco image ( ), that means
the eco mode is currently enabled.
), that means
the eco mode is currently enabled.
Eco options
-
: Follows the settings from the machine's control panel.
-
: Disables Eco mode.
-
: Enables eco mode. Activate the various Eco items you want to use.
-
: If the administrator fixed to enable the Eco mode, you have to enter the password to change the status.
button: You can set from SyncThru™ Web Service ( tab > > > ) or Samsung Easy Printer Manager ( > ), the password button is activated. To change the print settings, click on this button, enter the password or need to contact the administrator.
Result simulator
shows the results of reduced emission of carbon dioxide, used electricity, and the amount of saved paper in accordance with the settings you selected.
-
The results are calculated on the basis that the total number of printed paper is one hundred without a blank page when the Eco mode is disabled.
-
Refers to the calculation coefficient about CO2, energy, and paper from , the index of Ministry of Internal Affairs and Communication of Japan and www.remanufacturing.org.uk. Each model has a different index.
-
The power consumption in printing mode refers to the average printing power consumption of this machine.
-
The actual amount displayed is only an estimate as the actual amount may differ depending on the operating system used, computing performance, application software, connection method, media type [thickness], media size, job complexity, etc.
|
|
|
|
When you use a printing device in an office, school or other public place, you can protect your personal documents or confidential information by using the secure printing feature.
Starting secure printing from the SyncThru™ Web Service
-
Access a web browser, such as Internet Explorer, from Windows.
Enter the machine IP address of your printer (http://xxx.xxx.xxx.xxx) in the address field and press the Enter key or click .
-
Click Login on the upper right of SyncThru™ Web Service website (see Using SyncThru™ Web Service).
-
> > > .
-
Enable .
|
|
|
|
This features may not appear on the display depending on options or models. If so, it is not applicable to your machine. |
Printing secure documents from the control panel
-
Select
() > > on the printer’s control panel. -
Select the document to print.
-
Enter the password that you set from the printer driver.
-
Print or delete the document.