|
|
|
|
|
|
|
|
This feature may not be available depending on model or optional goods (see Variety feature). |
You can scan the originals with your machine via an USB cable or the network. The following methodoloqies can be used for scanning your documents:
-
: Scan the originals from the control panel. Then, the scanned data will be stored in the connected computers folder (see Basic Scanning).
-
TWAIN: TWAIN is the one of a preset imaging applications. Scanning an image launches the selected application, enabling you to control the scanning process. This feature can be used via the local connection or the network connection (see Scanning from image editing program).
-
Samsung Scan Assistant/Samsung Easy Document Creator: You can use this program to scan images or documents.
-
WIA: WIA stands for Windows Images Acquisition. To use this feature, your computer must be connected directly with the machine via an USB cable (see Scanning using the WIA driver).
-
USB Memory: You can scan a document and save the scanned image onto an USB memory device.
-
Email: You can send the scanned image as an email attachment (See Scanning to email).
-
FTP/SMB: You can scan an image and upload it to an FTP/SMB server (see Scanning to FTP/SMB server).
Setting the scan settings in the computer
|
|
|
|
This feature may not be available depending on model or optional goods (see Features by models). |
-
Open Samsung Easy Printer Manager (see Using Samsung Easy Printer Manager ).
-
Select the appropriate machine from the .
-
Select menu.
-
Select the option you want.
-
: Determines whether or not scanning is enabled on the device.
-
tab: Contains settings related to general scan and device settings.
-
tab: Contains settings related to image altering.
-
-
Press > .
|
|
|
|
The machine that does not support the network interface, it will not be able to use this feature (see Rear view). |
Make sure the printer driver is installed on your computer using the software CD, since the printer driver includes the scan program (see Installing the driver locally).
-
Place a single document face down on the document glass, or load the documents face up into the document feeder (see Loading originals).
-
Select
 () > > on the control panel.
Or select > on the touch screen.
![[Note]](../../common/icon_note.png)
If you see message, check the port connection.
-
Select your registered computer , and enter the if necessary.
-
is the same ID as the registered scan ID for Samsung Easy Printer Manager >
 Switch
to advanced mode > .
Switch
to advanced mode > . -
is the 4 digit number registered password for Samsung Easy Printer Manager >
Switch
to advanced mode > .
-
-
Select the option you want and press .
-
Scanning begins.
Scanned image is saved in computer’s C:\\users name\. The saved folder may differ, depending on your operating system or the application you are using.
|
|
|
|
This feature may not be available depending on model or optional goods (see Features by models). |
Setting up an email account
-
Access the SyncThru™ Web Service (see Using SyncThru™ Web Service).
-
Select > and .
-
Enter the IP address in dotted decimal notation or as a host name.
-
Enter the server port number, from 1 to 65535.
-
Check the box next to to require authentication.
-
Enter the SMTP server login name and password.
-
Press .
-
If the authentication method of SMTP server is POP3 before SMTP, put a check mark of .
-
Enter the IP address and port number.
-
Scanning and sending an email
-
Place a single document face down on the document glass, or load the documents face up into the document feeder (see Loading originals).
-
Select
(scan) > on the control panel.Or select > on the touch screen.
-
Enter the login name and password if you configured on SyncThru™ Web Service (see Using SyncThru™ Web Service).
-
Enter the sender’s and recipient’s email address.
You can send an email to yourself by activating the option in the > > on SyncThru™ Web Service.
-
Enter an email subject and press .
-
Select the file format to scan, and press .
-
Enter the SMTP server login name and password.
-
The machine begins scanning and then sends the email.
|
|
|
|
This feature may not be available depending on model or optional goods (see Features by models). |
Setting up an FTP/SMB server
-
Access the SyncThru™ Web Service (see Using SyncThru™ Web Service).
-
Select > > .
-
Check the box next to or .
-
Enter the IP address in dotted decimal notation or as a host name.
-
Enter the server port number, from 1 to 65535.
-
Check the box next to , then the server permits the access of unauthorized people.
-
Enter the login name and password.
-
Enter the domain name if your server is joined to the certain domain, otherwise just enter your computer name which is registered to the SMB server.
-
Enter the path for saving the scanned image.
-
The folder to save the scanned image must be on the root.
-
The folder properties need to be setup as a share.
-
Your user name should have the rights to read and write the folder.
-
-
Press .
Scanning and sending to FTP/SMB server
-
Make sure that your machine is connected to a network.
-
Place a single document face down on the document glass, or load the documents face up into the document feeder (see Loading originals).
-
Select
(scan) > or on the control panel.Or select > or on the touch screen.
-
Select a server and scan format you want.
-
The machine begins scanning and then sends the scanned image to the specified server.
You can scan and import documents at the image editing software such as Adobe Photoshop, if the software is TWAIN-compliant. Follow the steps below to scan with TWAIN-compliant software:
-
Make sure that the machine is connected to your computer and powered on.
-
Place a single document face down on the document glass, or load the documents face up into the document feeder (see Loading originals).
-
Open an application, such as Adobe Photoshop.
-
Click > , and select the scanner device.
-
Set the scan options.
-
Scan and save your scanned image.
Your machine supports the Windows Image Acquisition (WIA) driver for scanning images. WIA is one of the standard components provided by Microsoft Windows 7 and works with digital cameras and scanners. Unlike the TWAIN driver, the WIA driver allows you to scan and easily adjust images without using additional software:
|
|
|
|
The WIA driver works only on Windows OS (not supported Windows 2000) with a USB port. |
-
Make sure that the machine is connected to your computer and powered on.
-
Place a single document face down on the document glass, or load the documents face up into the document feeder (see Loading originals).
-
Click > > > .
-
Right-click on device driver icon in > .
-
application appears.
-
Choose your scanning preferences and click to see your preferences affect the picture.
-
Scan and save your scanned image.
|
|
|
|
-
Download the software from the Samsung website then unpack andinstall it.
-
Make sure that the machine is connected to your computer and powered on.
-
Place a single document face down on the document glass, or load the documents face up into the document feeder (see Loading originals).
-
Click > > , and start Samsung Scan Assistant.
Select the menu or click the
 button
from the window and click on any option you want to know about.
button
from the window and click on any option you want to know about. -
Set the scan options.
-
Click .
Scanning from USB connected machine
-
Make sure that the machine is connected to your computer and powered on.
-
Place a single document face down on the document glass, or load the documents face up into the document feeder (see Loading originals).
-
Start and click .
If message appears, disconnect the USB cable and reconnect it. If the problem continues, refer to the ’s help.
-
Select the option you want.
-
Scan and save your scanned image.
If scanning does not operate in , update Mac OS to the latest version. operates properly in Mac OS X 10.4.7 or higher.
Scanning from network connected machine
|
|
|
|
Network or wireless model only (see Features by models). |
-
Make sure that your machine is connected to a network.
-
Place a single document face down on the document glass, or load the documents face up into the document feeder (see Loading originals).
-
Start and click .
-
According to OS, follow steps below.
-
For 10.4
-
Click > on Menu bar.
-
Select your machine in Twain devices option. Make sure that checkbox is checked.
-
Click .
If a warning message appears, click to select port, or If TWAIN UI appears, click from the tab and select a new port.
-
-
For 10.5
-
Click > on Menu bar.
-
Make sure that checkbox is checked beside your machine in .
-
If you want to scan using TWAIN, refer to the Mac OS X10.4 steps above.
-
-
For 10.6 -10.7, select your device below .
-
-
Set the scan options on this program.
-
Scan and save your scanned image.
-
If scanning does not operate in Image Capture, update Mac OS to the latest version. Image Capture operates properly Mac OS X 10.4.7 or higher.
-
For more information, refer to the ’s help.
-
You can also scan using TWAIN-compliant software, such as Adobe Photoshop.
-
Scanning
-
Make sure that the machine is connected to your computer and powered on.
-
Double-click the on your desktop.
-
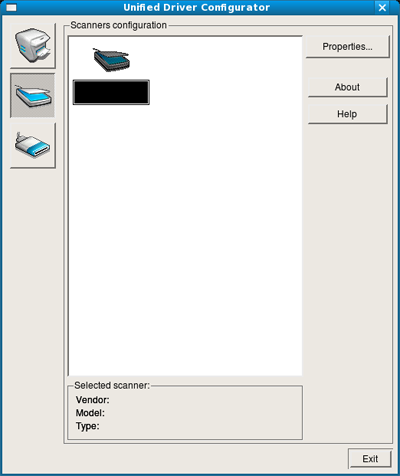
Click the
 button
to switch to Scanners Configuration.
button
to switch to Scanners Configuration. -
Select the scanner on the list.
-
Click .
-
Place a single document face down on the document glass, or load the documents face up into the document feeder (see Loading originals).
-
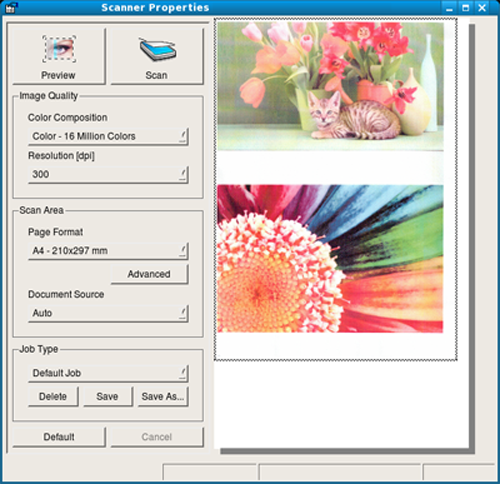
From the window, click .
-
The document is scanned and the image preview appears in the .
-
Drag the pointer to set the image area to be scanned in the .
-
Select the option you want.
-
Scan and save your scanned image.
For later use, you can save as your scan settings and add it to the drop-down list.
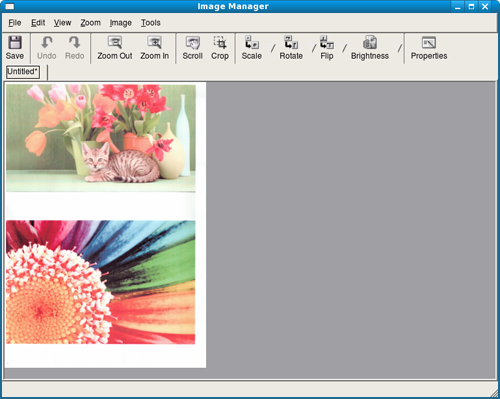
Editing an image with Image Manager
The Image Manager application provides you with menu commands and tools to edit your scanned image.