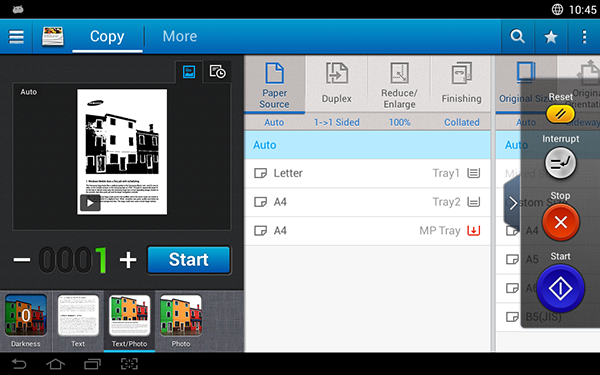
When you tap from
the home screen or , the screen appears. This
screen has several tabs and many copying options. All the
options are grouped by feature so you can configure your selections
easily. If want to go home, tap the home(![]() ) button.
) button.
|
|
|
|
Click the |
Command keys
|
Button |
Name |
Description |
|---|---|---|
|
|
|
Open the quick menus. |
|
|
|
Search for a desired menu or app. |
|
|
|
Add an app to my program list. |
|
|
Sub menu (Action overflow) |
Open the sub menu. |
|
|
Set the number of copies printed. |
|
Virtual Hard Key
|
|
|
|
|
Button |
Name |
Description |
|---|---|---|
|
|
|
Reset the current machine’s configuration. |
|
|
|
Suspend the current job, allowing for urgent copying. |
|
|
|
Stop a job at any time. A popup window appears to show the jobs that you can stop. |
|
|
|
Start a job. |
Copy tab
Preview
Display the originals type.
|
Button |
Name |
Description |
|||
|---|---|---|---|---|---|
|
|
|
View changed options list. |
|||
|
|
Preview for status |
Shows the job preview. |
|||
|
|
Preview for play |
Scans for job. |
|||
|
|
Preview edit mode |
Preview edit mode appears when you tap
the play(
|
|||
|
|
|
Starts a job. |
Changing Darkness
You can adjust the darkness level of a copy if needed for easier reading if the original contains faint markings or dark images. Adjust the darkness level using the control bar. This feature allows you to print dark images lighter, or light images darker.
Tap ( ![]() ) to
show the slider control.
) to
show the slider control.
Selecting the type of originals
Use the original type setting to improve copy quality by selecting the appropriate document type for a copy job.
-
: Use if the original is mostly text and very few or no images.
-
: Use if the original is a mix of text and images.
-
: Use if the original is mostly or exclusively images.
 Sub
menu (Action overflow)
Sub
menu (Action overflow)
-
: Add an app to my program list.
-
: When Eco mode is enabled, you can select only economical printing settings. Tap the Eco option in the Action Overflow menu to turn Eco mode on or off.
-
: This option can be turned on or off. When this option is on:After the scanning is finished, the window appears to ask if you want to scan another page. If you select , then you can scan another page in the current job. If you select , then the scanning process is completed and the remainder of the job is performed.
-
: Allows you to print a test copy to check the quality and alignment of the printout. Tap this option in the Action Overflow menu to print a proof copy. After ensuring that the copy is perfect, tap the Start button to print the rest of the copies.
-
: Allows you to copy both sides of a two-sided original onto one sheet of paper. This feature is helpful for copying originals with important information on both sides, such as driver's licenses.
-
: Allows you to save scanned originals to the hard disk drive in the machine. You can then print these saved documents at a later date or store them as printable files. Tap this option in the Action Overflow menu to save a document to the hard disk drive in the machine.
-
: Allows you to save the current copy options as the default copy settings. After you save the default copy settings, all future copy tasks use these settings. Tap this option in the Action Overflow menu to save the current settings as the default settings.
-
: Allows you to restore the copy settings to the default settings of the machine. This option changes the current copy settings to the original copy settings configured at the factory. Tap the Restore Default option in this menu to restore the default settings.
-
: The option specifies whether the machine requires you to confirm that the scanning is complete after each page. Select this option to efficiently copy multiple pages in a single copy job.
![[Note]](../../common/icon_note.png)
-
: This option specifies whether the machine requires you to confirm that the scanning is complete after each page. Select this option to efficiently copy multiple pages in a single copy job.
-
-
: Allows you to select the options that appear in the menu. Tap the + or - symbol on the menu icons to add or remove menus. You can also tap and hold a menu icon to move it to a different position or tap to remove all the menus.
Job progress
This menu appears whenever the machine is processing a job.
-
: Tap this button to see the status, type, and time of the job.
-
Preview Area : Allows you to see a preview of the document being copied. The image in the preview area indicates the current send settings, such as the orientation and size of the printout.
-
: Allows you to send feedback about the current send job. If you want to receive sending job by email, you can set from app (see Understanding the menu).
To use this feature, you may need to log-in as an administrator (see Log-in ).
Setting options
The tab provides two sections. The tab provides additional sections.
|
|
|
|
The paper source option sets the tray for this print job. The machine prints the scanned image on the paper in the selected tray. You can see icons that represent paper sizes and the amount of paper remaining in each tray.
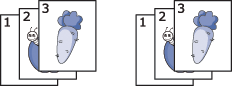
You can set the machine to print copies on both sides of paper.
You can select the and binding type, either type is or .
-
: For originals or output binding type that are printed on one side only.
-
: For originals or output binding type that are printed on both sides.
-
: For originals or output binding type that are printed on both sides, but the back is rotated 180 degrees.
The reduce/enlarge feature allows you print an image larger or smaller than the original. Tap the icons on the screen to reduce a copy by 25 % to 99 %, or enlarge a copy by 101 % to 400 %.
-
100% (): Prints the copy at the same size as the original.
-
: Reduces or enlarges the copy based on the size of the output paper.
-
: You can set custom percentage(between25 to 400%).
-
: You can set XY custom values(between 25 to 400%).
-
Other preset values: Reduces or enlarges the copy to a preset value. The icons on the right side of the column indicate the presets to use when copying to a different paper size.
You can set the print output options.
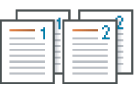
Sets the machine to sort the copy job. For example, if you make 2 copies of a 3 page original, one complete 3 page document will print followed by a second complete document.
-
: Prints output in sets to match the sequence of originals.
-
: Prints output sorted into stacks of individual pages.
Use this option to set the actual paper size of the originals.
-
: If the original uses a combination of both Letter and Legal-size paper, the machine can use the proper-sized paper for each sheet from multiple trays. For example, if the original is 3 pages, two Letter and one Legal, the machine prints in order on the correct paper size for each page.
-
Custom size: If you need to set a custom value for a special size of paper, use the arrows to set the required size.
Use this option to set the orientation of the original.
-
: Use this setting for an original document loaded with the top toward the back of the machine.
-
: Use this setting for an original document loaded into the DSDF with the top of the document toward the left side of the machine, or an original document placed on the scanner glass with the top of the document toward the right side of the machine.
Use this setting to improve copy quality by selecting the appropriate document type for the current job.
-
: Use if the original is mostly text and very few or no images.
-
: Use if the original is a mix of text and images.
-
: Use if the original is mostly or exclusively images.
Reduces the size of the original images and prints 2 -16 pages onto one sheet of paper.
-
: Disable this feature.
-
N-Up: Copies the specified number of pages from the original onto one sheet of paper.
-
Orientation: You can select the direction in which information is copied on a page.
The machine automatically prints on one or both sides of the paper, which are then folded to produce a booklet with all pages in the correct sequence. The machine will also reduce and correctly adjust the position of each image to fit on the selected paper.
-
: Disables this feature.
-
: Copy one side of the original to one sheet of a booklet.
-
: Copy each side of an original to one sheet of a booklet.
-
: Copy each side of an original to one page of a booklet. The second side of each original is rotated 180 degrees so the text will be upright in the booklet.
Use this feature to copy a book. If the book is too thick, lift the DSDF until its hinges are engaged by the stopper, then close the DSDF. If the book or magazine is thicker than 30 mm (1.18 inches), start copying with the DSDF open.
|
|
|
|
This copy feature is available only when you place originals on the scanner glass. |
-
: Disables this feature.
-
: Prints only the left page of the book.
-
: Prints only the right page of the book.
-
: Prints both facing pages from the left page.
-
: Prints both facing pages from a right page.
-
: Erases shadows caused by bindings or book edges from the center and side edges of copies.
-
: Erases shadows caused by bindings or book edges from the center nd side edges of copies.
This feature allows you to print a single-page document onto 4, 9, or 16 sheets of paper, for the purpose of pasting the sheets together to form one poster-size document.
|
|
|
|
This copy feature is available only when you place originals on the scanner glass. |
This option prints several copies of the original image on the same side of a single page. If you have other original in the DSDF, all other original images get printed the same way.
-
: Disables this feature.
-
: The number of images is automatically determined by the original image and paper size. The number of repeating images is automatically selected based on size of the original, the size of output page, and the reduce/enlarge percentage by up to 100 %.
-
: Manually select the number of images from 2, 4, 6, 8, 9 or 16.
The watermark option allows you to print text over an existing document. For example, you use it when you want to have large gray letters reading “Draft” or “Confidential” printed diagonally across the first page or all pages of a document.
|
|
|
|
You cannot apply stamps to booklets or posters. |
Prints the , , , , or on printouts. You can set the , or of the stamp.
An overlay is text and/or images stored on a computer hard drive (HDD) in a special file format that can be printed on any document. Overlays can take the place of traditional letterhead paper. Rather than using preprinted letterhead, you can create an overlay matching the layout of the letterhead. To print a letter on your company’s letterhead, you do not need to load preprinted letterhead in the machine, just enable the letterhead overlay on your document.
-
: Disables this feature.
-
: Create a new page overlay containing your logo or image.
-
: Select an overlap location.
You can copy the original without any edges or margins.
-
: Disables this feature.
-
: Erase an equal amount of edges from all copies.
-
: Erase hole-punch marks from the left edge of copies.
To prevent images from overlapping with punch holes, staples, and other marks, you can move an image’s position.
-
: Disables this feature.
-
: Automatically position at the center of the paper.
-
: Adjust the margins of the paper as needed.
The machine automatically adds covers to your copied set using stock taken from a different tray. Covers must be the same size and orientation as the main body of the job.
-
: Disables this feature.
-
: Print the document with a front cover.
-
: Print the document with a back cover.
-
: Prints the document with a front and back cover.
-
: Sets the option for double-sided copying.
-
: Selects the default paper tray to use.
This option allows you to manually adjust the image , , and .
This option allows you to compensate for originals that contain color in the background, such as newspapers or catalogs. You can use the options in this menu to make the copies easier to read.
-
: Allows you to adjust the density of the background in the scanned image. This feature is useful when scanning originals that have turned yellow from age or originals with a dark background.
-
: Allows you to erase any text or images that show through from the other side of the original. You can use this feature to ensure that your scanned output is clearly legible.
This option allows you to reverse the original document like a mirror.