Tap from
the home screen or , then
tap ![]() to
open the screen. If
you see a different screen, tap the
to
open the screen. If
you see a different screen, tap the ![]() icon
to go to the home screen.
icon
to go to the home screen.
|
|
|
|
Send tab
Command keys
|
Button |
Name |
Description |
|||
|---|---|---|---|---|---|
|
|
|
Open the quick menu. |
|||
|
|
|
Open your saved address book. |
|||
|
|
|
Send a fax. |
|||
|
|
|
Add an app to my program list. |
|||
|
|
Sub menu (Action overflow) |
Open the sub menu. |
|||
|
|
When users are logged in, the destination configured in their profile appears.You can set the destination in the menu of the app (see Understanding the menu). Administrators can also set the default destination in the sub menu (Action overflow) > > .
|
||||
Virtual Hard Key
|
|
|
|
|
Button |
Name |
Description |
|---|---|---|
|
|
|
Reset to app default configuration. |
|
|
|
When you press this button, you can hear a dial tone. Then enter a fax number. It is similar to making a call using speaker phone. |
|
|
|
Stop a job at any time. A popup window appears to show the jobs that you can stop. |
|
|
|
Start a job. |
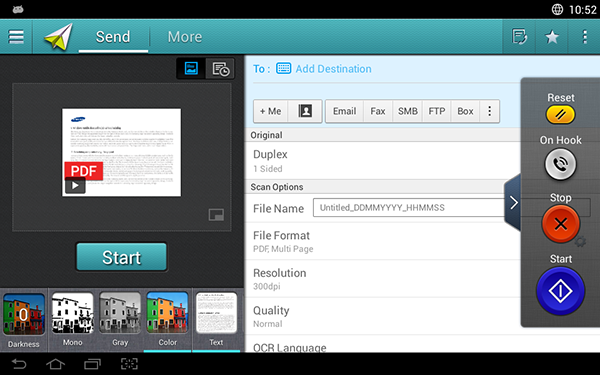
Preview
Preview displays the original scanned image.
|
Button |
Name |
Description |
|||
|---|---|---|---|---|---|
|
|
|
View changed options list. |
|||
|
|
Preview for status |
Shows the job preview. |
|||
|
|
Preview for play |
Scans for job.
|
|||
|
|
|
Starts a job. |
Adjusting the brightness
You can adjust the brightness level of a copy if needed for easier reading if the original contains faint markings or dark images. Adjust the brightness level using the slider. This feature allows you to print dark images lighter, or light images darker.
Tap ![]() to
show the slider control.
to
show the slider control.
Selecting the color mode
Use one of the following options to use for the scan.
-
: Use black and white (1-bit per pixel).
-
: Use grayscale (8-bit per pixel).
-
: Use color (24-bit per pixel, each of the RGB channels has 8 bits).
Selecting the original type
Use the original type setting to improve copy quality by selecting the appropriate document type for a copy job.
-
: Use if the original is mostly text and very few or no images.
-
: Use if the original is a mix of text and images.
-
: Use if the original is mostly or exclusively images.
 Sub
menu (Action overflow)
Sub
menu (Action overflow)
-
: Add an app to my program list. With this feature, user can set default settings, destinations required for each program. Also can set default options as Auto Launch, add shortcut to Home.
-
: Search for a desired options.
-
: This option can be turned on or off. When this option is on:After the scanning is finished, the window appears to ask if you want to scan another page. If you select , then you can scan another page in the current job. If you select , then the scanning process is completed and the remainder of the job is performed.
-
: Allows you to attach a file to your message. You can use this option to quickly send one or more files from the hard disk drive (BOX) of the machine to an SMB, FTP, Email, Box, USB.
-
: Allows you to save the current settings as the default settings. After you save the default settings, all future send tasks use these settings. Tap this option in the Action Overflow menu to save the current settings as the default settings.
-
: Allows you to restore the settings to the default settings of the machine. This option changes the current settings to the original settings configured at the factory. Tap this option in the Action Overflow menu to restore the default settings.
-
: Allows you to quickly scan a document and send it to a destination. The scanned document is sent as an image file. Tap this option in the sub menu (action overflow menu) to scan and attach a file to the current message.
-
: The setting specifies how the machine handles name conflicts when saving files.
-
: You can use this feature to get confirmation on executed destination's successfully or not.
![[Note]](../../common/icon_note.png)
If the report contains characters or fonts that the machine does not support, then may appear in the report instead of the characters/fonts.
-
: Allows you to select the default destination for the send job. When logged in, you can select your any Send destination as the default send destination. Same will appear in widgets too.
-
: Scans and sends scanned output to a computer.
-
-
: This address book contains contacts that are available to all users. You can use the address book to make contacts available to anyone who uses the machine.
-
: This address book contains the contacts registered in your Google contacts list. You must log into your Google account to access your .
-
-
: Allows you to select the options that appear in the menu. Tap the + or - symbol on the menu icons to add or remove menus. You can also tap and hold a menu icon to move it to a different position or tap to remove all the menus.
Job progress
This menu appears whenever the machine is processing a job.
-
: Tap this button to see the status, destination, sender, and time of the job.
-
Preview Area : Allows you to see a preview of the document being sent. The image in the preview area indicates the current send settings, such as the orientation and size of the file.
-
: Allows you to send feedback about the current send job. If you want to receive sending job by email, you can set from app (see Understanding the menu).
To use this feature, you may need to log-in as an administrator (see Log-in ).
Setting options
You can set a detail options in the tab and tab.
|
|
|
|
Tap ![]() to
add a recipient’s email address or a fax number. If
you want to send to , , , , or click
on respective buttons.
to
add a recipient’s email address or a fax number. If
you want to send to , , , , or click
on respective buttons.
This setting is used to improve the scan quality by selecting the document type for the current scan job.
-
: For originals that are printed on one side only.
-
: For originals that are printed on both sides.
-
: For originals that are printed on both sides, but the back is rotated 180 degrees.
|
|
|
|
To use and , load the originals on the DSDF. If the machine cannot detect the original on the DSDF, it automatically changes to . |
Set file options of the scanned output.
-
: Enter a file name to store the scan file name at destination.
-
: Select a file format for the scanned output.
-
: Adjust the document resolution. The higher this value, the clearer the result, but scan time may take longer.
-
Quality: Use this option to produce a high quality document. The higher quality you select, the larger file size.
-
: When producing scanned output for OCR software, select the appropriate language. This is supported when Searchable PDF option is selected in File Format settings.
If you send originals that are of poor quality, or contain photographs, you can adjust the resolution to produce a higher quality fax.
-
-
: Usually recommended for originals with text. This option will reduce the transmission time.
-
: Recommended for the originals containing small characters, thin lines, or text from a dot-matrix printer.
-
: Recommended for originals containing fine details. This option is only available if the receiving machine also supports resolution.
-
Ultra Fine: Recommended for originals containing extremely fine details. This option is only available if the receiving machine also supports resolution.
-
Use this feature to scan a book. If the book is too thick, lift the DSDF until its hinges are engaged by the stopper, then close the DSDF. If the book or magazine is thicker than 30 mm (1.18 inches), start copying with the DSDF open.
-
: Disable this feature.
-
: Scans only the left page of the book.
-
: Scans only the right page of the book.
-
: Scans both facing pages from the left page.
-
: Scans both facing pages from the right page.
-
: You can set shaded areas to erase shadows caused by bindings or book edges from the center and side edges of copies.
 (fax user only)
Set the sending options for fax, such as and .
-
: Disables this feature.
-
: The machine will begin to transmit the fax right after the first page has been scanned. Originals with many pages can be sent this way without overflowing the machine’s memory.
-
: Set your machine to send a fax at scheduled time. Define the and .
|
|
|
|
You can delay a fax by any length of time starting 1 minute and 24 hours after the scan. |
Set email information, such as , and .
Use this setting to improve copy quality by selecting the appropriate document type for the current job.
-
: Use if the original is mostly text and very few or no images.
-
: Use if the original is a mix of text and images.
-
: Use if the original is mostly or exclusively images.
Use this option to set the actual paper size of the originals.
-
: Automatically detect the size of original if the original uses a combination of different paper types.
-
Custom size: If you need to set a custom value for a special size of paper, use the arrows to set the required size.
Use this option to set the orientation of the original.
-
: The original is in landscape orientation. The images or text in the original are parallel to the long edge of the page.
-
: The original is in portrait orientation. The images or text in the original are perpendicular to the long edge of the page.
Use this option to set the default color mode used for copy jobs.
-
: Displays an image in black and white.
-
: Displays an image in gray.
-
: Displays an image in color.
|
|
|
|
JPEG file format cannot be selected if color mode is set as MONO. |
This option allows you to manually adjust the image.
-
: Allows you to adjust the darkness of the scanned output file. This feature is useful when scanning faded originals or originals with little contrast.
-
: Allows you to adjust the edges of text so that it is easier to read. You can also use this feature to enhance the details of images.
-
: allows you to adjust the contrast to make the scanned output crisper or smoother. You can use this feature to improve the quality of an image or increase the readability of text.
This option allows you to compensate for originals that contain color in the background, such as newspapers or catalogs. You can use the options in this menu to make the copies easier to read.
-
: Allows you to adjust the density of the background in the scanned image. This feature is useful when scanning originals that have turned yellow from age or originals with a dark background.
-
: Allows you to erase any text or images that show through from the other side of the original. You can use this feature to ensure that your scanned output is clearly legible.
Fax screen
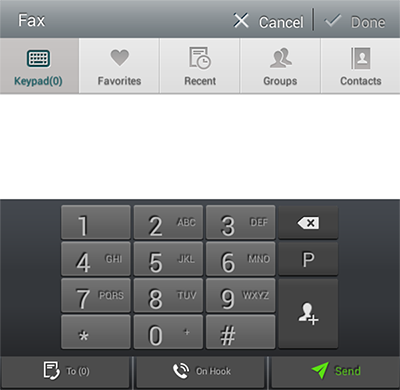
Command keys
|
Button |
Name |
Description |
|---|---|---|
|
|
keypad |
Open the keypad. |
|
|
|
Open a list of frequently-used addresses. |
|
|
|
View any recently-used addresses. |
|
|
Groups |
Open a list of group addresses. |
|
|
Contacts |
Open a list of your contacts. |
|
|
Pause |
Pause the current job. |
|
|
Add Contacts |
Add a new contact to your addresses. |
|
|
Add To |
Add to the destination list. |
|
|
Destination List |
Open the destination list. |
|
|
On Hook |
Enable dialing. When you hear the dial tone, enter a fax number using the numeric keypad on the screen. |
|
|
Send |
Send the fax. |