Wired network setup
You must set up the network protocols on your machine to use it on your network.
You can use network after connecting network cable to a corresponding port on your machine.
For models that do not have the display screen on the control panel, use the SyncThru™ Web Service or SetIP program.
Printing a network configuration report
You can print Network Configuration Report from the machine’s control panel that will show the current machine’s network settings. This will help you to set up a network.
Press the  () button for
more than 4 seconds on the control panel.
() button for
more than 4 seconds on the control panel.
Using this Network Configuration Report, you can find your machine’s MAC address and IP address.
For example:
-
MAC Address: 00:15:99:41:A2:78
-
IP Address: 192.0.0.192
Setting IP address
First, you have to set up an IP address for network printing and managements. In most cases a new IP address will be automatically assigned by a DHCP (Dynamic Host Configuration Protocol) server located on the network.
Before using the SetIP program, disable the computer firewall from > > .
|
|
|
|
The following instructions may differ for your model. |
-
Download the software from the Samsung website then unpack and install it: (http://www.samsung.com > find your product > Support or Downloads).
-
Follow the instructions in the installation window.
-
Connect your machine to the network with a network cable.
-
Turn on the machine.
-
From the Windows menu, select > > SetIP > SetIP.
-
Click the
 icon (third
from left) in the SetIP window
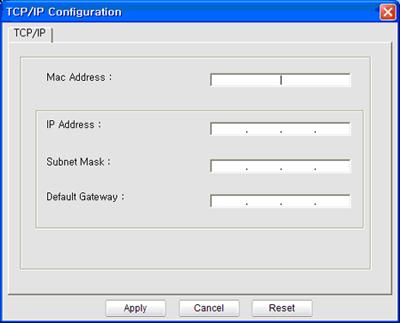
to open the TCP/IP configuration window.
icon (third
from left) in the SetIP window
to open the TCP/IP configuration window. -
Enter the machine’s new information into the configuration window as follows. In a corporate intranet, you may need to have this information assigned by a network manager before proceeding.
![[Note]](../../common/icon_note.png)
Find the machine’s MAC address from the Network Configuration Report (see Printing a network configuration report) and enter it without the colons. For example, 00:15:99:29:51:A8 becomes 0015992951A8.
-
Click , and then click . The machine will automatically print the Network Configuration Report. Confirm that all the settings are correct.
Before using the SetIP program, disable the computer firewall from > > .
|
|
|
|
The following instructions may vary from your model. |
-
Connect your machine to the network with a network cable.
-
Insert the supplied software CD into your CD-ROM drive.
-
Double-click the CD-ROM icon that appears on your Mac desktop.
-
For Mac OS X 10.8, Double-click the CD-ROM that appears on Finder.
-
-
Double-click the folder > icon.
-
Click .
-
Read the license agreement and click .
-
Click to agree to the license agreement.
-
Click . All components necessary for machine operations will be installed.
If you click , you can choose individual components to install.
-
Enter the password and click .
-
When the message that warns that all applications will close on your computer appears, click .
-
Select on the and click button.
-
Click the
icon (third
from left) in the SetIP window
to open the TCP/IP configuration window. -
Enter the machine’s new information into the configuration window. In a corporate intranet, you may need to have this information assigned by a network manager before proceeding.
Find the machine’s MAC address from the Network Configuration Report (see Printing a network configuration report) and enter it without the colons. For example, 00:15:99:29:51:A8 becomes 0015992951A8.
-
Click , and then click . The machine will automatically print the Network Configuration Report. Confirm that all the settings are correct.
Before using the SetIP program, disable the computer firewall from or .
|
|
|
|
The following instructions may vary from your model or operating systems. |
-
Open //////.
-
Double-click the file.
-
Click to open the TCP/IP configuration window.
-
Enter the machine’s new information into the configuration window. In a corporate intranet, you may need to have this information assigned by a network manager before proceeding.
Find the machine’s MAC address from the Network Configuration Report (see Printing a network configuration report) and enter it without the colons. For example, 00:15:99:29:51:A8 becomes 0015992951A8.
-
The machine will automatically print the Network Configuration Report.
|
|
|
|
IPv6 is supported properly only in Windows Vista or higher. |
|
|
|
|
The machine supports the following IPv6 addresses for network printing and managements.
-
: Self-configured local IPv6 address (Address starts with FE80).
-
: Automatically configured IPv6 address by a network router.
-
: IPv6 address configured by a DHCPv6 server.
-
: Manually configured IPv6 address by a user.
From the SyncThru™ Web Service
Activating IPv6
-
Access a web browser, such as Internet Explorer, from Windows. Enter the machine IP address (http://xxx.xxx.xxx.xxx) in the address field and press the Enter key or click .
-
If it’s your first time logging into you need to log-in as an administrator. Type in the below default ID and password. We recommend you to change the default password for security reasons.
-
:
-
:
-
-
When the window opens, move the mouse cursor over the of the top menu bar and then click .
-
Click on the left pane of the website.
-
Check the check box to activate IPv6.
-
Click the button.
-
Turn the machine off and turn it on again.
|
|
|
|
IPv6 address configuration
-
Start a web browser, such as Internet Explorer, that supports IPv6 addressing as a URL.
-
Select one of the IPv6 addresses (, , , ) from Network Configuration Report (see Printing a network configuration report).
-
: Self-configured local IPv6 address (Address starts with FE80).
-
: Automatically configured IPv6 address by a network router.
-
: IPv6 address configured by a DHCPv6 server.
-
: Manually configured IPv6 address by a user.
-
-
Enter the IPv6 addresses (e.g.,: http://[FE80::215:99FF:FE66:7701]).
![[Caution]](../../common/icon_caution.png)
Address must be enclosed in '[ ]' brackets.