Setting up an address book
This guide gives you guidelines for the address book.
You can save frequently used fax numbers, e-mail addresses, SMB server addresses, FTP server addresses and WebDAV server addresses in your machine.
-
: Stores up to 500 recipients’ information.
-
: Makes groups when you frequently send the same document to several destinations. You can register up to 500 recipients in a group. Entries stored here will be available for selection within the sending list on the tab of , or . Sending can be also setup comprising of many Individual entries.
![[Note]](../common/note.png)
You cannot register a group as you register an individual in a group.
-
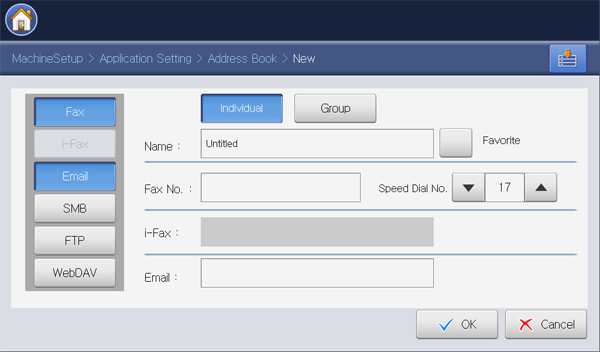
Press > > > > , > are automatically choosed.
-
Press the input area. Then enter the name of the recipient using the pop-up keyboard. Press .
Check for addresses you often use. You can easily find them from the search results.
-
Press the input area and enter the fax number using the numeric keypad on the control panel. You have to use only the numbers, with the area code if necessary.
Inserting a pause: with some telephone systems, you must dial an access code (9, for example) and listen for a second dial tone. In such cases, you must insert a pause in the telephone number. You can insert a pause while entering fax number.
-
is automatically filled with the first free number.
is the number representing a recipient’s information, you can use the numeric keypad on the control panel.
-
Press the input area. Then enter the e-mail address of the recipient using the pop-up keyboard. Then press .
-
Press to save the information.
-
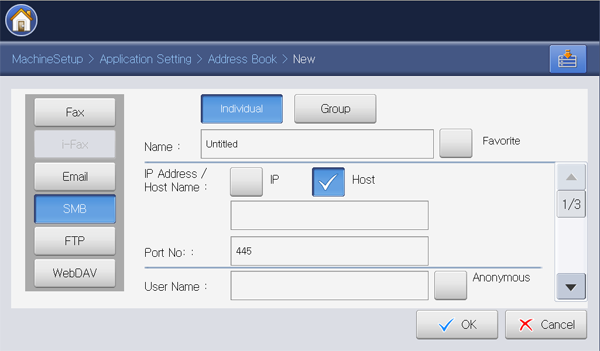
Press > > > > , or > from the display screen.
-
Press the input area. Then enter the name of the recipient using the pop-up keyboard. Press .
Check for addresses you often use. You can easily find them from the search results.
-
Press or , and press the input area. Then enter the server address in dotted decimal notation or a host name using the pop-up keyboard. Press .
-
Press the input area. Then enter the server port number using the pop-up keyboard. Press .
-
Press the input area. Then enter the user name using the pop-up keyboard. Press .
-
In case of or , if you want the server to permit access for unauthorized person. Press the box. This box is unchecked by default. If you checked the box, go to step 7.
-
In case of , you can send the files in encryption pressing . If the machine and receiving server of the option are different, the transfer could be failed. Also, if the receiving server can receive only the encrypted file, you need to press the button.
-
-
Press the input area. Then enter the password using the pop-up keyboard. Press .
-
Press the input area. Then enter the domain name using the pop-up keyboard. Press .
-
In case of , does not appear.
-
If the SMB server you entered is not registered any domain, leave it blank or enter the computer name of the SMB server.
-
-
Press the input area. Then enter the name of file folder where the sent files are to be stored using the pop-up keyboard. Then press .
Example:
-
Select the option you want using the left/right arrows. If the server has the same named file already, the file will get processed by following the file policy you selected.
-
: The sent file is saved as a different file name that is automatically programmed.
-
Cancel: Does not save the sent file.
-
: The sent file overwrite the existing file.
-
-
Press the input area. Enter the name of the sent file using the pop-up keyboard. Press .
-
Select the option you want using the left/right arrows.
-
: If you select in this option, the machine creates a sub-folder in the file folder you selected. The sub-folder is named using the user name which is you entered in step 5.
If the file folder has a sub-folder with the same name already, the machine does not create a sub-folder.
-
: You can set the cycle of sub-folder creation. The machine create a sub-folder according to this option set.
If the file folder has a sub-folder with the same name already, the machine does not create a sub-folder.
-
: A sub-folder is created every day. The sub-folder name format is YYYY-MM-DD (e.g. 2010-01-01).
-
: A sub-folder is created every month. The sub-folder name format is YYYY-MM (e.g. 2010-01).
-
: A sub-folder is created every year. The sub-folder name format is YYYY (e.g. 2010).
-
-
: If you select in this option and scanned multiple files, the machine creates a sub-folder in the file folder you selected, and the sent files will be stored in the sub-folder.
If all folder creation options are enabled at same time, the sent file(s) will be stored as below.
-
When single scanned file is sent:
\\folder\user name\\
-
When multiple scanned files are sent:
\\folder\user name\\\
\\folder\user name\\\
\\folder\user name\\\
-
-
Press to save the information.
-
Press > > from the display screen.
-
Press the name of individual you want to edit. Press .
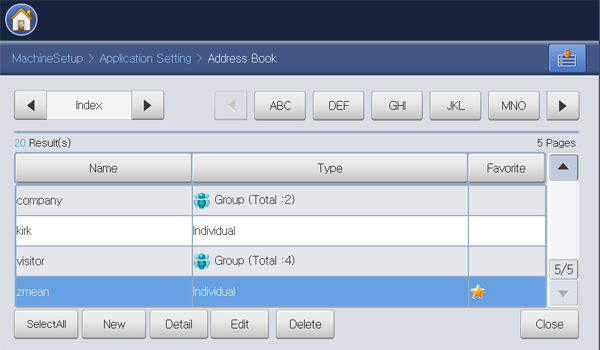
If you want to delete an individual address, press .
-
Press the input area you want to change. Then change the contents using the pop-up keyboard, or numeric keypad on the control panel. If you use the pop-up keyboard, press after changing the contents.
-
Press to save the information.
-
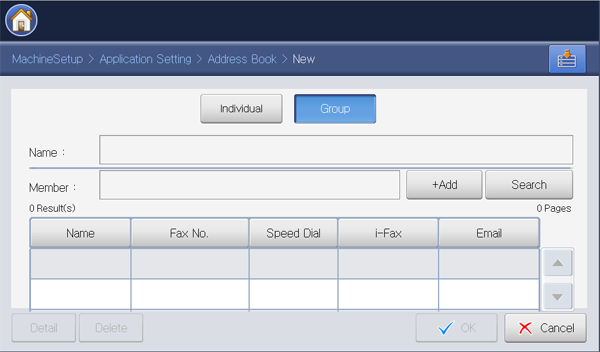
Press > > > > from the display screen.
-
Press the input area. Then enter the group name using the pop-up keyboard. Then press .
-
Press the input area. Then enter the name of individual you want to include in the group using the pop-up keyboard. Then press .
If you are not sure of the name, you can use the button. Enter the first few letters or just press . The machine shows the individual list. Press the name you want and then press . Go to step 5.
-
Press , then the name of individual is saved.
-
Press to save the information.
-
Press > > from the display screen.
-
Press the name of group you want to edit. Then press .
If you want to delete a group address, press .
-
Press the input area. Change the group name using the pop-up keyboard. Press .
-
Press the input area. Enter the name of individual you want to include in the group using the pop-up keyboard. Then press .
If you are not sure of the name, you can use the button. Enter the first few letters or just press . The machine shows the individual list. Press the name you want and then press . Go to step 7.
-
Press , then the name of individual is saved.
-
Press the name of individual you want to delete. Press . The name of the individual will be deleted from the group.
-
Press to save the information.
You can search the addresses that are currently stored in the address book.
-
Press > > from the display screen.
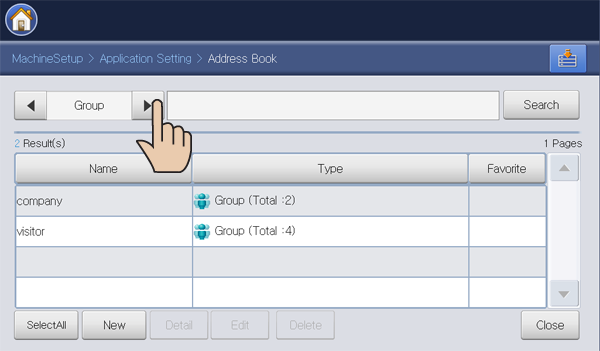
You can find addresses in a specific category such as , , , , , , etc .
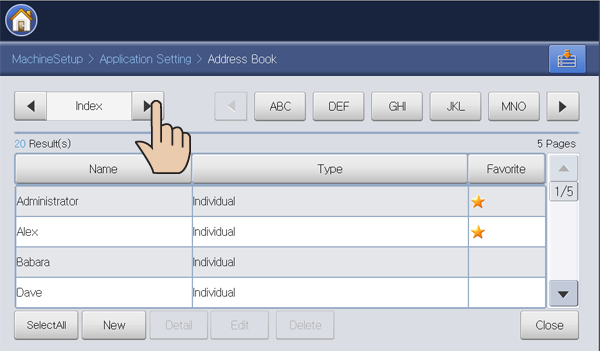
When you select , you can find the addresses which classified with first letter of the all registered addresses by pressing the specific alphabet category. For example, if you press , you can see the addresses with the first letter of A, B and C.
-
Select the specific category you want using the left/right arrows .
For example, you want to find the address, press the left/right arrows until appears. You can see the list only.
-
Press the input area, and enter the name using the pop-up keyboard. Press .
If you are not sure of the name, you can enter the first few letters.
-
Press , display screen displays the search results.
You can delete the selected address which currently stored in address book.
-
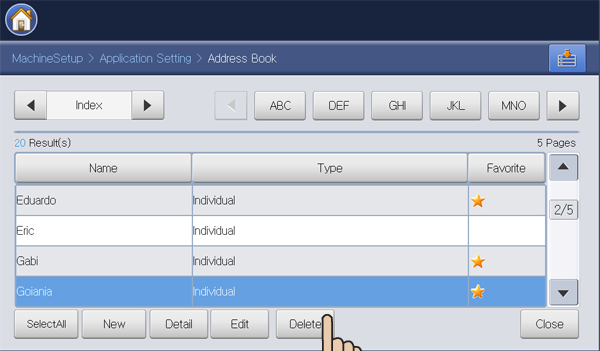
Press > > from the display screen.
-
Press the address you want to delete. Press .
-
Press when the confirmation window appears.
The selected address will be deleted from the list.
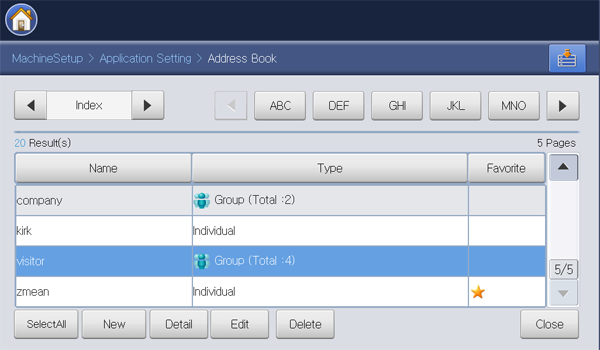
Checking Address Book for an entry
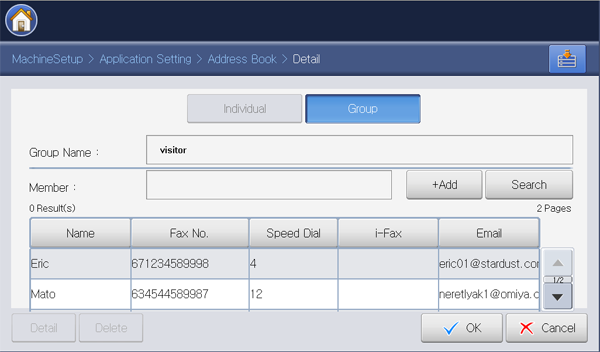
You can see an individual or group address information.
-
Press > > from the display screen.
-
Press the address you want to see. Press .
The display screen shows all information of the address.
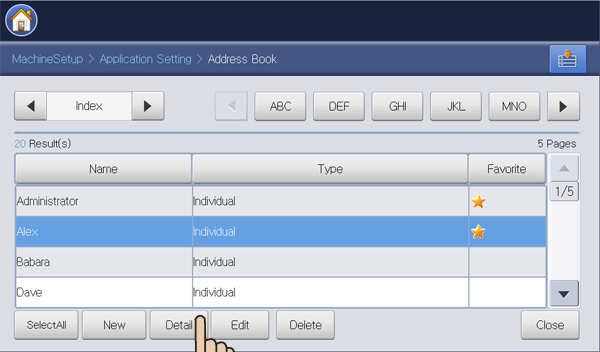
You can edit the address directly pressing in the detail’s screen, or if you select a group address, you can also see the individual addresses in the group address using .
You can store addresses conveniently from the networked computer using SyncThru™ Web Service. Only for users registered in the machine can store addresses through login SyncThru™ Web Service.
Storing on your local machine
This method means that you store addresses on your machine’s memory. You can add addresses, as well as group them in particular categories.
Adding addresses in
-
Turn your networked computer on and open the web browser.
-
Enter your machine’s IP address as the URL in a browser.
(Example, http://123.123.123.123)
-
Press or click to access the SyncThru™ Web Service shows.
If necessary, you can change the language in the upper right corner of the SyncThru™ Web Service.
-
Click . The window appears.
-
Enter the ID and password, and select a domain as you log in the machine.
-
Click .
If you do not use the SyncThru™ Web Service for five minutes, it automatically gets logged out.
-
Click .
-
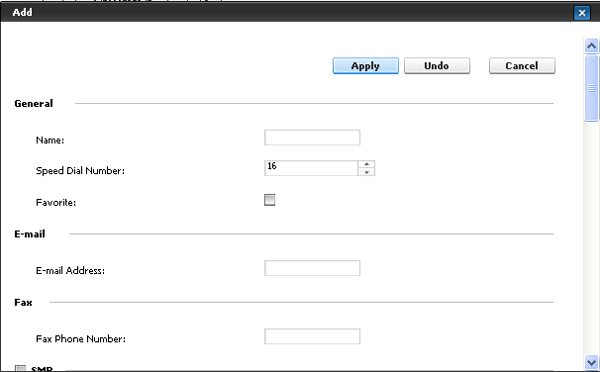
Click . Then the window appears.
-
Enter the name to be added, and select the speed dial number in .
-
is the number representing a recipient’s information, you can use the numeric keypad on the control panel.
-
Check for addresses you often use. You can easily find them from the search results.
-
-
Enter the email address in .
-
Enter the fax number in .
-
Check the enable SMB box in . You can enter the information when you check it.
-
Enter the server address in dotted decimal notation or a host name in .
-
Enter the server port number in .
-
Enter the login name in .
-
In case of or , if you want the server to permit access for unauthorized person. Press the box. This box is unchecked by default. If you checked the box, go to step 18.
-
In case of , you can send the files in encryption checking . If the machine and receiving server of the option are different, the transfer could be failed. Also, if the receiving server can receive only the encrypted file, you need to check the button.
-
-
Enter the password in , and re-enter the password in .
-
Enter the domain name in .
-
In case of , does not appear.
-
If the SMB server you entered is not registered any domain, leave it blank or enter the computer name of the SMB server.
-
-
Enter the scan file folder for storing scanned images in .
Example:
-
Select the option you want.
-
: If you select this option, the machine creates a sub-folder in the file folder you selected. The sub-folder is named using the user name which is you entered in step 15.
If the file folder has a sub-folder with the same name already, the machine does not create a sub-folder.
-
: You can set the cycle of sub-folder creation. The machine create a sub-folder according to this option set.
If the file folder has a sub-folder with the same name already, the machine does not create a sub-folder.
-
: A sub-folder is created every day. The sub-folder name format is YYYY-MM-DD (e.g. 2010-01-01).
-
: A sub-folder is created every month. The sub-folder name format is YYYY-MM (e.g. 2010-01).
-
: A sub-folder is created every year. The sub-folder name format is YYYY (e.g. 2010).
-
-
: If you select this option and scanned multiple files, the machine creates a sub-folder in the file folder you selected, and the sent files will be stored in the sub-folder.
If all folder creation options are enabled at same time, the sent file(s) will be stored as below.
-
When single scanned file is sent:
\\folder\user name\\
-
When multiple scanned files are sent:
\\folder\user name\\\
\\folder\user name\\\
\\folder\user name\\\
-
-
Select the policy for generating file name in . If the server has the same named file already, the file will get processed by following the file policy you selected.
-
: The sent file is saved as a different file name that is automatically programmed.
-
: Does not save the sent file.
-
: The sent file overwrite the existing file.
-
-
Enter the file name in , which is to be stored in the server.
-
You can check if it works well according to the entered server information, click .
-
Enter and server information almost same as you do for .
-
Click .
Press to delete the information you entered. If you press , the window is closed.
Editing addresses in
-
Turn your networked computer on and open the web browser.
-
Enter your machine’s IP address as the URL in a browser.
(Example, http://123.123.123.123)
-
Press or click to access the SyncThru™ Web Service shows.
If necessary, you can change the language in the upper right corner of the SyncThru™ Web Service.
-
Click . The window appears.
-
Enter the ID and password, and select a domain as you log in the machine.
-
Click .
If you do not use the SyncThru™ Web Service for five minutes, it automatically gets logged out.
-
Click .
-
Check an address you want to edit and press . The window appears.
-
Change the address information.
-
Click .
Press to delete the information you entered. If you press , the window is closed.
Deleting addresses in
-
Turn your networked computer on and open the web browser.
-
Enter your machine’s IP address as the URL in a browser.
(Example, http://123.123.123.123)
-
Press or click to access the SyncThru™ Web Service shows.
If necessary, you can change the language in the upper right corner of the SyncThru™ Web Service.
-
Click . The window appears.
-
Enter the ID and password, and select a domain as you log in the machine.
-
Click .
If you do not use the SyncThru™ Web Service for five minutes, it automatically gets logged out.
-
Click .
-
Check an address you want to delete and click .
If you check the column headers’ check box, all addresses are checked.
Click when the confirmation window appears.
Searching addresses in
-
Turn your networked computer on and open the web browser.
-
Enter your machine’s IP address as the URL in a browser.
(Example, http://123.123.123.123)
-
Press or click to access the SyncThru™ Web Service shows.
If necessary, you can change the language in the upper right corner of the SyncThru™ Web Service.
-
Click . The window appears.
-
Enter the ID and password, and select a domain as you log-in to the machine.
-
Click .
If you do not use the SyncThru™ Web Service for five minutes, it automatically gets logged out.
-
Click .
You can change arrangement by clicking each column header. For example, clicking , you can see the addresses in the order of speed dial number. If you click again, you can see in the reversed order.
-
Enter the name for which you want to search in search input area.
You can find addresses in a specific category such as , , , etc.
For example, if you want to find the fax number, click drop down list next to
 and
select .
and
select . -
Click
. Then
the search result appears.
You can see the addresses in a specific category such as , , , etc.
For example, if you want to see the addresses which are included fax number, click drop down list below and select .
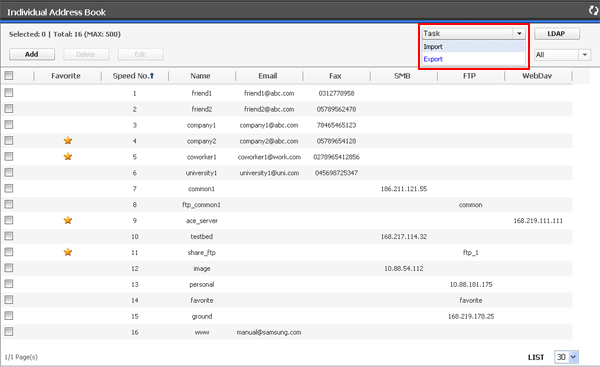
Importing
You can import an address book file from a server or computer. The file should have the file extension ‘csv’. Also you can import addresses from a LDAP server. Before importing the addresses to your machine, the LDAP server administrator should store the addresses.
-
Turn your networked computer on and open the web browser.
-
Enter your machine’s IP address as the URL in a browser.
(Example, http://123.123.123.123)
-
Press or click to access the SyncThru™ Web Service shows.
If necessary, you can change the language in the upper right corner of the SyncThru™ Web Service.
-
Click . The window appears.
-
Enter the ID and password, and select a domain as you log in the machine.
-
Click .
If you do not use the SyncThru™ Web Service for five minutes, it automatically gets logged out.
-
Click .
-
Select . The window appears.
-
Select or , and enter the address or folder name where the file is stored.
-
Click .
Exporting
You can export an address book file to your computer for backup of the file or to another machines Samsung produced.
-
Turn your networked computer on and open the web browser.
-
Enter your machine’s IP address as the URL in a browser.
(Example, http://123.123.123.123)
-
Press or click to access the SyncThru™ Web Service shows.
If necessary, you can change the language in the upper right corner of the SyncThru™ Web Service.
-
Click . The window appears.
-
Enter the ID and password, and select a domain as you log in the machine.
-
Click .
If you do not use the SyncThru™ Web Service for five minutes, it automatically gets logged out.
-
Click .
-
Select . The window appears.
-
Click . Then the address book file stored in your computer.
Grouping addresses in
-
Turn your networked computer on and open the web browser.
-
Enter your machine’s IP address as the URL in a browser.
(Example, http://123.123.123.123)
-
Press or click to access the SyncThru™ Web Service shows.
If necessary, you can change the language in the upper right corner of the SyncThru™ Web Service.
-
Click . The window appears.
-
Enter the ID and password, and select a domain as you log in the machine.
-
Click .
If you do not use the SyncThru™ Web Service for five minutes, it automatically gets logged out.
-
Click .
-
Click .
-
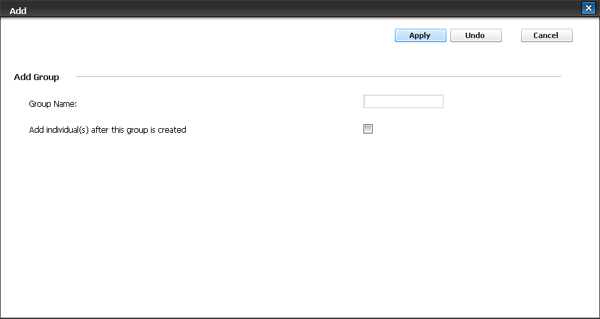
Click . The window appears.
-
Enter the group name to be added in .
-
Check .
If you do not want to add individual addresses to the group address you made, skip this step. You can add individual addresses next time pressing .
-
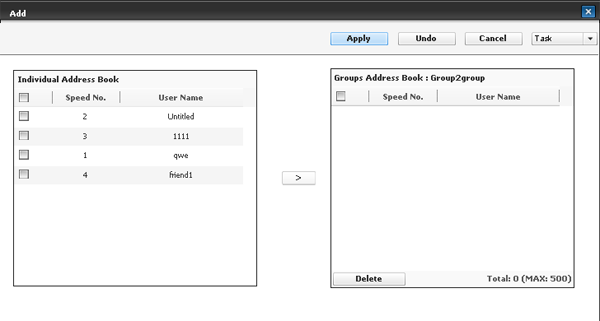
Click . Then the window appears.
-
Check the addresses you want to add to in .
-
Click the arrow in the middle. The selected addresses are added in .
-
Click .
Editing Group addresses in
-
Turn your networked computer on and open the web browser.
-
Enter your machine’s IP address as the URL in a browser.
(Example, http://123.123.123.123)
-
Press or click to access the SyncThru™ Web Service shows.
If necessary, you can change the language in the upper right corner of the SyncThru™ Web Service.
-
Click . The window appears.
-
Enter the ID and password, and select a domain as you log in the machine.
-
Click .
If you do not use the SyncThru™ Web Service for five minutes, it automatically gets logged out.
-
Click .
-
Click .
-
Check the group address you want to edit and press . The window appears.
-
Change the group address information.
-
Click .
Press to delete the information you entered. If you press , the window closes.
Deleting Group addresses in a
-
Turn your networked computer on and open the web browser.
-
Enter your machine’s IP address as the URL in a browser.
(Example, http://123.123.123.123)
-
Press or click to access the SyncThru™ Web Service shows.
If necessary, you can change the language in the upper right corner of the SyncThru™ Web Service.
-
Click . The window appears.
-
Enter the ID and password, and select a domain as you log in the machine.
-
Click .
If you do not use the SyncThru™ Web Service for five minutes, you will be logged out automatically.
-
Click .
-
Click .
-
Check the group addresses you want to delete.
-
Click .
Click when the confirmation window appears.
Checking Group Addresses
You can see group addresses information. You can also add or delete individual addresses in the window.
-
Turn your networked computer on and open the web browser.
-
Enter your machine’s IP address as the URL in a browser.
(Example, http://123.123.123.123)
-
Press or click to access the SyncThru™ Web Service shows.
If necessary, you can change the language in the upper right corner of the SyncThru™ Web Service.
-
Click . The window appears.
-
Enter the ID and password, and select a domain as you log in the machine.
-
Click .
If you do not use the SyncThru™ Web Service for five minutes, it automatically gets logged out.
-
Click .
-
Click .
-
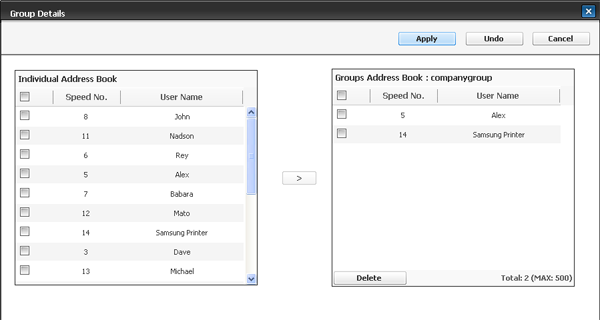
Press the group address you want to see. Press .
The window appears.
-
You can add individual addresses directly. Check the addresses you want to add to in .
-
You can delete individual addresses directly. Check the addresses you want to delete and press in .
-