Using special print features
Special print features include:
You can select the number of pages to print on a single sheet of paper. To print more than one page per sheet, the pages will be reduced in size and arranged in the order you specify. You can print up to 16 pages on one sheet.
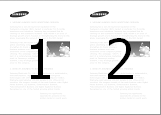
-
To change the print settings from your software application, access (see Opening printing preferences).
-
Click the tab, select in the drop-down list.
-
Select to print a border around each page on the sheet.
-
Select the number of pages you want to print per sheet (2, 4, 6, 9, or 16) in the drop-down list.
-
Select the page order from the drop-down list, if necessary.
-
Click the tab, select the , , and .
-
Click or until you exit the window.
This feature allows you to print a single-page document onto 4, 9, or 16 sheets of paper, for the purpose of pasting the sheets together to form one poster-size document.
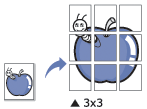
-
To change the print settings from your software application, access (see Opening printing preferences).
-
Click the tab, select in the drop-down list.
-
Select the page layout you want.
-
Select the value. Specify in millimeters or inches by selecting the radio button on the upper right of tab to make it easier to paste the sheets together.

-
Click the tab, select the , , and .
-
Click or until you exit the window.
-
You can complete the poster by pasting the sheets together.
This feature prints your document on both sides of a paper and arranges the pages so that the paper can be folded in half after printing to produce a booklet.

-
To change the print settings from your software application, access the (see Opening printing preferences).
-
Click the tab, select from the drop-down list.
-
Click the button. Then select the option you want.
-
Click the tab, select the , , and .
![[Note]](../../common/icon_note.png)
The option is not available for all paper sizes. In order to find out the available paper size for this feature, select the available paper size in the option on the tab.
If you select an unavailable paper size, this option can be automatically canceled. Select only available paper. (paper without
 or
or  mark).
 -
Click or until you exit the window.
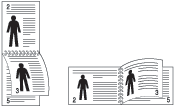
You can print on both sides of a paper; duplex. Before printing, decide how you want your document oriented.
|
|
|
|
Do not print on both sides of the special media, such as labels, envelopes, or thick paper to print on both sides of paper. It may cause a paper jam or damage the machine. |
-
To change the print settings from your software application, access (see Opening printing preferences).
-
Click the tab.
-
From the section, select the binding option you want.
-
: If you select this option, this feature is determined by the setting you’ve made on the control panel of the machine. This option is available only when you use the PCL printer driver.
-
: Disables this feature.
-
: This option is the conventional layout used in bookbinding.

-
: This option is the conventional layout used in calendars.
-
: Check this option to reverse the print order when duplex printing.
-
-
Click the tab, select the , , and .
-
Click or until you exit the window.
You can change the size of a document to appear larger or smaller on the printed page by typing in a percentage you want.

-
To change the print settings from your software application, access (see Opening printing preferences).
-
Click the tab.
-
Select actual paper size of the originals from the .
-
Enter the scaling rate in the input box.
You can also click the up/down arrows to select the scaling rate.
![[Note]](../../common/icon_note.png)
You cannot use this feature when you select a size of paper from the .
-
Select the and .
-
Click or until you exit the window.
This printer feature allows you to scale your print job to any selected paper size regardless of the document size. This option can be useful when you want to check fine details on a small document.
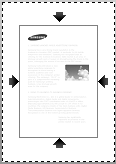
-
To change the print settings from your software application, access (see Opening printing preferences).
-
Click the tab.
-
Select actual paper size of the originals from the .
-
Select the size of paper to be printed in the tray from the .
-
Select the and .
-
Click or until you exit the window.
The watermark option allows you to print text over an existing document. For example, you use it when you want to have large gray letters reading “” or “” printed diagonally across the first page or all pages of a document.

There are several predefined watermarks that come with the machine. They can be modified, or you can add new ones to the list.
|
|
|
|
-
To change the print settings from your software application, access (see Opening printing preferences).
-
Click the tab, and select the desired watermark from the drop-down list.
-
Click or until you exit the print window.
-
To change the print settings from your software application, access (see Opening printing preferences).
-
From the tab, select from the drop-down list.
-
Enter a text message in the box. You can enter up to 256 characters.
When the box is checked, the watermark prints on the first page only.
-
Select watermark options.
You can select the font name, style, size, and shade from the section, as well as set the angle of the watermark from the section.
-
Click to add a new watermark to the list.
-
When you finish editing, click or until you exit the window.
To stop printing the watermark, select from the drop-down list.
-
To change the print settings from your software application, access (see Opening printing preferences).
-
Click the tab, select from the drop-down list.
-
Select the watermark you want to edit from the list and change the watermark message and options.
-
Click to save the changes.
-
Click or until you exit the window.
-
To change the print settings from your software application, access (see Opening printing preferences).
-
Click the tab, select from the drop-down list.
-
Select the watermark you want to delete from the list and click .
-
Click or until you exit the window.
This option is available only when you use the PCL printer driver.
What is an overlay?
An overlay is text and/or images stored on the computer hard drive (HDD) as a special file format that can be printed on any document. Overlays are often used to take the place of letterhead paper. Rather than using preprinted letterhead, you can create an overlay containing exactly the same information that is currently on your letterhead. To print a letter with your company’s letterhead, you do not need to load preprinted letterhead paper in the machine just print the letterhead overlay on your document.
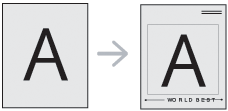
To use a page overlay, you must create a new page overlay containing your logo or image.
-
Create or open a document containing text or an image for use in a new page overlay. Position the items exactly as you wish them to appear when printed as an overlay.
-
To save the document as an overlay, access (see Opening printing preferences).
-
Click the tab, and select from the drop-down list.
-
In the window, type a name up to eight characters in the box. Select the destination path, if necessary (The default is C:\Formover).
-
Click .
-
Click or until you exit the window.
When a confirming message window appears, click .
-
The file is not printed. Instead, it is stored on your computer hard disk drive.
|
|
|
|
The overlay document size must be the same as the document you print with the overlay. Do not create an overlay with a watermark. |
After an overlay has been created, it is ready to be printed with your document. To print an overlay with a document:
-
Create or open the document you want to print.
-
To change the print settings from your software application, access (see Opening printing preferences).
-
Click the tab.
-
Select the from the drop-down list.
-
If the overlay file you want does not appear in the or drop-down list, select from the . Select the overlay file you want to use.
If you have stored the overlay file you want to use in an external source, you can also load the file when you access the window.
After you select the file, click . The file appears in the box and is available for printing. Select the overlay from the box.
-
If necessary, check box. If this box is checked, a message window appears each time you submit a document for printing, asking you to confirm your wish to print an overlay on your document.
If this box is not checked and an overlay has been selected, the overlay automatically prints with your document.
-
Click or until you exit the window.
The selected overlay prints on your document.
|
|
|
|
The resolution of the overlay document must be the same as that of the document you will print with the overlay. |
You can delete page overlays that you no longer use.
-
In the window, click the tab.
-
Select the from the drop-down list.
-
Select the overlay you want to delete from the box.
If the overlay file you want does not appear in the , select from the Overlay List. Select the overlay file you want to delete.
-
Click .
-
When a confirming message window appears, click .
-
Click or until you exit the window.