Changing the scan feature settings

This section explains how to adjust the document settings for each scan job, such as resolution, duplex, original size, original type, color mode, darkness, and more. The settings you change will be maintained for a certain time, but after that period, the options will be reset to default values.

[Note]

Some menus may not appear in the display depending on options or models.

To change the menu options:

  1. Press Scan menu from the display screen.
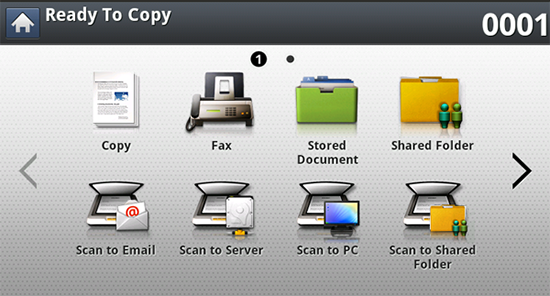
  2. Place the originals face up in the RADF or place a single original face down on the scanner glass and close the RADF (see Loading originals).

  3. If you want to customize the scan settings including reduce/enlarge, darkness, original type, and more from the display screen.

  4. Press the Basic, Advanced, Image, or Output tab from the display screen.

  5. Press the appropriate option.

Item

Description

Original Size

Sets the image size.

Original Orientation

  • Upright ImagesSelect this setting for an original document loaded with the top toward the back of the machine.

  • Sideways ImagesSelect this setting for an original document loaded into the RADF with the top of the original document toward the left side of the machine or an original document placed on the scanner glass with the top of the original document toward the right side of the machine.

Original Type

The original type setting is used to improve the scan quality by selecting the document type for the current scanning job.

  • TextUse for originals containing mostly text.

  • Text/PhotoUse for originals with mixed text and photographs.

  • PhotoUse when originals are photographs.

Resolution

You can adjust document resolution.

Press the resolution and choose the values. The higher value you select, the clearer the result, but the scanning time may take longer.

Color Mode

You can select the color options of scan outputs.

  • ColorUses color to display an image: 24 bits per pixel, 8 bits for each RGB, is used for 1 pixel.

  • GrayUses the black gradation to display an image: 8 bits per pixel.

  • MonoDisplays an image in black and white. 1 bit per pixel.

Duplex

  • 1 SidedFor originals that are scanned on one side only.

  • 2 Sided, BookFor originals that are scanned on both sides.

  • 2 Sided, CalendarFor originals that are scanned on both sides, but the back is rotated 180 degrees.

[Note]

If an original is placed on the scanner glass, the machine shows the window asking to place another page. Load another original and press Yes. When you finish, select No for this option.

Darkness

Adjusts the brightness level to scan.

Filing Policy

This option is available When USB memory is inserted into the USB memory port on your machine.

You can choose the policy for generating file names before you proceed with the scan job through the USB memory device. If the USB memory device already has the same name entered, you can rename or overwrite it.

  • Change NameIf the USB memory device already has the same name when you enter a new file name, the file will be saved as a different file name that is automatically generated.

  • Cancel: Does not send the scanned file if a file with same name is already on the server.

  • OverwriteThe sent file overwrites the existing file.

File Format

  • JPEGScans originals in JPEG format.

  • PDFScans originals in PDF format. You can open the file with the Adobe Acrobat Reader.

    • Multi PageIf you want several originals to be scanned as one file, press Multi Page.

    • SearchableThe machine detects text in the scanned image and creates a searchable PDF for text searching. Press this button and select a language that is used in the scanned image. Press OK.

    • CompactYou can compress originals to create a small-sized file, press Compact. This compression method is different from the normal PDF format. Some data parts can be lost during compression.

    • Add Digital SignatureYou can insert a digital signature in the PDF with a certificate.

      [Note]

      Only an administrator can manage the digital certificate on Digital Signature in PDF from SyncThru™ Web Service.

    • PDF EncryptionSets the encrypts PDF files.

File Format

  • TIFFScans originals in TIFF (Tagged Image File Format). If you want several originals to be scanned as one file, press Multi Page.

  • XPSScans originals in XPS (XML Paper Specification). If you want several originals to be scanned as one file, press Multi Page.

  • Page SettingsDetermines whether to save the scanned originals into one or multiple files.

    • Multi PageSaves originals in one file.

    • Page SeparationSeparates the scanned originals into multiple files that include the specified number of pages. This feature is available only if the Multi Page option is enabled.

Adjust Background

Adjust the background to some extent by adjusting density or brightness. You can lighten, or delete the dark background of colored paper or newspaper to be scanned.

[Note]

When you use this option, Erase Backside Image in the Image tab are inactivated.

  • OffDisables this feature.

  • AutoAutomatically adjusts background brightness.

  • EnhanceDarkens the background. Use the left/right arrows to toggle the values.

  • EraseLightens the background. Use the left/right arrows to toggle the values.

Erase Backside Image

This feature prevents scanning the other side’s image shown through the original paper

  • OffTurns this option off.

  • EraseLightens the background. Use the left/right arrow’s to toggle the values.

Quality

You can use this option to produce a high-quality document. The higher quality you select, the larger file size you get.

  • BestProduces a high-quality image, but the file size will be larger.

  • NormalBoth the image quality and file size will be between Best and Draft.

  • DraftProduces a low-quality image, but the file size will be smaller.

Scan to Edge

Scans the document all the way to the edge of the paper.