Precautions
-
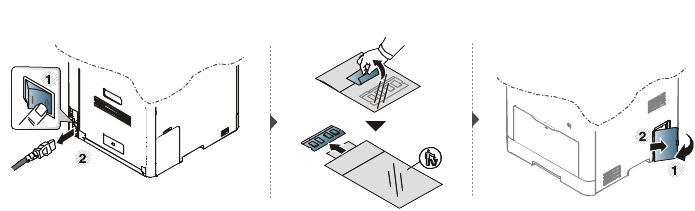
Disconnect the power cord
Never remove the control board cover while the power is turned on.
To avoid the possibility of an electrical shock, always disconnect the power cord when installing or removing ANY internal or external accessories.
-
Discharge static electricity
The control board and internal accessories (network interface card or memory module) are sensitive to static electricity. Before installing or removing any internal accessories, discharge static electricity from your body by touching something metal, such as the metal back plate on any device plugged into a grounded power source. If you walk around before finishing the installation, repeat this procedure to discharge any static electricity again.
|
|
|
|
When installing accessories, the battery inside the machine is a service component. Do not change it by yourself. There is a risk of an explosion if battery is replaced by an incorrect type. Dispose used batteries according to the instructions. |
When you install the optional devices such as optional tray, memory, etc, this machine automatically detects and sets the optional devices. If you cannot use the optional devices you installed in this driver, you can set the optional devices in .
-
Click the Windows menu.
-
For Windows 8, from , select > .
-
-
For Windows XP/2003, select .
-
For Windows 2008/Vista, select > > .
-
For Windows 7, select > > .
-
For Windows 8, search for .
-
For Windows Server 2008 R2, select > > .
-
-
Right-click your machine.
-
For Windows XP/2003/2008/Vista, press .
For Windows 7, For Windows 8, and Windows Server 2008 R2, from context menus, select the .
![[Note]](../../common/icon_note.png)
If item has ▶ mark, you can select other printer drivers connected with selected printer.
-
Select .
The window may differ depending on the driver or operating system you are using.
-
Select the appropriate option.
Some menus may not appear in the display depending on options or models. if so, it is not applicable to your machine.
-
: Select the optional tray you installed. You can select the tray.
-
: Select the optional memory you installed. If this feature is checked, you can select the .
-
: Select the printer language for the print job.
-
: You can select the and .
-
: Allows you to associate user and account identification information with each document you print.
-
: If you check this option, only users with user permission can start a print job.
-
: If you check this option, only groups with group permission can start a print job.
If you want to encrypt job accounting password, check .
-
-
Custom Paper Size Settings: You can specify custom paper size.
-
-
Click until you exit the or window.
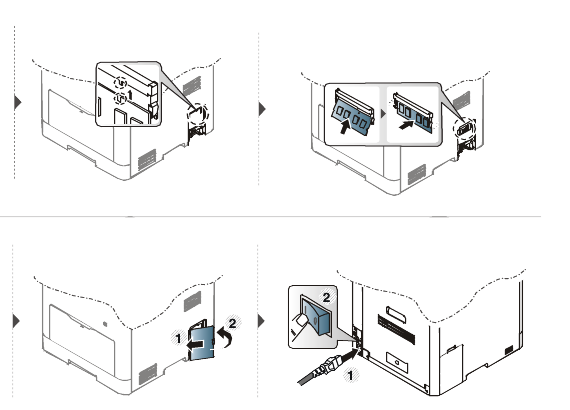
Your machine has a dual in-line memory module (DIMM). Use this memory module slot to install additional memory. We recommend the use of only genuine Samsung DIMM's. You may void your warranty if it is determined that your machine problem is being caused by third party DIMM's.
The order information is provided for optional accessories (see Available accessories).
|
|
|
|
After installing the optional memory, you can use the advanced printing features, such as proofing a job and specifying of printing a secure print job in the printer properties window. You can control the active job queue and file policy in menu (see Using optional device features). |